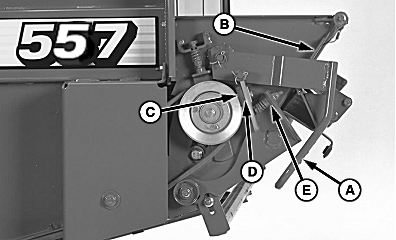
Checking and Adjusting Net Wrap Feed Roll Brake1. Open net wrap cover.2. Make sure brake lever (A) is engaged under tab (B). 3. Turn tractor key to ON position. Do not start tractor engine. 4. Turn monitor-controller ON. 5. Press WRAP key to cycle net actuator.
6. Turn monitor-controller OFF with actuator fully extended. Turn tractor key to OFF position. Remove key. Disconnect monitor-controller power plug from tractor convenience outlet. 7. Check that brake pad (C) contacts belt sheave. If not, perform the following: a. Check that spring length (E) is within specifications. Adjust by tightening or loosing bolt. Specification
b. If spring length is according to specifications, loosen nut on brake pad. Install shims (D), as needed, between brake pad (C) and bracket until brake pad contacts belt sheave. 8. Release brake handle (A), install one more shim, and tighten nut. Engage brake handle (A). 9. Connect monitor-controller power plug to tractor convenience outlet. Turn tractor key to ON position. |
|
OUO6059,0000069 -19-06SEP00-1/4 |
|
10.
Turn monitor-controller ON. Press and briefly hold TWINE/NET key to select NET mode.
11. Press WRAP key to cycle net wrap. 12. Set monitor-controller selector switch to OFF (centered) position. Turn tractor key to OFF position. Remove key. Disconnect monitor-controller power plug from tractor convenience outlet. |
OUO6059,0000069 -19-06SEP00-2/4 |
|
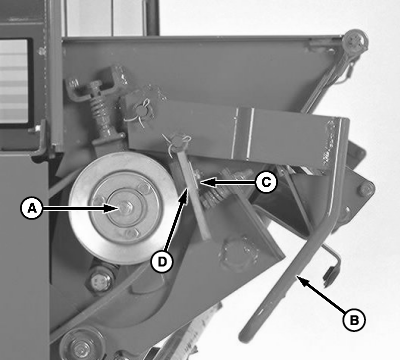
IMPORTANT: Do not tighten bolt (A) more than 68 N·m (50 lb-ft) or damage to bolt may occur. 13. Check roller torque by turning bolt (A) clockwise with torque wrench. Roller torque should be within specification for brake sheave to slip against rubber pad. Specification
14. To adjust feed roll brake: a. Release feed roll brake by pulling out and up on handle (B). NOTE: If worn, rubber brake pad can be reversed. b. Loosen nut. Install shims (C) one at a time, between brake pad (D) and bracket until torque is within specifications. Put extra shims behind bracket. IMPORTANT: After making this adjustment, turn monitor-controller ON. Press WRAP key to return net knife arms to home position. Turn monitor-controller off to cancel STOP alarm. If this procedure is not followed, net will be fed continuously during the next bale. c. Connect monitor-controller power plug to tractor convenience outlet. Turn tractor key to ON position. d. Turn monitor-controller ON. Press and briefly hold TWINE/NET key to select NET mode. e. Press WRAP key to cycle net wrap actuator. angle at home (downward) position. |
|
OUO6059,0000069 -19-06SEP00-3/4 |
|
f. Turn monitor-controller OFF. Turn tractor key to OFF position. Remove key. Disconnect monitor-controller power plug from tractor convenience outlet. g. Check feed roll brake torque with actuator rod retracted. If torque is not within specifications, repeat procedure. 15. Close net wrap cover. |
OUO6059,0000069 -19-06SEP00-4/4 |
 CAUTION:
To avoid personal injury from unexpected counteracting movement, disconnect net actuator wiring connector or power plug.

