Install Left-Hand Lower Drive Roll Bearing Only (Preferred Method)IMPORTANT: To prevent bearing failure, always loosen the three RIGHT SIDE flange mounting bolts before tightening left side (drive side) center bolt. Adjust and tighten right side mounting bolts per this instruction AFTER left side is tightened. 1. Thoroughly clean bearing bore, shaft, washers, and chamfered spacer, using denatured alcohol.2. Assemble bearing on shaft and check clearance between bearing race and shaft. If gap exceeds specification, replace bearing or shaft as needed. Specification
3. Remove bearing from baler. 4. Make 3 small center punch marks, in a triangle pattern, on both outside thirds of each flat where bearing will rest. (Used to aid in centering and provide a light interference fit between bearing and shaft when installing bearing.) 5. Install chamfered spacer (chamfer toward roll), and washers. |
OUO6085,0000643 -19-29SEP06-1/3 |
|
IMPORTANT: To prevent roll knock, apply Quick Metal compound to roll shaft where bearing rides. Thoroughly clean roll shaft and bearings using denatured alcohol and apply solventless activator. Make sure to knead (mix) Quick Metal material before applying to shaft. Failure to knead material will result in poor bonding and curing. NOTE: See John Deere dealer for Quick Metal and primer solventless activator. 6. Liberally apply PM38651 Quick Metal to area of shaft where bearing rides. 7. Apply PM37509 Klean N Prime to inside of bearing flats. 8. Assemble bearing on shaft and tighten mounting nuts. 9. Check roller clearance at hole through sidesheet. Loosen bearing support hardware and reposition roll as needed. |
OUO6085,0000643 -19-29SEP06-2/3 |
|
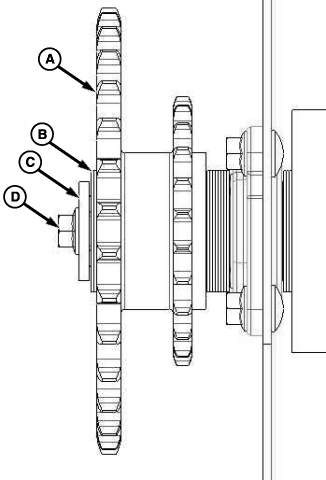
10.
Install sprocket (A) and thin washers (B).
11. Install center bolt (D), with thick washer (C), against end of shaft. Tighten bolt to specification. Specification
NOTE: If washers are not free to rotate, remove one thin washer. 12. Verify that thin washers (B) are free to rotate. 13. Tighten right-hand mounting bolts as described in Steps 7 and 8 of "Install Right-Hand Drive Roll Bearing" in Service section.
|
|
OUO6085,0000643 -19-29SEP06-3/3 |