Understanding the Twisting Cycle
Understanding the twisting cycle is critical for performing baler adjustments. Twisting cycle is as follows:
|
|
|
|
OUO6038,00000A6 -19-29SEP00-1/5
|
|
1.
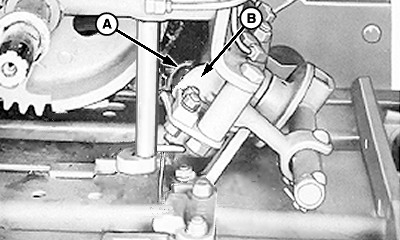
After needle has been threaded, the end of the wire (A) is anchored by wire gripper (B). As the bale is formed, needle wire is pulled from the wire box around the bale.
A-Wire
B-Gripper
|
|
|
|
OUO6038,00000A6 -19-29SEP00-2/5
|
|
2.
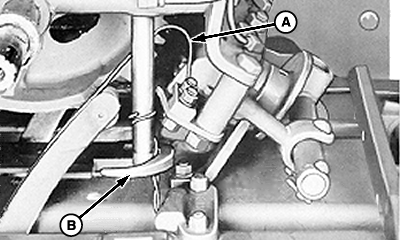
When the bale is long enough, the measuring wheel trips twisting mechanism. As needle (A) starts up, it catches wire (B) around the bottom of the bale and carries it up the front of the bale. The intermittent drive gear on the needle lift engages the pinion on bevel gear drive shaft. It turns the pinion on twister shaft (C). The needle continues to rise and places wire in shear plate notch on the opposite side of the anchored wire. Meanwhile, the twister hook (D) on the twister shaft is rotating in a clockwise direction. The twister hook completes one revolution and grasps both strands of wire.
|
A-Needle
B-Wire
C-Shaft
D-Hook
|
|
|
OUO6038,00000A6 -19-29SEP00-3/5
|
|
3.
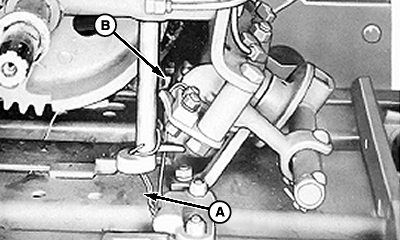
The wire gripper drive pinion is engaged by the intermittent drive gear. This pinion drives the gripper shaft, which actuates the arm of the gripper to release the anchored wire (A), also shearing and anchoring the needle wire as the gripper moves to the other side. The needle returns home and twister hook (B) makes five complete revolutions, twisting wire ends together.
A-Wire
B-Hook
|
|
|
|
OUO6038,00000A6 -19-29SEP00-4/5
|
|
4.
The completed bale pulls twisted knot (A) off the twister hook. The next bale pulls anchored wire (B) into position for the next twisting cycle.
A-Knot
B-Wire
|
|
|
|
OUO6038,00000A6 -19-29SEP00-5/5
|
|