Installing Orifice in Tractors With Low Hydraulic Flow
If an accident occurs, see a doctor immediately. Any fluid injected into the skin must be surgically removed within a few hours or gangrene may result. Doctors unfamiliar with this type of injury should reference a knowledgeable medical source. Such information is available from Deere & Company Medical Department in Moline, Illinois, U.S.A. Hydraulic hoses can fail due to physical damage, kinks, age and exposure. Check hoses regularly. Replace damaged hoses. To avoid injury from escaping fluid under pressure, stop engine and relieve the pressure in the system before disconnecting or connecting hydraulic or other lines. Tighten all connections before applying pressure. For tractors with hydraulic flow less than 25 L/min (6.5 gpm), the gate may close before the belt tension arm returns. This may result in belts being pinched between the lower gate roller and axle tube. To correct this situation, install orifice which is available through your John Deere dealer. 1. Raise shield.2. Clean fittings and valve area before disconnecting hydraulic hoses. |
|
 CAUTION:
Escaping fluid under pressure can penetrate the skin causing serious injury. Avoid the hazard by relieving pressure before disconnecting hydraulic or other lines. Tighten all connections before applying pressure. Search for leaks with a piece of cardboard. Protect hands and body from high pressure fluids.
CAUTION:
Escaping fluid under pressure can penetrate the skin causing serious injury. Avoid the hazard by relieving pressure before disconnecting hydraulic or other lines. Tighten all connections before applying pressure. Search for leaks with a piece of cardboard. Protect hands and body from high pressure fluids.
AG,OUO6017,1711 -19-09NOV99-1/5 |
|
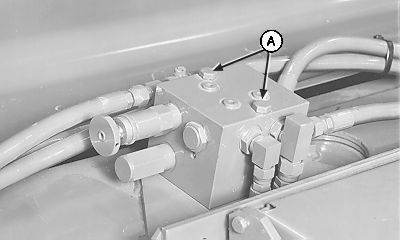
3.
Remove nuts from cap screws (A). Tensioning valve can then be lifted for access to lower hydraulic fitting.
|
|
AG,OUO6017,1711 -19-09NOV99-2/5 |
|
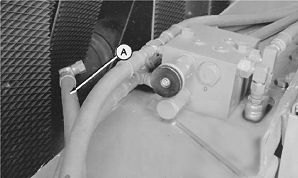
NOTE: Shield removed for illustration purposes. 4. Disconnect hydraulic hose (A).
|
|
AG,OUO6017,1711 -19-09NOV99-3/5 |
|
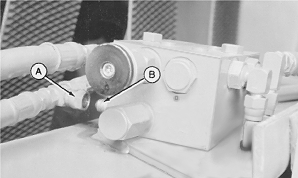
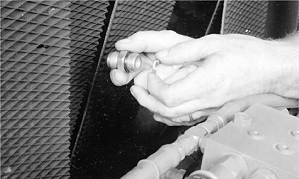
5.
Disconnect bottom hydraulic line (A) and remove fitting (B).
|
|
AG,OUO6017,1711 -19-09NOV99-4/5 |
|
IMPORTANT: Be sure orifice is installed flush with valve. It must not be tilted. 6. Install orifice in valve with smooth face towards fitting. Tighten fitting. 7. Connect and tighten hydraulic lines. 8. Install nuts on cap screws in bale density control valve. 9. Lower shield. |
|
AG,OUO6017,1711 -19-09NOV99-5/5 |