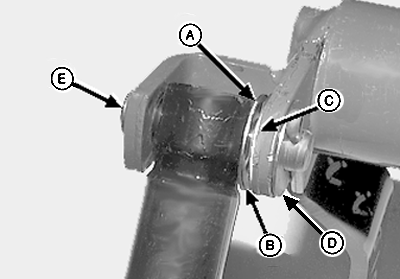
Installing Net Wrap Actuator1. Install rod end of actuator with new 17/32 x 1-1/8 x 1/32 in. washer (A), wave spring washer (B), and 17/32 x 1-1/8 x 1/32 in. washer (C) on inside of rod. 2. Install 17/32 x 1-1/8 x 1/32 in. washer (D) only if it can be easily installed between arm and cotter pin. Install new mounting pin (E) and cotter pin. 3. Wave spring washer (B) should be compressed slightly. If washers cannot be rotated by hand, remove washer (C) between wave spring washer and arm.
|
|
AG,OUO1078,12 -19-11OCT99-1/4 |
|
4. Install new 17/32 x 1-1/8 x 1/32 in. washer (A) against base end of actuator. 5. Install new 17/32 x 1-1/8 x 1/32 in. washer (B), wave spring washer (C), and additional 17/32 x 1-1//8 x 1/32 in. washers (D) (as needed) to slightly compress wave spring washer (B). 6. Install 17/32 x 1-1/8 x 1/32 in. washer (E) only if it can be installed easily between arm and cotter pin. Install new mounting pin (F) and cotter pin. 7. Washers must rotate by hand or actuator may bind. If washers cannot be rotated by hand, remove washer (D) between wave spring washer and arm. |
|

AG,OUO1078,12 -19-11OCT99-2/4 |
|
|
|
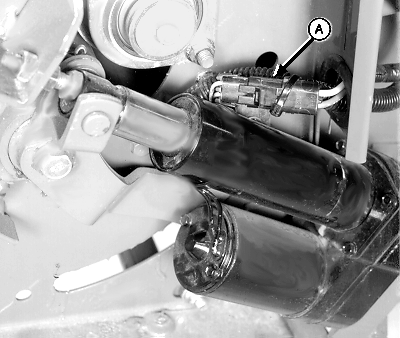
8. Check and clean wiring harness connector (A) with electrical contact cleaner. 9. Connect actuator connector to wiring harness connector (A). IMPORTANT: Tie band, conduit, and connectors must not interfere with switch or switch arm movement. |
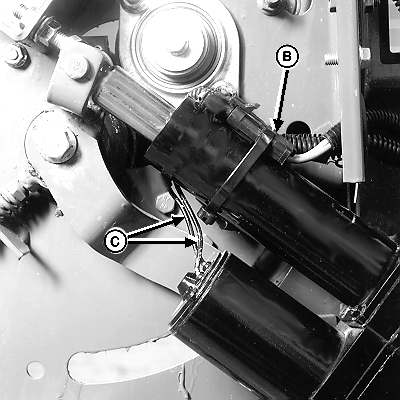
10. Install tie band (B) around actuator conduit and connectors. Do NOT put tie band around wires (C). 11. Install actuator shield and tighten hardware. |
AG,OUO1078,12 -19-11OCT99-3/4 |
|
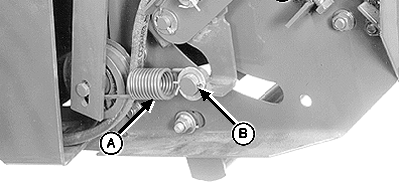
12. At left-hand side; Install spring (A), washer, and cotter pin (B). IMPORTANT: After installing actuator, turn controller ON. Press WRAP switch to return net knife arms to home position. If this procedure is not followed, net will be fed continuously during the next bale. 13. Connect net wrap controller power plug to tractor convenience outlet. Turn tractor key to ON position. Do not start tractor engine. 14. Cycle actuator several times using WRAP switch. Observe actuator to make sure it fully extends (rod contacts stop bolt) and fully retracts. If not, check for binding at mounting pins and washers, clean electrical connections, and check for low tractor voltage. 15. Momentarily press WRAP switch and return net knife to home (forward) position. 16. Turn tractor key to OFF position. Remove key. Disconnect controller power plug from tractor convenience outlet. 17. Check and adjust feed roll brake and knife arm stop. (See CHECKING AND ADJUSTING NET WRAP FEED ROLL BRAKE and ADJUSTING NET WRAP KNIFE ARM STOP in this section.) |
|
AG,OUO1078,12 -19-11OCT99-4/4 |