Adjusting Net Wrap Knife Arm StopNOTE: Knife arm stop adjustment determines the clearance between the knife and the rubber flap. Check feed roll brake after adjusting knife arm stop. 1. Turn tractor key to ON position. Do not start tractor engine. 2. Momentarily press WRAP switch to return knife arm to "home" position (actuator extended) .
3. Turn tractor key to OFF position. Remove key. Disconnect net wrap controller power plug from tractor convenience outlet. 4. Open net wrap cover. |
 CAUTION:
To avoid personal injury from unexpected knife movement, disconnect net actuator wiring connector or power plug.
CAUTION:
To avoid personal injury from unexpected knife movement, disconnect net actuator wiring connector or power plug.
AG,OUO1078,4 -19-11OCT99-1/4 |
|
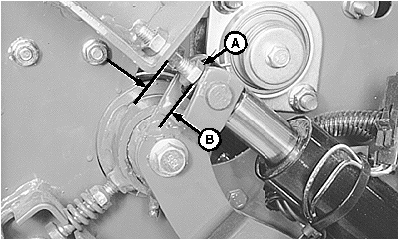
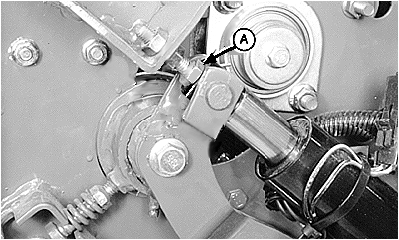
NOTE: Uneven gaps may appear between knife and flap due to natural waviness of the rubber flap. If stop bolt (A) has been removed or replaced, adjust bolt to approximately 25 mm (0.984 in.) (B) and check clearance between knife and flap. 5. Clearance between knife and rubber flap should be to within specifications when actuator rod contacts stop bolt (A). Do not deflect flap when checking clearance. Specification
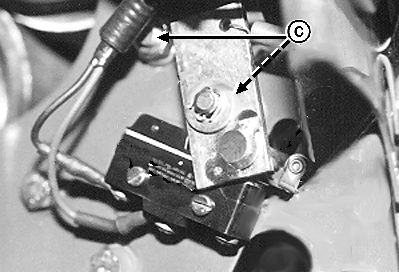
6. To align knife, loosen net guide bolts (C) and adjust flap to knife clearance. Tighten bolts (C).
|
|

AG,OUO1078,4 -19-11OCT99-2/4 |
|
The following symptoms may occur if the knife to belt clearance is too short:
The following symptoms may occur if the knife to belt clearance is too long:
|
|
AG,OUO1078,4 -19-11OCT99-3/4 |
|
IMPORTANT: Lengthening stop bolt against actuator may damage actuator. Move actuator to mid stroke before adjusting stop bolt. 7. To change clearance between knife and rubber flap: a. Connect net wrap controller power plug to tractor convenience outlet. Turn tractor key to ON position. b. Move manual override switch to RETRACT position to move actuator to mid stroke. c. Turn tractor key to OFF position. Remove key. Disconnect controller power plug from tractor convenience outlet. d. Loosen jam nuts at stop bolt (A) and adjust accordingly:
e. Connect net wrap controller power plug to tractor convenience outlet. Turn tractor key to ON position. f. Momentarily press WRAP switch to cycle net wrap. g. Turn tractor key to OFF position. Remove key. Disconnect controller power plug from tractor convenience outlet. h. Check clearance between knife and rubber flap. Actuator rod must contact stop bolt (A). 8. Check net wrap switch adjustment. (See ADJUSTING NET WRAP SWITCH in this section.) 9. Close net wrap cover. |
|
AG,OUO1078,4 -19-11OCT99-4/4 |