E-SCV (optional)
Hydraulic Components
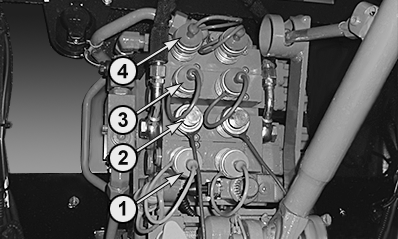
AGCPTJD0565-UN-18AUG14
1 - E-SCV No. 1
2 - E-SCV No. 2
3 - E-SCV No. 3
4 - E-SCV No. 4
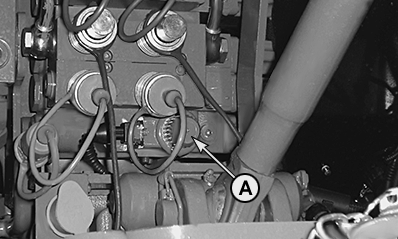
AGCPTJD0566-UN-18AUG14
A - E-SCV End Cover Valve
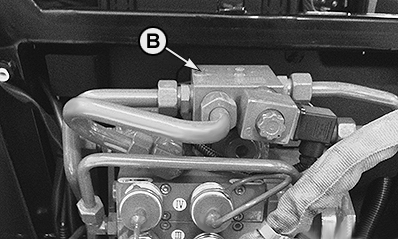
AGCPTJD0686-UN-01OCT14
B - E-SCV Safety Valve
Electric Components
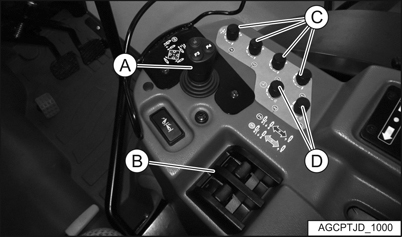
AGCPTJD1000-UN-09DEC14
A - Multi-Function Lever
B - E-SCV Levers
C - E-SCV Flow Regulators
D - Kick-Out Timing Regulators
AGCPTJD0675-UN-01OCT14
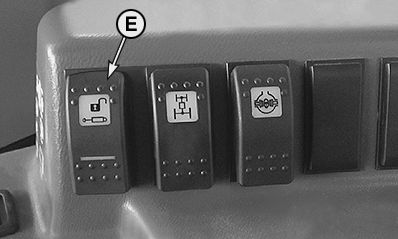
E - Transport Lock Switch
AGCPTJD0676-UN-01OCT14
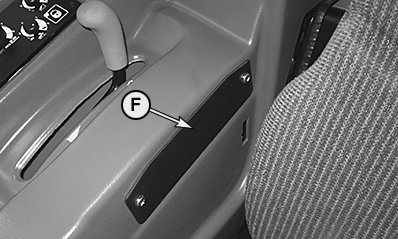
F - Fuse Box
AGCPTJD0677-UN-01OCT14
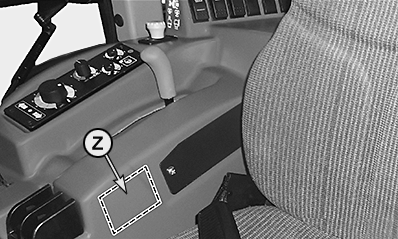
Z - E-SCV Control Unit (TCV)
The control unit (TVC) for E-SCVs is located under the RH right side console.Activating the System
-
Start the engine.
AGCPTJD0675-UN-01OCT14 -
Switch on Safety Stop Switch (E) to wake up the system waiting for activation.
NOTE: The backlight of the switch blinks biefly, then it switches off. Multi-function lever and SCV levers are not yet activated.
Transport Lock Switch provides the information to the E-SCV Electronic Control Unit located under the right lever cover for activating the system. At the same time an electrical signal is provided to the electrohydraulic valve located on the Main Valve (base flange) for giving a small amount of oil flow (low pressure) inside the E-SCVs.
NOTE: Transport Lock Switch (E) has a “warning” backlight which advises the operator that a failure occurred.
-
To activate the system (giving pressure to E-SCVs), press and keep pressed for about 3-5 sec the Activation Switch (G) located on the top of the multi-function lever. When the system is activated, the Activation Switch backlight lights “ON”. The system is now pressurized and ready to be used.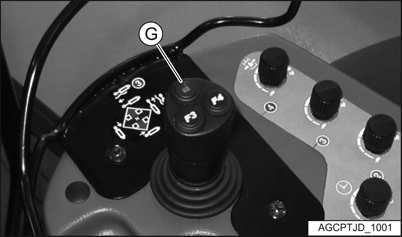
AGCPTJD1001-UN-09DEC14
NOTE: After a time-out of 30 seconds of NO ACTION on multi-function lever or SCV levers, the system goes in to stand-by mode (pressure on valves goes off). To resume the system (pressurize again) all that is required is to give an input with the multi-function lever or SCV levers. Pressing button (G) on top of the multi-function lever sends the system back in to its initial waiting mode. The green backlight goes off, and multi-function lever and SCV levers are locked out. If detent position is engaged (multi-function lever or SCV levers locked in this position), or if float position is engaged, time-out is inhibited because pressure is also required in the absence of inputs.
E-SCV Levers
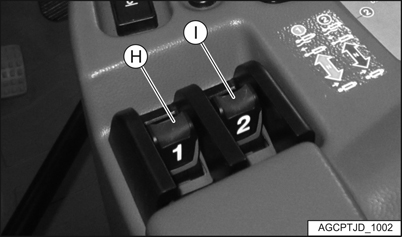
AGCPTJD1002-UN-09DEC14
H - Lever for E-SCV No. 1
I - Lever for E-SCV No. 2.
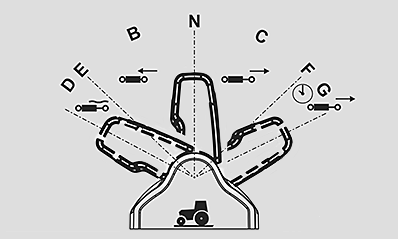
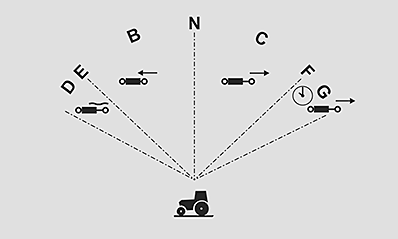
Pressure positionEach linear control has the same operating logic:
– Position (N) = Neutral.
– Positions (B-C) = Supply proportional to the control movement.
AGCPTJD0574-UN-19AUG14
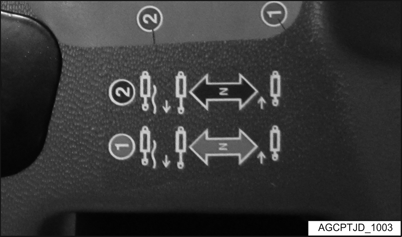
AGCPTJD1003-UN-09DEC14
Each linear control has a floating function.
– In float position (D), the pressure connectors are connected to the tank, which enables the hitched implement to follow the contours of the terrain.
– Push the linear control beyond the point of resistance (E) on one of its axes.
NOTE: The linear control will lock in this position.
Hydraulic timer
– To activate the auxiliary electrohydraulic control valve hydraulic timer, push the linear control for the relevant auxiliary electrohydraulic control valve (G) beyond the point of resistance (F).
Multi Function Lever
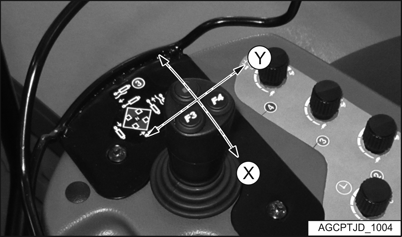
AGCPTJD1004-UN-09DEC14
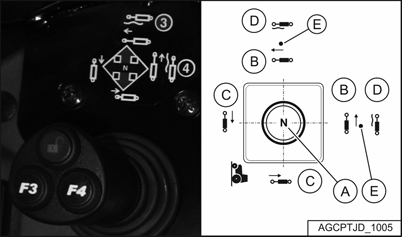
AGCPTJD1005-UN-09DEC14
X - E-SCV No.3
Y - E-SCV No.4
The multi function lever controls E-SCVs no. 3 and 4.The joystick enables 2 auxiliary hydraulic control valves to be activated simultaneously (or independently):
- Moving the lever along longitudinal axis (X) controls auxiliary hydraulic control valve no. 3 (Green).
- Moving the lever along longitudinal axis (Y) controls auxiliary hydraulic control valve no. 4 (Purple).
Each axis has the same operating logic:
- Position (A) = Neutral.
- Positions (B-C) = Supply proportional to the control movement.
Floating position:
The multi function lever has a floating function on its 2 axes.
- In the floating position (D), the pressure connectors are connected to the tank.
- This position can be locked.
- Push the multi function lever beyond the point of resistance (E) on one of its axes.
- The multi function lever will lock in this position.
- The multi function lever can be in the floating position on both axes simultaneously.
Flow Regulators:
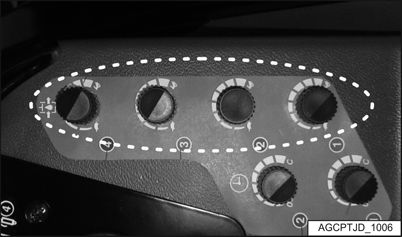
AGCPTJD1006-UN-09DEC14
Each auxiliary electrohydraulic control valve is fitted with a hydraulic flow controller:
Turn the setting knob in one direction or the other to adjust the flow rate of the auxiliary hydraulic control valve oil:
- Clockwise : Increase hydraulic flow.
- Anticlockwise : Decrease hydraulic flow.
Kick-Out Timing Regulators (For E-SCV Levers Only)
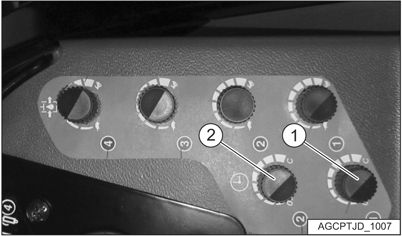
AGCPTJD1007-UN-09DEC14
AGCPTJD0581-UN-19AUG14
- Adjustment knob (1): Auxiliary electrohydraulic control valve no. 1.
- Adjustment knob (2): Electrohydraulic control valve no. 2.
Push the linear control beyond the point of resistance (F) on one of its axes. The linear control will lock in position (G)
The new setting for the timer is active.
Set Up
- Turn the setting knob (1) or (2) in one direction or the other to set the hydraulic timer:
- Clockwise : Increases the hydraulic timer period.
- Anticlockwise : Decreases the hydraulic timer period.
Turn the setting knob (1) or (2) fully clockwise to lock the linear control in position (G) permanently:
Relays and Fuses
Relay box is located inside the right lever cover.
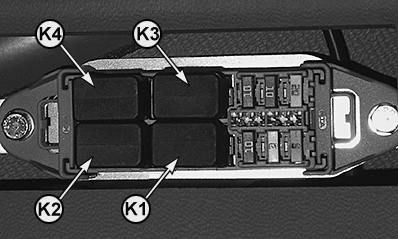
AGCPTJD0684-UN-01OCT14
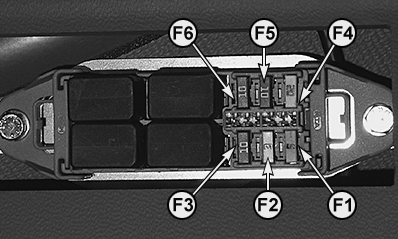
AGCPTJD0685-UN-01OCT14
K1 - (12V 20A) Relay for E-SCV Power Supply
K2 - (12V 20A) Relay for E-SCV End Cover Valve Power Supply
K3 - (12V 20A) Relay for E-SCV Valve 3 Power Supply
K4 - (12V 20A) Relay for E-SCV Valve 4 Power Supply
F1 - (5A) Fuse for E-SCV End Cover Relay Power Supply
F2 - (3A) Fuse for E-SCV Power Supply (+15)
F3 - (10A) Fuse for E-SCV Valve 1 and 2 Power Supply
F4 - (20A) Fuse for E-SCV Control Unit Power Supply
F5 - (10A) Fuse for E-SCV Valve 3 Power Supply
F6 - (10A) Fuse for E-SCV Valve 4 Power Supply
|
OULXBER,0002511-19-20141217 |