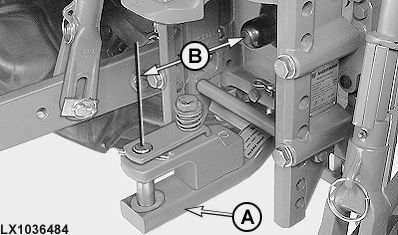
Connect an Implement to the Rear PTO
LX1036484-UN-23JAN06
 CAUTION: Shut off engine and disengage PTO before attaching
PTO-driven equipment.
CAUTION: Shut off engine and disengage PTO before attaching
PTO-driven equipment.
CAUTION: High-inertia implements do not come to a standstill
the moment the PTO is shifted to the disengaged position. Do NOT approach
the implement while it is coasting down. Do not work on the implement
until it has stopped.
CAUTION: Before attempting to clean, adjust or lubricate a PTO-driven
machine, the three-point hitch or the drive shaft, always make sure
the PTO is switched off, the tractor engine is shut off and the ignition
key is removed.
IMPORTANT: See relevant operating instructions in this section.
- Align drawbar (A) parallel to PTO shaft and lock it in position.
-
Distance (B) between the end of the PTO shaft and the hole in
the drawbar end varies depending on which type of PTO stub shaft is
used. The distance must be correct.
PTO stub shaft
Distance to drawbar
CAT II
CAT III
Type 1 / 6 Splines..............
350 mm (13.8 in.)
350 mm (13.8 in.)
Type 2 / 21 Splines..............
400 mm (15.7 in.)*
400 mm (15.7 in.)
Type 3 / 20 Splines..............
—
500 mm (19.7 in.)
* Not on tractors with AutoPowr™ or DirectDrive transmission
If PTO splines are not aligned with the grooves in the drive shaft, keep the engine shut off and select N window on the PTO page at the CommandCenter™. Then turn the PTO shaft manually to the correct position.
|
OULXA64,0002716-19-20130124 |