CommandCenter™ - Set Implement Width and Control Modes
RXA0098156-UN-07NOV08
Menu Button
![]()
RXA0106134-UN-15JUL10
Softkey for Performance Monitor Main Page → Advanced Settings
RXA0112580-UN-22DEC10
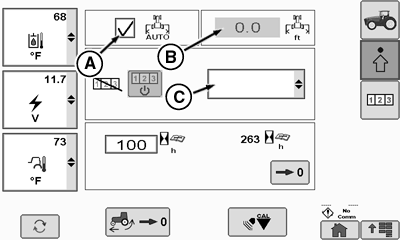
Performance Monitor Page
RXA0112582-UN-14FEB11
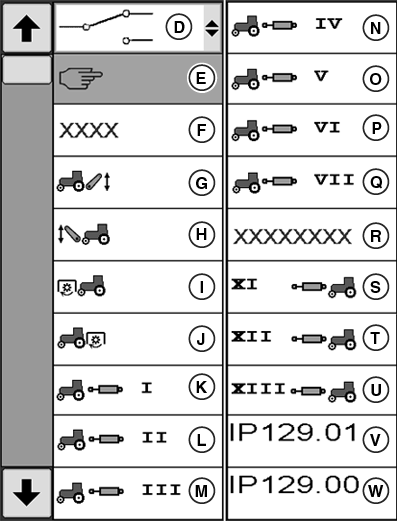
Area Counter Control Modes
A - Box for Automatic Implement Width
B - Box for Implement Working Width
C - Area Counter Control Mode Drop-Down Box
D - Switch Mode
E - Manual Mode
F - Automatic Mode
G - Hitch Control Unit Mode
H - Front Hitch Control Unit Mode
I - Front PTO Mode
J - Rear PTO Mode
K - SCV I Mode
L - SCV II Mode
M - SCV III Mode
N - SCV IV Mode
O - SCV XI Mode
P - SCV XII Mode
Q - SCV XIII Mode
R - GreenStar™
S - Front SCV XI
T - Front SCV XII
U - Front SCV XIII
V - Implement Status Indicator (IP129.01)
W - Implement Status Indicator (IP129.00)
-
Press the menu button.
-
Select Performance Monitor.
-
Select Performance Monitor Main Page softkey.
-
Select Implement Width box (A).
-
Width Input box (B) is highlighted. Enter implement width.
-
Select Confirm button.
NOTE: If Area Counter Control manual mode (E) is selected, the implement status indicator can be changed.
-
Area Counter Control Modes are changed by selecting mode in Area Counter Control Mode Drop-Down box.
|
OULXA64,0002748-19-20120625 |