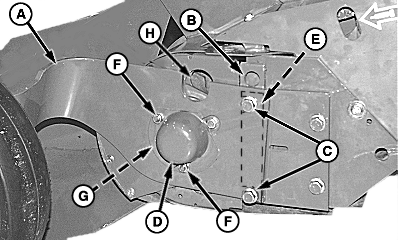
Install Gauge Wheel Arm Assembly (MegaWide™ Plus Pickup)IMPORTANT: If 1/2-2 threads are not shown beyond flange locknuts, studs (F) may have turned back inside while tightening locknuts. If stud has backed inside, remove gauge wheel arm, place double nuts on cam studs and turn counterclockwise to turn studs out. Remove nuts and continue installation. 1. Remove gauge wheel arm assemblies (A) from tongue.2. Remove two 3/8-in. locknuts (F), end cap (D). Disk (G) remains in place. 3. Remove and retain two cap screws (C). 4. Install gauge wheel arm with notch (H) as shown. Insert two straps (B) and shims (E) between gauge wheel arm and pickup frame and install using previously removed two M12 x 40 cap screws (C). 5. Install end cap (D) with two 3/8-in. nuts. Tighten to specification. Specification
6. Tighten cap screws (C). 7. Repeat on opposite side. |
|
PP98408,0000232 -19-22SEP09-1/1 |