Adjust Twine Arm Distance From Right Sidesheet —(459 and 459S) (Electric)
-
IMPORTANT: Do not operate twine arms with pickup in raised position or damage to pickup teeth can occur.
The twine cutter tension must be adjusted first before performing this procedure.
NOTE: For 559 and 559S balers, the right-hand twine guide controls twine distance from the right end of bale. Because of this, the following adjustment procedure does not apply to these balers.
Lower pickup.
-
Turn tractor key to ON position. Do not start tractor engine. .
-
Turn monitor-controller ON
-
Move twine arms all the way to right-hand side of baler using monitor-controller EXTEND key.
-
Turn monitor-controller OFF. Turn tractor key to OFF position. Remove key.
-
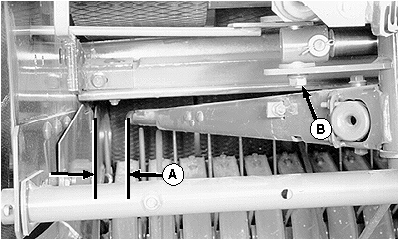
E39282-UN-19JUN96A - Twine Arm Distance
B - Nut
Measure sidesheet to twine arm distance (A). Distance must be within specifications with actuator fully extended and twine arm end play removed toward the rear.Item Measurement Specification Twine Arm-to-Right Sidesheet (Electric) Distance 83—133 mm (3-1/4—5-1/4 in.) -
To adjust, loosen nut (B) enough so twine arms can be moved by hand, but with some resistance.
-
Move twine arms toward sidesheet as far as possible, then move twine arms to the rear to obtain recommended distance (A).
-
Tighten nut (B) enough to hold actuator bolt in position on twine arm when twine arm is moved to home position.
-
Turn tractor key to ON position. Do not start tractor engine.
-
Turn monitor-controller ON.
-
Move twine arms to the home position (actuator fully retracted) using monitor-controller RETRACTED key.
-
Set monitor-controller selector switch to OFF (centered) position. Turn tractor key to OFF position. Remove key.
-
Tighten nut (B) to specifications with twine arms in home position.
Item Measurement Specification Actuator Nut Torque 95 N·m (70 lb.-ft.) -
Repeat Steps 3—6 to confirm correct distance from right-hand end of bale. Repeat Steps 7—13 as necessary.
-
Adjust twine cutter tension. (See ADJUST TWINE CUTTER TENSION in this section.)
|
PP98408,0000FB9-19-20130207 |