Adjust Main PTO Driveline Slip Clutch
-
IMPORTANT: Disassemble and clean dirt between pressure plate and disk spring to maintain drive protection. Dirt becomes trapped between pressure plate and disk spring and will not allow disk spring to flatten.
IMPORTANT: If distance between rear plate and tab on pressure plate is not within specifications, slip clutch will not slip, causing damage to drive components or can slip too easily.
Failure to follow the order of the following steps can damage the clutch.
NOTE: Clutch can be adjusted while on machine.
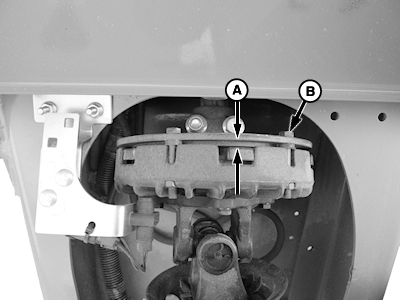
E69396-UN-11FEB13540 rpm Bracket Assembly Shown
A - Distance
B - Cap Screw
Raise gate fully using tractor hydraulics to slack belts. -
Turn off tractor engine and remove key.
-
Lock gate.
-
Disconnect PTO driveline from tractor.
-
Measure distance (A).
Item Measurement Specification Rear Plate-to-Tab on Pressure Plate Distance 4.7—7.1 mm (0.185—0.280 in.) -
NOTE: If distance (A) is less than specification, go to step 7.
If distance (A) exceeds specification, perform the following procedure:
-
Remove one cap screw (B) from clutch.
-
Remove one washer between rear plate and clutch housing.
-
Install washer between head of cap screw (B) and rear plate.
-
Tighten cap screw.
-
Repeat steps a—d for remaining five cap screws.
-
-
If distance (A) is less than specification, perform the following procedure:
-
Remove one cap screw (B) from clutch.
-
Remove one washer between head of cap screw (B) and rear plate.
-
Install washer between rear plate and clutch housing.
-
Tighten cap screw.
-
Repeat steps a—d for remaining five cap screws.
-
-
Measure distance (A). If distance is still not within specification, and there are no washers between rear plate and housing, replace clutch friction disks. (See your John Deere dealer.)
-
Unlock and lower gate.
|
PP98408,00010BA-19-20130212 |