Check and Adjust Net Wrap Feed Roll Brake
-
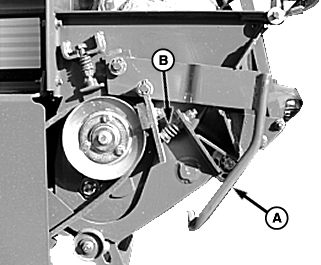
E55139-UN-08MAY07A - Brake Lever
B - Spring Length
Open net wrap cover. -
Release brake lever (A). Check that spring length (B) is within specifications. Adjust be tightening or loosing bolt.
Item Measurement Specification Spring Length 22 ± 0.5 mm (0.87 ± 0.20 in.) -
Check that rubber and steel rolls are clean.
-
Check that brake pad and v-belt sheave are clean and dry.
-
Check that rubber and steel rolls turn freely by hand with brake lever disengaged.
-
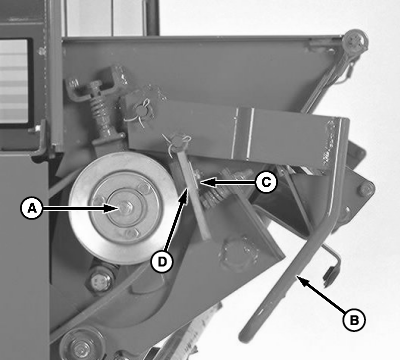
E48483-UN-24JUL00A - Cap Screw
B - Lever
C - Shims
D - Brake Pad
Engage brake lever (B). -
IMPORTANT: Always check ADJUSTING NET WRAP FEED ROLL PRESSURE before performing this adjustment.
Connect monitor-controller power plug to power source. Turn tractor key to ON position. Do not start tractor engine. Turn monitor-controller ON.
-
Press WRAP key and return counterknife angle to home (downward) position.
-
 CAUTION: To avoid personal injury from unexpected counterknife
angle movement, disconnect net wrap actuator wire connector or power
plug when performing adjustment or working in area.
CAUTION: To avoid personal injury from unexpected counterknife
angle movement, disconnect net wrap actuator wire connector or power
plug when performing adjustment or working in area.Disconnect monitor-controller power plug from power source.
-
IMPORTANT: To avoid damage to cap screw (A), do not apply oil, grease, or anti-seize compound to threads.
Check roller torque by turning bolt (A) clockwise with torque wrench.
Item Measurement Specification Rubber Pad Brake-to-Sheave Brake Roller Torque Torque 54—95 N·m (40—70 lb.-ft.) -
If torque is less than specification, net cut-off will not function correctly. Net can wrap around rubber feed roll, or net can feed over top of counterknife.
-
To adjust feed roll brake:
-
Release feed roll brake by pulling out and up on lever (B).
-
NOTE: If worn, rubber brake pad can be reversed.
Loosen nut. Install shims (C), one at a time, between brake pad (D) and bracket until torque is within specifications. Put extra shims behind bracket.
-
Engage brake lever (B). Repeat Steps 6—9 as required to obtain proper torque. If torque cannot be obtained, replace brake pad or see CHECK PIN WEAR IN SURFACE WRAP PANEL in this section.
-
-
IMPORTANT: After performing this adjustment, turn monitor-controller ON. Press WRAP key to return net knife arms to home position. Turn monitor-controller off to cancel STOP alarm. If this procedure is not followed, net will be fed continuously during the next bale.
Connect monitor-controller power plug to power source. Turn tractor key to ON position. Turn monitor-controller ON.
-
Press WRAP key to cycle net wrap actuator. Counterknife at home (downward) position.
-
Turn monitor-controller OFF. Turn tractor key to OFF position. Remove key.
|
PP98408,00010F5-19-20130211 |