Programming CDM
The monitoring system requires programming for each header, and the header must be attached to the windrower.
Programming the windrower may be accomplished with or without the engine running.
If the engine is running, the transmission must be in NEUTRAL. If the engine is not running, the ignition must be ON.
Exit Programming Mode at any time by pressing the PROGRAM switch (F) or by turning the ignition OFF.
The system only needs to be programmed once for each header. The Operator may make changes to a particular setting later, if necessary.
IMPORTANT: To calibrate the sensors the engine must be running.
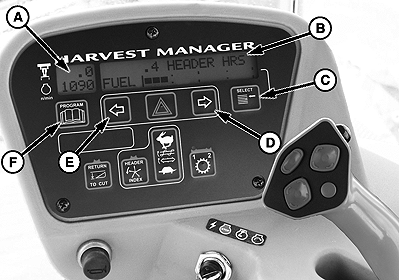
E60922-UN-02JUL12
A - Side Display
B - Main Display
C - Select Switch
D - Menu Item Scroll Forward
E - Menu Item Scroll Backward
F - Program Switch
|
KEY |
FUNCTION |
|
A - Side Display |
Displays software revision status. Upper line for CDM. Lower line for WCM. |
|
B - Main Display |
Displays menu item and selection. Upper line - Menu item. Lower line - Selection. |
|
C - Select Switch |
Places monitor into Program Mode while pressing PROGRAM switch at same time. Press to Accept Menu Item and Advance to next item |
|
D - Menu Item Scroll Forward |
Displays value under menu item. Push to scroll forward. Keep depressed for fast scroll when changing overload pressure, tire size. |
|
E - Menu Item Scroll Backward |
Displays value under menu item. Push to scroll backward. Keep depressed for fast scroll when changing overload pressure, tire size. |
|
F - Program Switch |
Places monitor into Program Mode while pressing SELECT switch at same time. Press to exit program mode. |
TO PROGRAM CDM:
-
Turn ignition key to RUN or Start engine.
-
Press and HOLD, PROGRAM (F) and SELECT (C) at same time on CDM to enter programming mode.
-
Press SELECT. WINDROWER SETUP? is displayed on upper line.
-
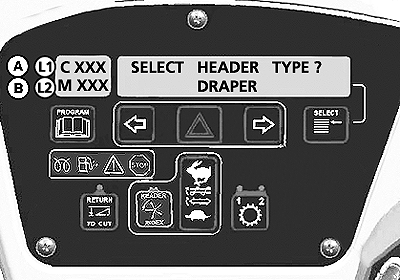
Press RIGHT ARROW (D) and SELECT HEADER TYPE? is displayed. DRAPER is flashing on lower line.
-
Press LEFT ARROW (E) or RIGHT ARROW (D) to change value on lower line.
-
Press SELECT. TILT CYL INSTALLED? is displayed.
-
Press LEFT ARROW (E) or RIGHT ARROW (D) to change value on lower line.
-
Press SELECT to advance to the next L1 item and press arrow keys to change values.
-
Press PROGRAM to exit Programming Mode when finished entering desired values.
Windrower Setup
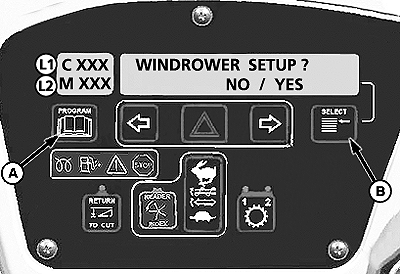
E60926-UN-06SEP12
L1 - Upper Line
L2 - Lower Line
A - Program Switch
B - Select Switch
Press and HOLD program switch (A) and select switch (B) at the same time to enter the programming mode.
WINDROWER SETUP? will display.
Press the left turn signal arrow switch to say NO and the menu will move to CAB DISPLAY SETUP. See Cab Display Setup later in this section.
Press the right turn signal switch to say YES and continue through WINDROWER SETUP.
E60927-UN-24OCT12
A - Line 1 - SELECT HEADER TYPE?
B - Line 2 - DRAPER (default factory setting)
This screen allows the operator to select the header type. The selected header will flash.
The factory default setting is DRAPER.
E60928-UN-12MAR12
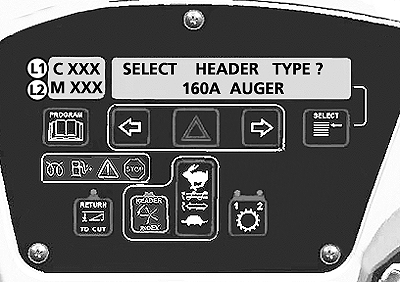
L1 - SELECT HEADER TYPE?
L2 - 160A AUGER
If the 160A auger is selected - the reel speed should be suppressed - as there is no reel speed sensor.
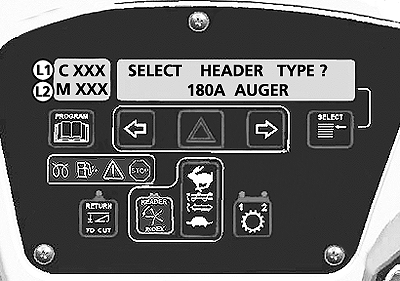
E60929-UN-12MAR12
L1 - SELECT HEADER TYPE?
L2 - 180A AUGER
If Draper or 180A auger is selected the reel speed should be enabled (with expansion module installed).

E60930-UN-12MAR12
L1 - TILT CYL INSTALLED?
L2 - NO/YES Choice
The TILT selection should be made available even if the expansion module is not installed.
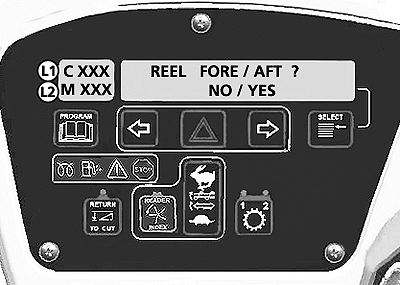
E60931-UN-12MAR12
L1 - REEL FORE/AFT?
L2 - NO/YES Choice
Reel Fore / Aft selection screen.
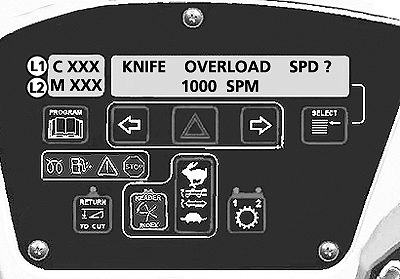
E60932-UN-12MAR12
L1 - KNIFE OVERLOAD SPD?
L2 - 1000 SPM (displays current SPM)
Knife overload speed should be suppressed unless the expansion module is installed.
|
RC48509,00006A3-19-20121030 |