Every 250 Hours or 10,000 Bales Service
Check Plunger Knife Clearance
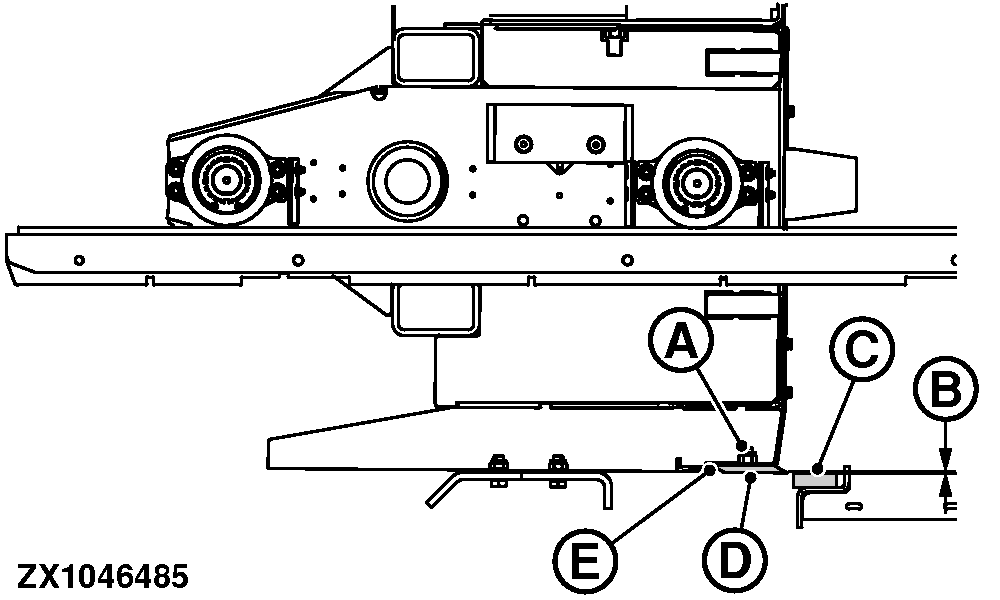
ZX1046485-UN-01FEB12
A - Nuts
B - Knife Spacing
C - Stationary Knife
D - Plungerhead Knife
E - Shims
Every 250 hours of operation, check the plunger knife clearance.
-
Check that spacing between stationary knife (C) and plungerhead knife (D) is within specification.
Stationary Knife-to-Plunger Distance 1—2 mm (0.039—0.079 in) -
To adjust plungerhead knife spacing using the following steps:
-
Block flywheel using brake.
-
Block plunger against stationary knife.
-
Loosen nuts (A).
-
Add or remove shims (E) as required.
-
Tighten nuts.
-
Check Plunger Adjustment
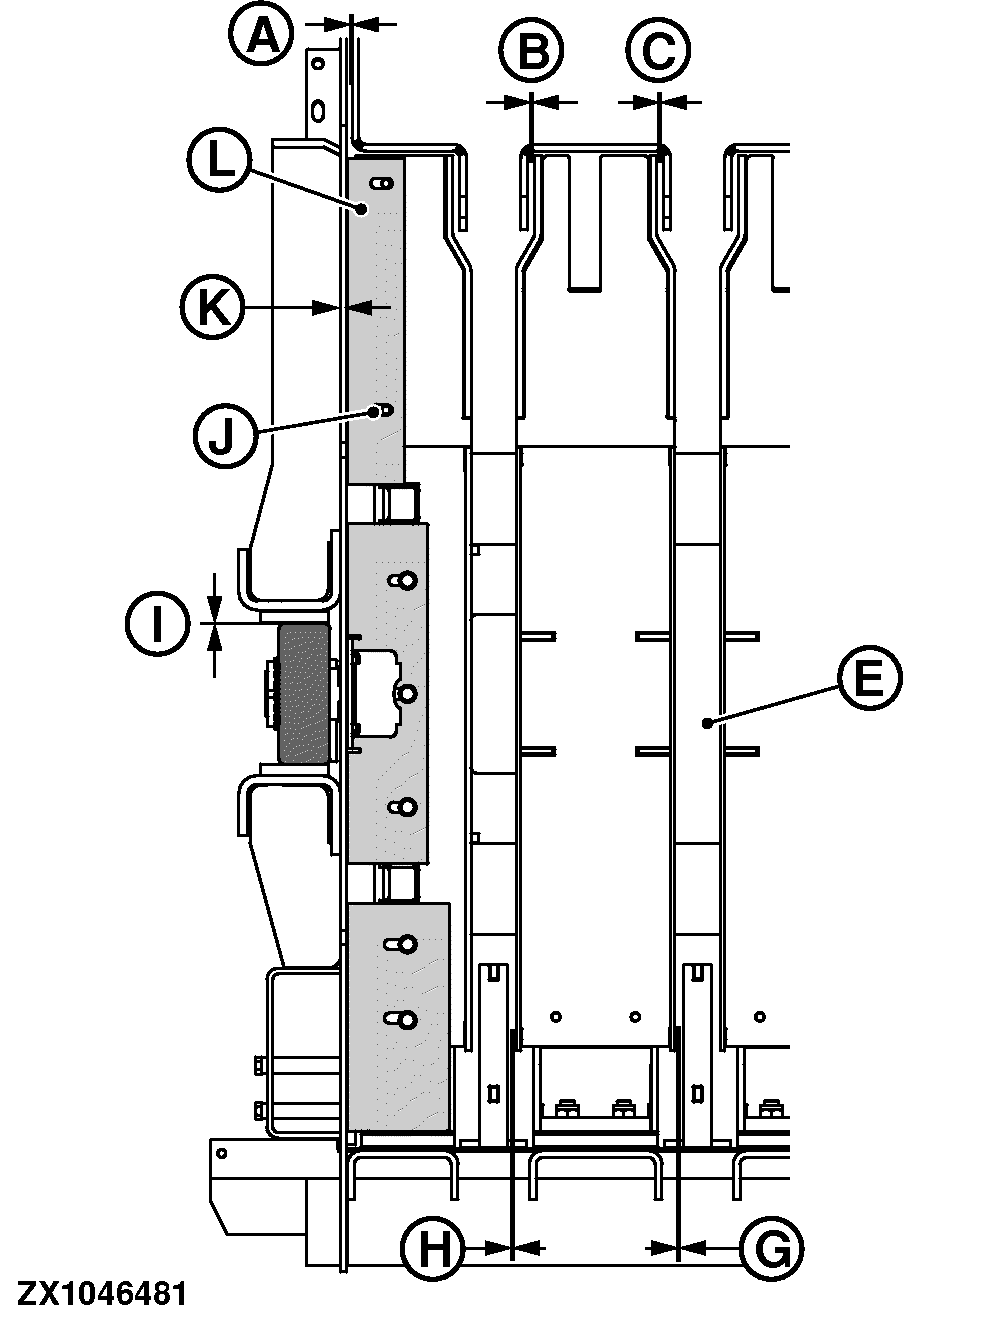
ZX1046481-UN-01FEB12
A - Guide Block Spacing
B - Top Retainer and Scraper Spacing 1
C - Top Retainer and Scraper Spacing 2
D - Retainer
E - Plungerhead
F - Scraper
G - Bottom Retainer and Scraper Spacing 1
H - Bottom Retainer and Scraper Spacing 2
I - Roller and Rail Spacing
J - Bolt
K - Scraper and Bale Chamber Spacing
L - Side Scrapers
Every 250 hours of operation, check the plunger adjustment.
Check and adjust plungerhead as follows:
-
Check spacing (I) between top of rollers and upper rail is within specification. Use shims to adjust for excess space.
Top of Rollers-to-Upper Rail Distance 0.2—0.5 mm (0.008—0.02 in) -
Check spacing (K) between scrapers and inside of bale chamber measured over full length of plunger stroke is within specification.
Scrapers-to-Inside Bale Chamber Distance 2 ± 1 mm (0.079 ± 0.039 in) -
Adjust Plunger Scrapers
Adjust spacing by completing following steps:
-
Loosen bolts of the side scrapers.
-
Slide side scrapers sideways until distance is within specification.
-
Tighten bolts of the side scrapers again.
-
Check that plungerhead is not rubbing against retainers and scrapers.
-
-
Check that top retainer and scraper spacing (B) is same as top retainer and scraper spacing (C).
-
Check that bottom retainer and scraper spacing (G) is same as bottom retainer and scraper spacing (H).
-
Check guide block spacing (A) between guiding blocks at plunger and inside of bale chamber are within specification on both left and right sides.
Guiding Blocks-to-Inside Bale Chamber Distance 1 ± 1 mm (0.039 ± 0.039 in) -
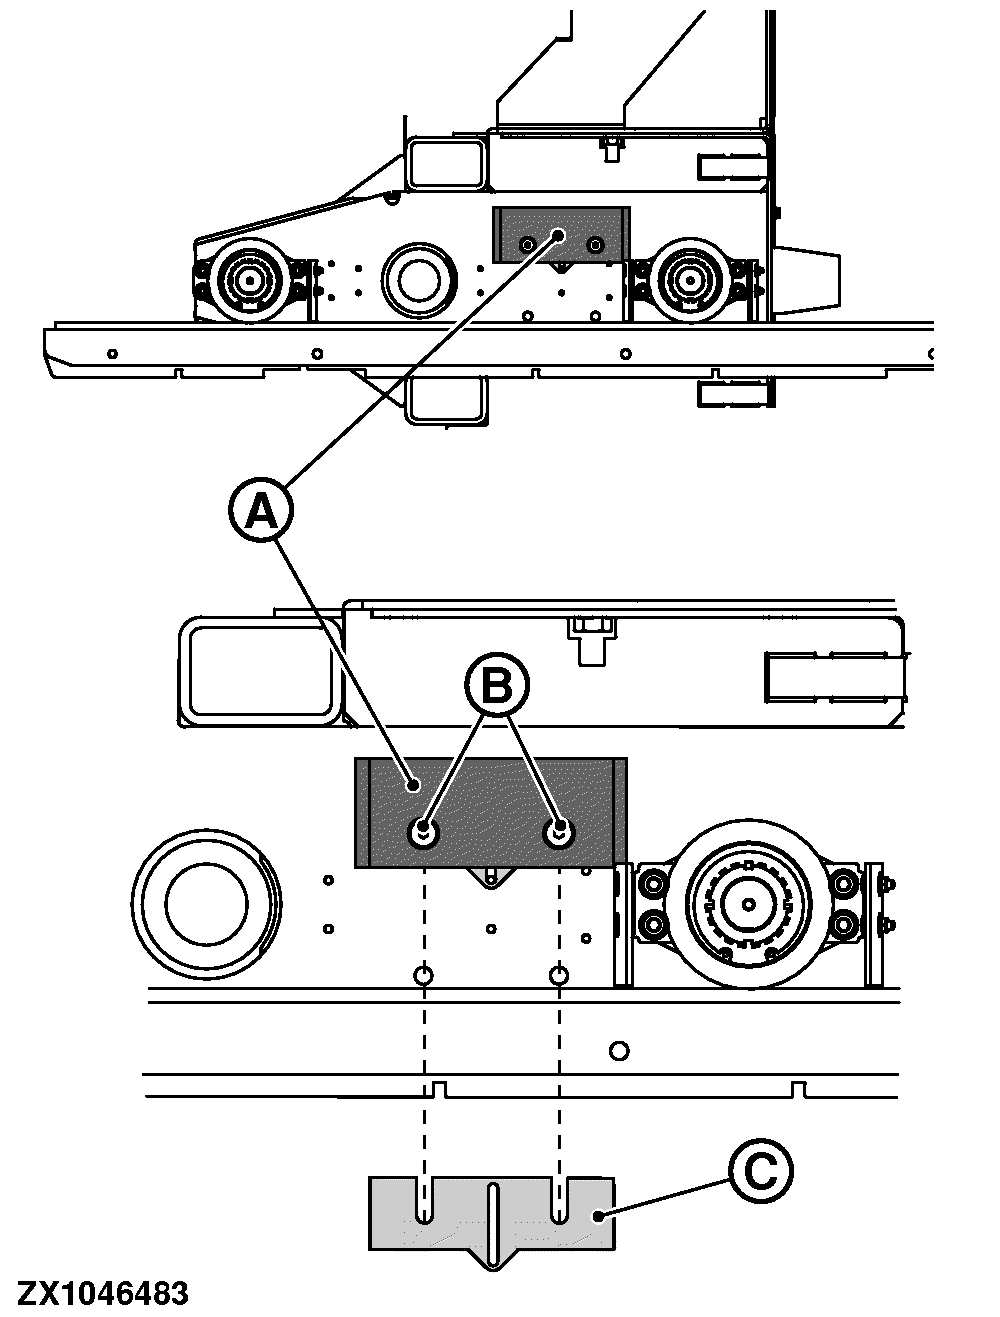
ZX1046483-UN-01FEB12Plungerhead Guide Block
A - Guide Block
B - Guide Block Bolts
C - Shim
Adjust Plunger Guide BlocksAdjust guide block spacing by completing following steps:
-
Turn flywheel until bolts (B) of guiding blocks (A) are visible through holes in the side wall.
-
Loosen both bolts inside the guiding block.
-
Add or remove shims (C) until the guide block spacing is within specification.
Shims (C) are available is different thicknesses.
-
Tighten bolts to specification.
Guide Block Bolt Torque 80 N·m (59 lb·ft)
-
-
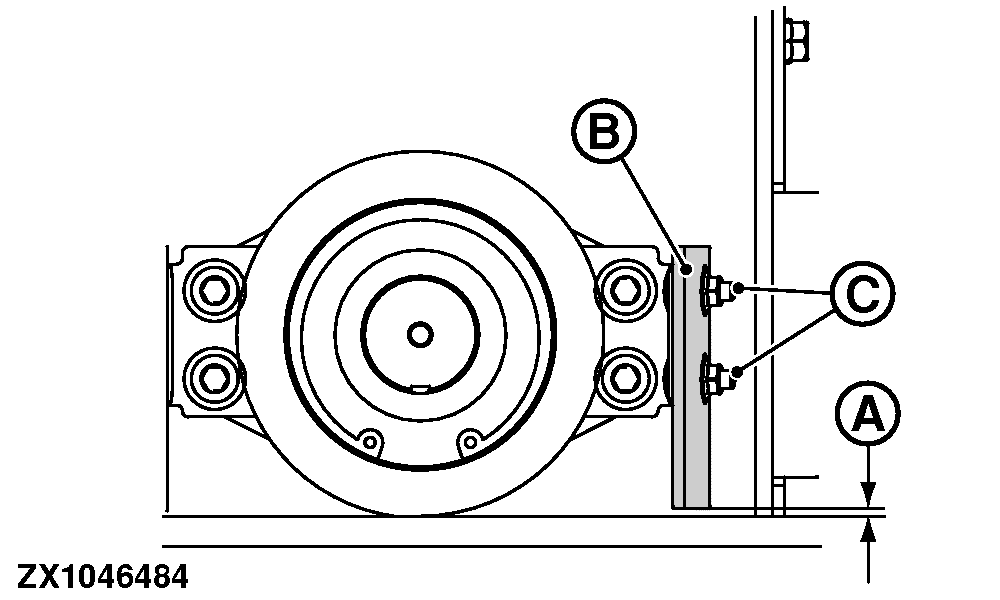
ZX1046484-UN-01FEB12A - Scraper and Rail Spacing
B - Scraper
C - Bolt
Check spacing (A) between roller scraper (B) and the bale chamber rail measured over full length of plunger stroke is within specification.Scraper-to-Bale Chamber Rail Distance 0.2 ± 0.1 mm (0.0079 ± 0.0039 in) -
Adjust spacing by completing following steps:
-
Loosen bolts (C) of roller scraper.
-
Slide scraper downward until distance is within specification.
-
Tighten bolts of scraper again.
-
-
ZX1046485-UN-01FEB12A - Nuts
B - Knife Spacing
C - Fixed Knife
D - Plungerhead Knife
E - Shims
Adjust Plunger KnivesCheck that spacing between fixed knife (C) and plungerhead knife (D) is within specification.
Fixed Knife-to-Plunger Head Distance 1—2 mm (0.039—0.079 in) -
To adjust plungerhead knife spacing complete following steps:
-
Block flywheel using brake.
-
Loosen nuts (A).
-
Add or remove shims (E) as required.
-
Tighten nuts.
-
-
ZX1046486-UN-01FEB12A - Shims
B - Bolts
C - Cross Member
D - Plungerhead and Cross Member Spacing
Adjust Plunger Crop DeflectorCheck that spacing (D) between plunger and cross-member (C) is within specification.
Plunger-to-Cross-Member Distance 2—3 mm (0.079—0.118 in) -
To adjust crop deflector spacing complete following steps:
-
Loosen bolts (B).
-
Add or remove shims (A) as required.
-
Tighten bolts.
-
Bleed 23-Knife Precutter Hydraulic System
Every 250 hours of operation, bleed 23-knife precutter hydraulic system.
-
 Escaping fluid under pressure can penetrate the skin
causing serious injury. Avoid the hazard by relieving pressure before
disconnecting hydraulic or other lines. Tighten all connections before
applying pressure. Search for leaks with a piece of cardboard. Protect
hands and body from high-pressure fluids. If an accident occurs, see
a doctor immediately. Any fluid injected into the skin must be surgically
removed within a few hours or gangrene can result. Doctors unfamiliar
with this type of injury can call the Deere & Company Medical
Department in Moline, Illinois, USA, or other knowledgeable medical
source.
Escaping fluid under pressure can penetrate the skin
causing serious injury. Avoid the hazard by relieving pressure before
disconnecting hydraulic or other lines. Tighten all connections before
applying pressure. Search for leaks with a piece of cardboard. Protect
hands and body from high-pressure fluids. If an accident occurs, see
a doctor immediately. Any fluid injected into the skin must be surgically
removed within a few hours or gangrene can result. Doctors unfamiliar
with this type of injury can call the Deere & Company Medical
Department in Moline, Illinois, USA, or other knowledgeable medical
source.Precutter accumulator system must be bled after repairs have been made and oil has been changed.
E75731-UN-12MAY14Hydraulic Valves Shown in OPEN Position
E75732-UN-12MAY14A - Caps (2 used)
Check oil level in reservoir is at the full mark. -
Open both valves on the hydraulic valve on the left-hand side of the pickup.
-
Engage PTO and decrease the density pressure to 0 kPa (0 bar) (0 psi) and lower knives using ISOBUS control monitor.
-
Run PTO for one minute after knives have fully dropped from pickup.
-
Remove shields as necessary.
-
Remove caps (A) and connect a bleed hose to one bleeding connection of one knife group.
Keep open end of the bleed hose in a suitable container.
-
Engage PTO and raise knives using ISOBUS display. Run baler at approximately 800 RPM.
Oil and air run out of the bleed hose.
When only oil is flowing from bleed hose, disengage PTO.
-
Switch bleed hose to other knife group and repeat Step 7.
-
Replace covers (A).
-
Fill hydraulic reservoir using recommended oil and install removed shields.
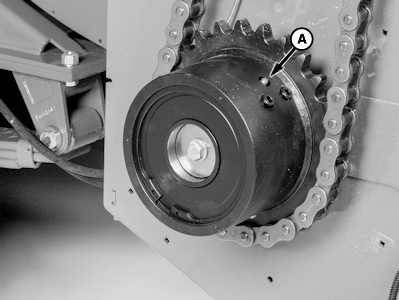
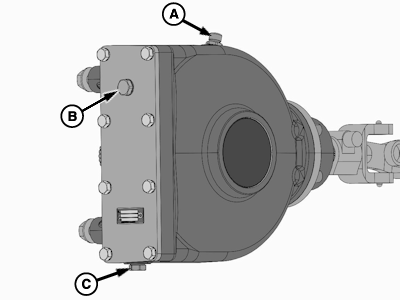
Lubricate Packer Clutch
E76548-UN-17JUL14
A - Lubrication Fitting
Every 250 hours of operation, lubricate packer clutch if it has been slipping.
Packer clutch has one lubrication fitting (A).
Lubricate with recommended grease.
Lubricate Rotor Cam Clutch (Machines Without Precutter)
E75971-UN-20MAY14
A - Lubrication Fitting
Every 250 hours of operation, lubricate rotor cam clutch if it has been slipping.
Rotor cam clutch has one lubrication fitting (A).
Lubricate with recommended grease.
Lubricate Rotor Cam Clutch (Machines with Precutter)
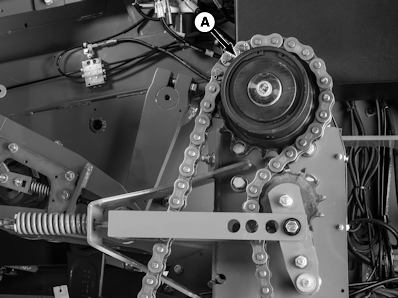
E75976-UN-21MAY14
A - Lubrication Fitting
Every 250 hours of operation, lubricate rotor cam clutch if it has been slipping.
Rotor cam clutch has one lubrication fitting (A).
Lubricate with recommended grease.
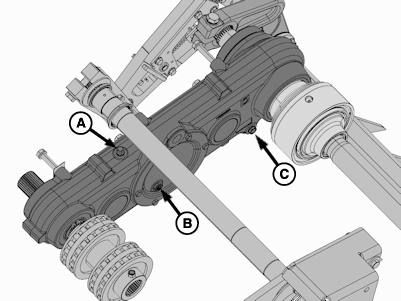
Replace Main Gear Case Oil
E75922-UN-19MAY14
A - Fill Plug
B - Sight Glass
C - Drain Plug
Every 250 hours of operation, replace main gear case oil.
Place machine on a firm, level surface with wheels blocked to prevent rolling.
Check and monitor oil level by viewing sight glass (B). Oil must be visible in glass.
-
Clean area around gear case to remove debris and dirt that contaminates the system. Area around the fill plug (A) must be clean.
-
Place a suitable container under the drain plug (C) and remove old oil.
Dispose of all waste oil in accordance with local and regional environmental regulations.
-
After oil is drained, clean drain plug and install.
If plugs in this procedure have an o ring - check condition. If it is hard and brittle, replace it.
-
Slowly fill replacement oil into fill plug (A) until it is visible in sight glass (B). Use oil specified in Lubricants and Capacities section.
-
Replace the fill plug (A).
L1524 and L1534 Capacity 42 L (11 gal) L1533 Capacity 26.3 L (7 gal)
Replace Upper Knotter Gear Case Oil
E75974-UN-20MAY14
A - Fill Plug
B - Drain Plug
Every 250 hours of operation, replace upper gear case oil.
Place machine on a firm, level surface with wheels blocked to prevent rolling.
Check and monitor oil level by opening fill plug (A). Oil must be at the level of the hole.
-
Clean area around gear case to remove debris and dirt that can contaminate gear case. Area around the fill plug (A) must be clean.
-
Remove the fill plug (A).
-
Place a suitable container under the drain plug (B) and drain oil.
Dispose of all waste in accordance with local and regional environmental regulations.
-
After oil is removed, clean drain plug (B) and install it.
-
Slowly fill replacement oil into fill plug (A) until oil just starts to come out of the check plug hole. Use oil specified in Lubricants and Capacities section.
-
Install check or fill plug.
L1524 and L1534 Capacity 2.1 L (0.6 gal) L1533 Capacity 0.8 kg (1.8 lb)
Replace Lower Knotter Gear Case Oil
E75920-UN-19MAY14
A - Fill Plug
B - Oil Level Plug
C - Drain Plug
Every 250 hours of operation, replace lower gear case oil.
Place machine on a firm, level surface with wheels blocked to prevent rolling.
Check and monitor oil level by opening oil level plug (B). Oil must flow out or be at the level of hole.
-
Clean area around gear case to remove debris and dirt that can contaminate the gear case. Area around the fill plug (A) must be clean.
-
Clean area around the oil level plug (B) and remove it.
-
Place a suitable container under the drain plug (C) and remove old oil.
Dispose of all waste oil in accordance with local and regional environmental regulations.
-
After oil is drained, clean drain plug and install it.
If plugs in this procedure have an o ring - check condition. If it is hard and brittle, replace it
-
Slowly fill replacement oil into fill plug (A) until it just begins to runout of the check plug hole (B). Use oil specified in Lubricants and Capacities section.
-
Replace oil level plug (B).
-
Replace the fill plug (A).
L1524 and L1534 Capacity 3.6 L (1 gal) L1533 Capacity 3.3 L (0.9 gal)
Replace Packer Gear Case Oil
E75921-UN-20MAY14
A - Fill Plug
B - Sight Glass
C - Drain Plug
Every 250 hours of operation, replace gear case oil.
Place machine on a firm, level surface with wheels blocked to prevent rolling.
Check and monitor oil level by viewing sight glass (B). Oil must be visible at glass.
-
Keep the area around plugs clean of debris and dirt that can contaminate the gear case. Area around the fill plug (A) must be clean.
-
Place a suitable container under the drain plug (C) and remove old oil.
Dispose of all waste oil in accordance with local and regional environmental regulations.
-
After oil is drained, clean drain plug (C) and install.
If plugs in this procedure have an o ring - check condition. If it is hard and brittle, replace it.
-
Slowly fill replacement oil into fill plug (A) until it is visible in sight glass (B). Use oil specified in Lubricants and Capacities section.
-
Replace the fill plug (A).
All Models, Packer Gear Case Oil Capacity 4.0 L (1.06 gal)
|
OUO6064,0001E22-19-20170612 |