Density Regulation
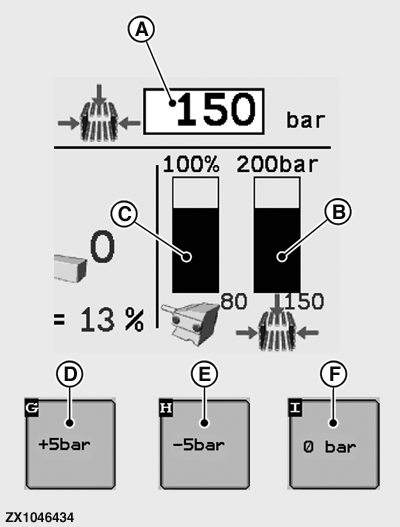
ZX1046434-UN-12JAN12
A - Bale Chamber Pressure Input Field
B - Actual Bale Chamber Pressure
C - Plungerhead Load
D - Increase Pressure Button
E - Decrease Pressure Button
F - Set Pressure to Zero Button
The maximum permissible density pressure is 180 bar (18 000 kPa)(2610 psi).Never exceed the maximum pressure value.
Refer to Operating Mode Page in Electronic Control System section.
Make sure that set bale chamber pressure input field (A) is displayed. If not, refer to the User Function Page in Electronic Control System section to activate the set bale chamber pressure input field (A).
The bale density is controlled through the bale chamber pressure (density) or through the plungerhead load (machine) regulation.
Pressure Regulation: When the PTO is running and the electronic system is in Operating Display mode, the pressure builds up to the preset density setting (A).
During baling, the pressure in the bale chamber cylinders (B) is constantly measured and adjusted to stay within 5 bar (500 kPa)(72.5 psi) of the preset value (A).
A plungerhead overload (C) causes hydraulic pressure in the bale chamber cylinders is automatically reduced. Once the load on the plungerhead is reduced, the pressure is automatically built up to the preset value (A).
The density pressure (A) must be adapted to the working conditions such as crop type, crop humidity, and twine resistance.
Crop Type-Recommended Pressures:
- Silage: 5 - 40 bar (500 - 4 000 kPa)(72.5 - 580 psi)
- Straw: 100 - 180 bar (10 000 - 18 000 kPa)(1 450 - 2610 psi)
- Hay: 60 - 150 bar (6 000 - 15 000 kPa)(870 - 2 175 psi)
Set Bale Chamber Pressure:
-
Baler is empty. Put the monitor under Operating Display Mode (see Electronic Control System section).
-
Press input field (A) to enter the desired bale chamber pressure value.
Setting range: 0 - 180 bar (0 - 18 000 kPa)(0 - 2610 psi).
-
The desired bale chamber pressure value (A) is set per + or - 5 bar (50 kPa)(72.5 psi) increments or quickly set to zero.
- Press the button (D) to increase the preset bale chamber pressure value (A).
- Press the button (E) to decrease the preset bale chamber pressure value (A).
-
Press zero pressure button (F) once to reset the preset bale
chamber pressure value (A) to 0 bar.
If during baling process it is necessary to relieve the press chamber guide cylinder hydraulic pressure, press the zero pressure button (F) twice or press and hold the button (E). The cylinder pressure drops to zero but the preset value (A) is kept. To recall the preset bale chamber pressure value (A) press zero pressure button (F) again. The pressure build-up begins when the tractor PTO is engaged.
-
Engage tractor PTO and run for a few minutes without baling until the required density pressure (A) is reached.
-
Start baling.
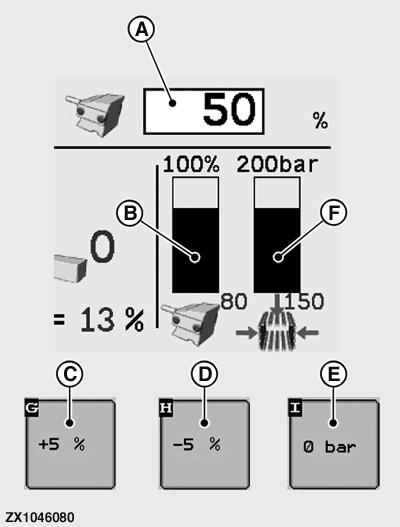
ZX1046080-UN-07JAN12
A - Machine Load Input Field
B - Actual Machine Load
C - Increase Load Button
D - Decrease Load Button
E - Set Pressure to Zero Button
F - Actual Bale Chamber Pressure
Machine Load Regulation:The pressure (F) is automatically controlled and depends on the measured machine load (B).
The machine load must be set between 30% and 100% of the maximum machine load.
Make sure that set machine load input field (A) is displayed. If not, refer to the User Function Page in this section to activate the set machine load input field (A).
At first activation of machine load regulation, default setting is 50 % (A) of the maximum machine load with a start pressure of 20 bar (2000 kPa)(290 psi) (B).
Changing the machine load setting (A) has no influence on the preset start pressure.
Machine Load Regulation: When there is no or a low machine load measured (B) and there is bale growth, the regulated bale chamber pressure (F) increases automatically. This is done to reach the right density in the bale as fast as possible (maximum regulated pressure is 180 bar (18 000 kPa)(2 610 psi)).
As soon as the machine load (B) exceeds the preset machine load (A), the pressure (F) decreases until the measured machine load (B) is within the limits of the preset machine load (A) ± 5%.
Depending on the measured machine load (due to windrow thickness variation, variation of crop, or change in weather conditions) the pressure (F) varies.
The machine load setting (A) must be adapted to the working conditions such as crop type, crop humidity, and twine resistance.
Crop Type-Recommended Machine Loads:
- Silage:30 - 60 %
- Straw: 60 - 100 %
- Hay: 50 - 80 %
Set Machine Load:
-
Baler is empty. Put the monitor under Operating Display Mode (see Electronic Control System section).
Make sure that set machine load input field (A) is displayed. If not, refer to the User Function Page in Electronic Control System section to activate the set machine load input field (A).
-
Press input field (A) to enter the desired machine load value.
Setting range: 0 - 100 %.
-
The desired machine load value (A) is set per + or - 5 % increments or quickly set to zero.
- Press the button (C) to increase the preset machine load value (A).
- Press the button (D) to decrease the preset machine load value (A).
-
Press zero pressure button (E) once to reset the preset bale
chamber pressure value to 0 bar. The bale machine load value (A) is
then reset to 0 %.
If during baling process it is necessary to relieve the press chamber guide cylinder hydraulic pressure, press the zero pressure button (E) twice or press and hold the button (D). The cylinder pressure drops to zero, and the machine load (B) reset to 0 %, but the preset value (A) is kept. To recall the preset machine load value (A) press zero pressure button (E) again. The pressure build-up begins when the tractor PTO is engaged.
-
Engage tractor PTO and run for a few minutes without baling until the default or previously input density pressure (F) is reached.
-
Start baling.
|
SF04007,00009F9-19-20151222 |