Adjust Knotter
Knotter Overview
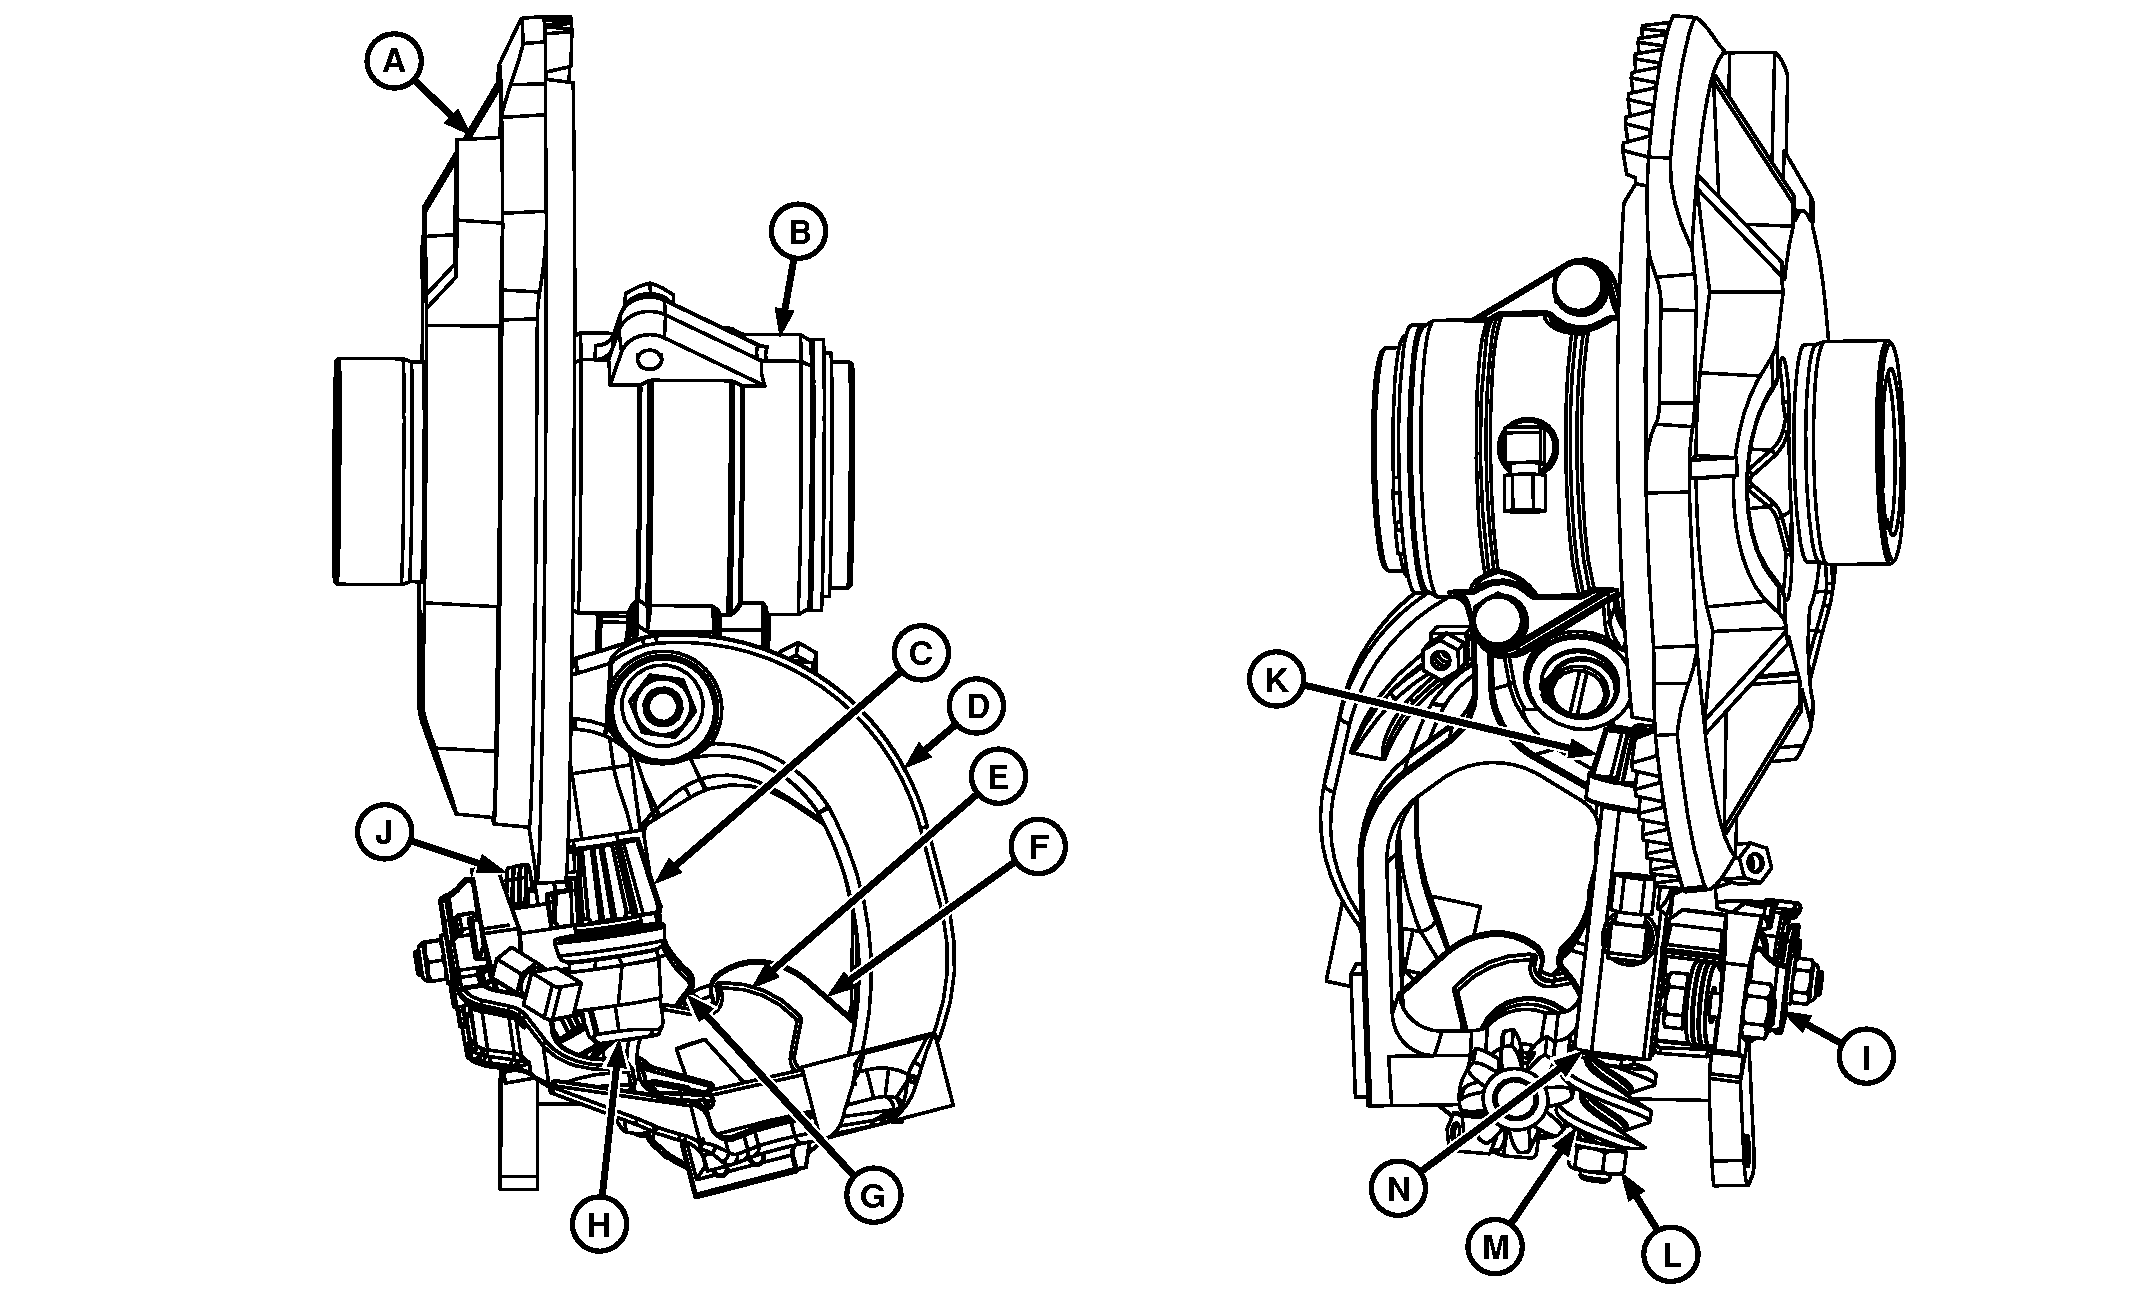
E77642-UN-26NOV14
A - Knotter Disc
B - Knotter Body
C - Billhook Gear
D - Stripper Arm
E - Twine Retainer
F - Stripper Plate
G - Clamping Segment
H - Billhook
I - Spring Billhook
J - Spring Twine Retainer
K - Twine Disc Gear
L - Nut
M - Worm Gear
N - Gear
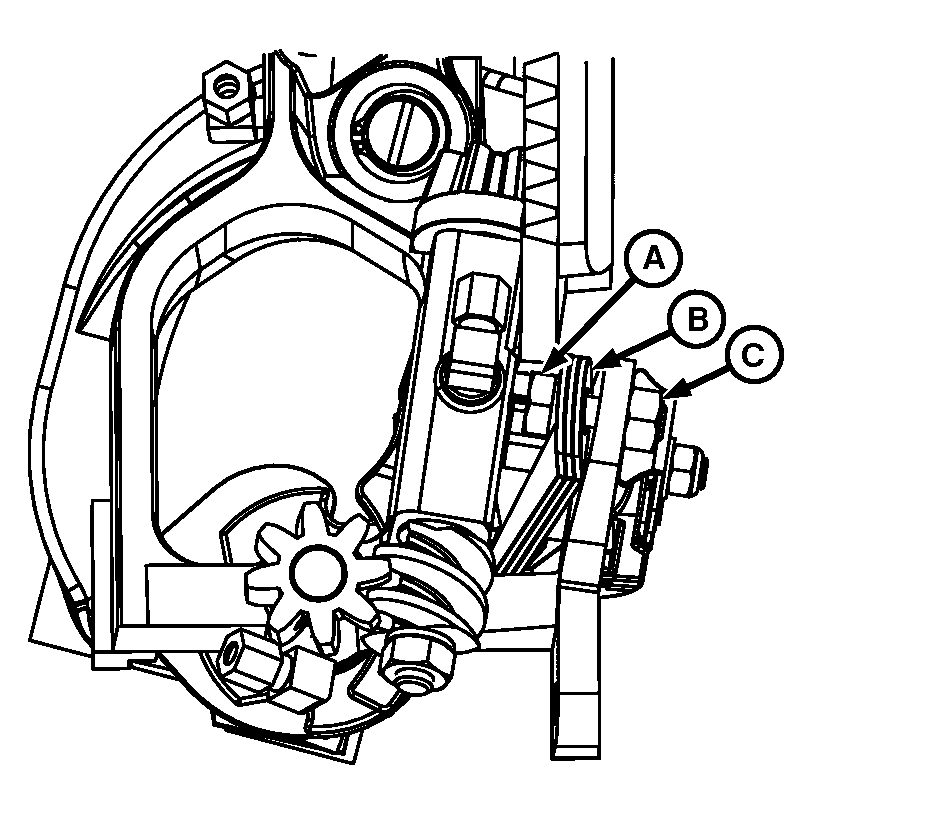
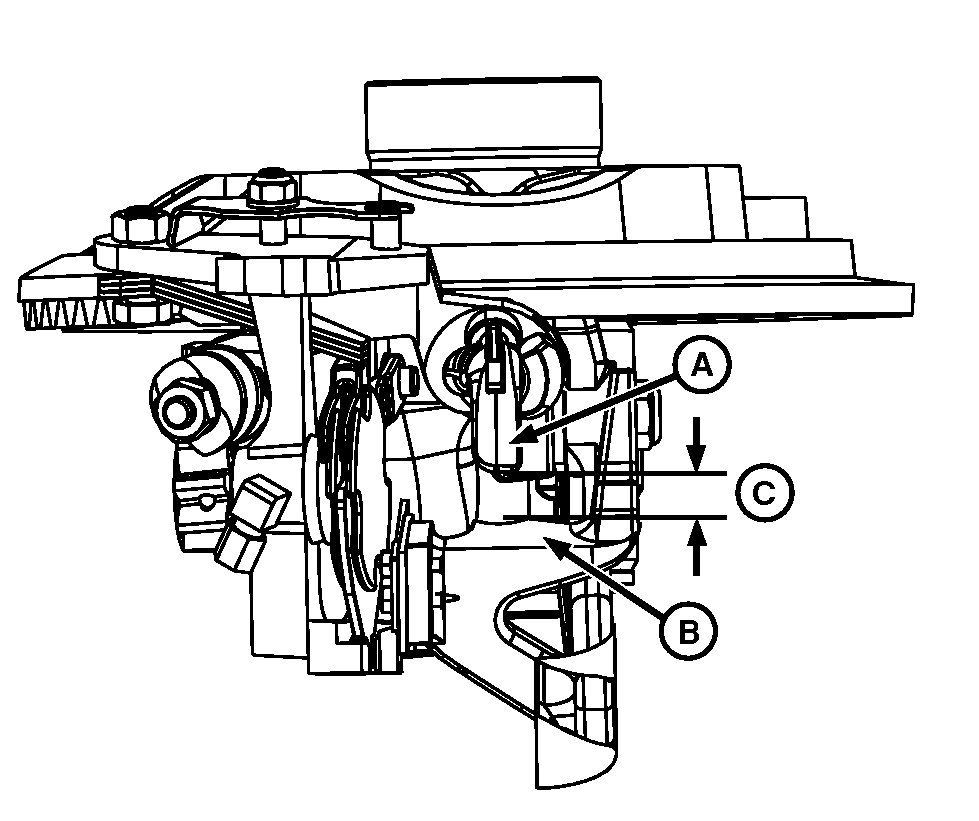
Adjust Intermittent Gear Clearance to Knotter Frame
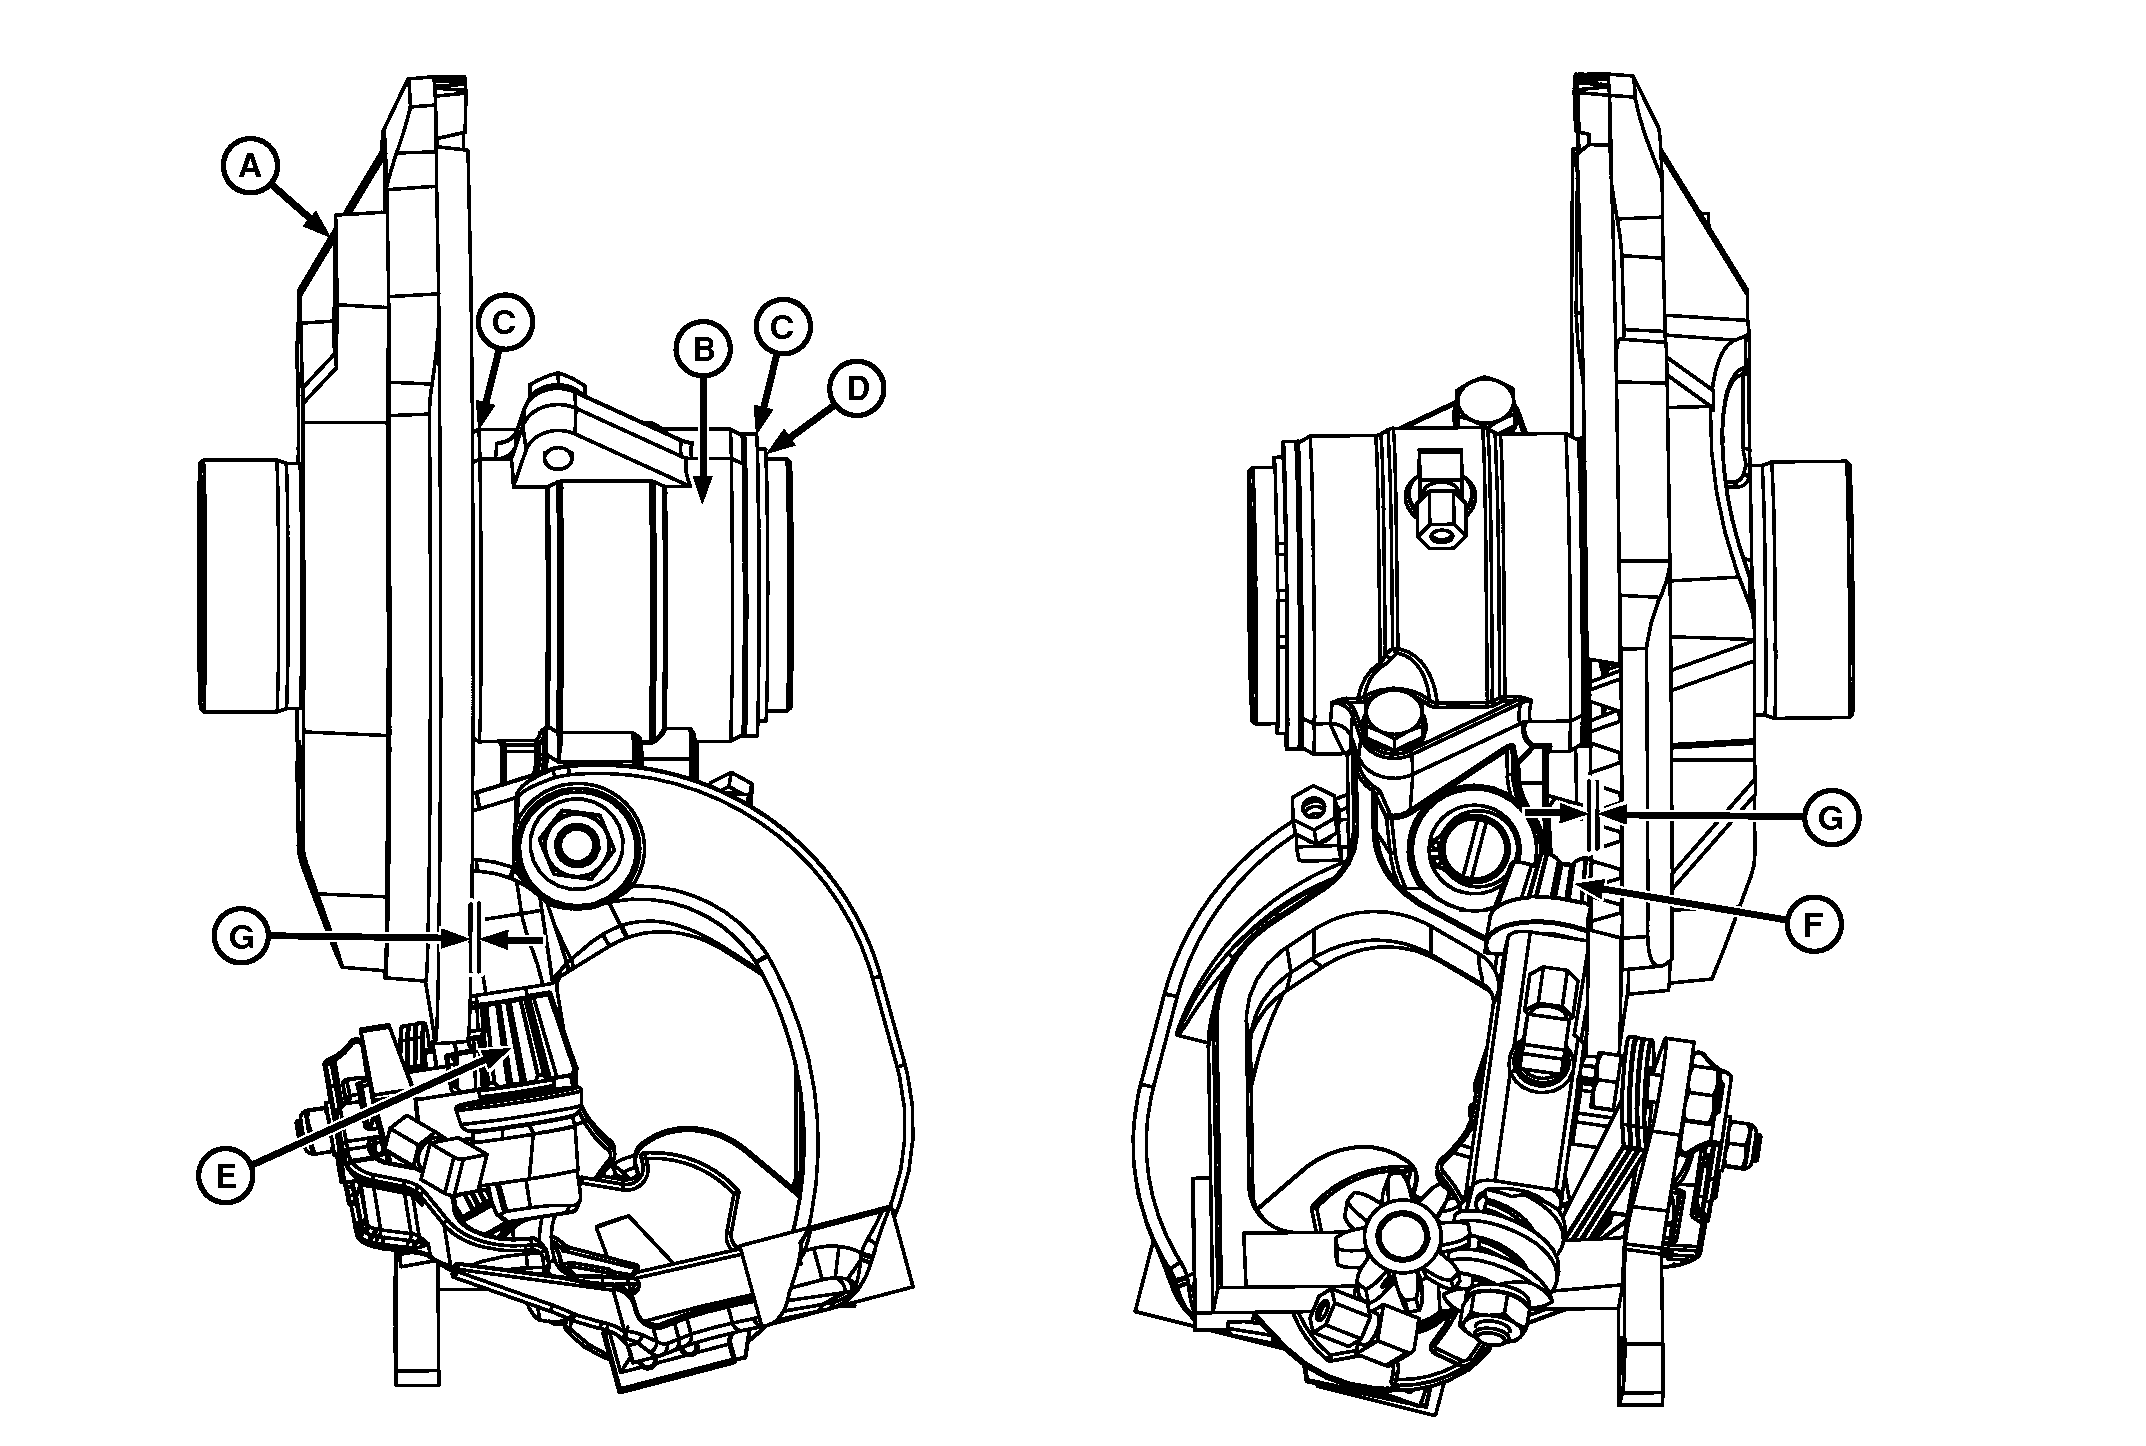
E77643-UN-26NOV14
A - Knotter Disc
B - Knotter Body
C - Shims
D - Snap Ring
E - Billhook Gear
F - Twine Disc Gear
G - Distance 0.2 - 0.4 mm (0.080 - 0.160 in.)
Adjust knotter disc (A) clearance as follows:
-
Push the knotter frame fully to the left on the knottershaft.
-
Using a feeler gauge. Check clearance between the knotter disc (A) and sliding surface of billhook gear (E) and twine retainer gear (F).
Billhook Gear Clearance Max 0.2 - 0.4 mm (0.080 - 0.160 in.) Twine Retainer Gear Clearance Max 0.2 - 0.4 mm (0.080 - 0.160 in.) -
Correct distance if necessary by adding or removing shims (C) between the knotter body (B) and knotter disc (A), and snap ring (D).
Adjust Billhook Compression Spring
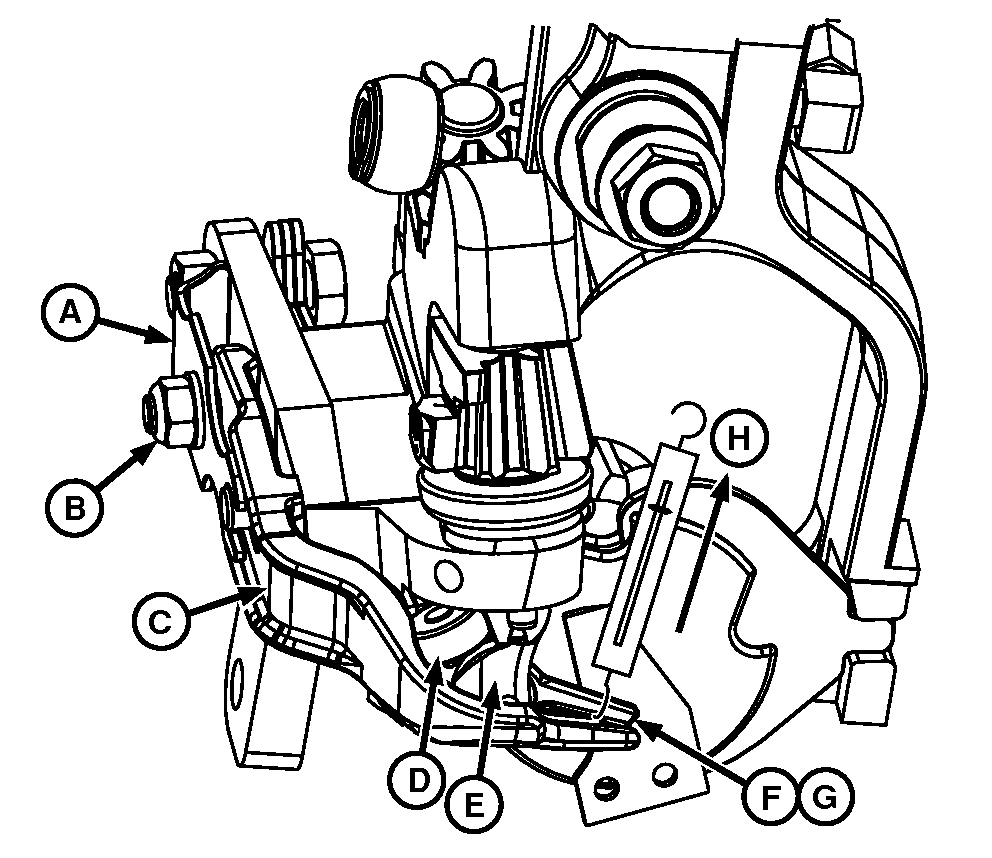
E77644-UN-26NOV14
A - Leaf Spring
B - Nut
C - Guide
D - Roll
E - Billhook
F - Billhook Tongue
G - Force, 50 N (11 lb.-force)
In rest position, force (G) needed to open the billhook tongue (F) must be 50 N (11 lb.-force), using a spring balance.
To adjust the billhook spring:
- Connect a spring balance to billhook tongue (F).
- Adjust the force (G) by turning the nut (B) (counter) clockwise.
As tension on leaf spring (A) increases or decreases, guide (C) will put more or less pressure on roll (D) of billhook.
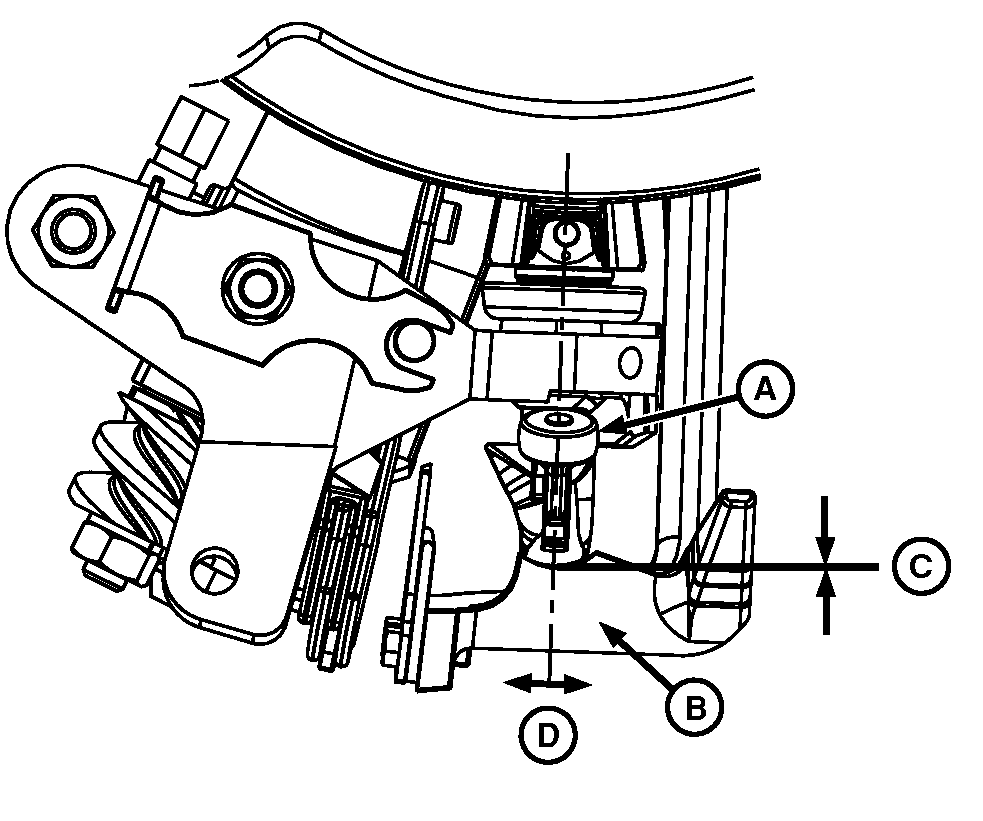
Billhook Opening
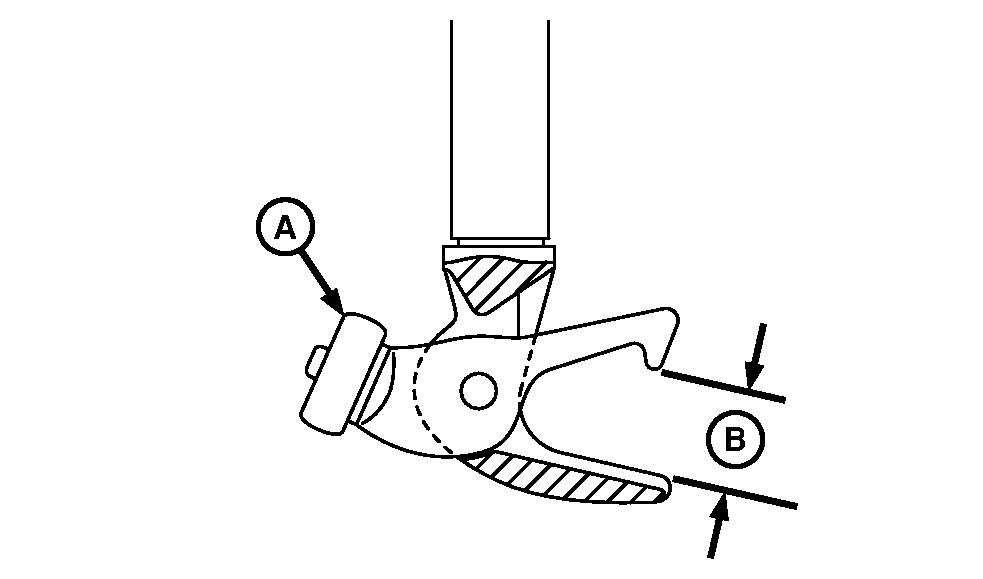
E77645-UN-26NOV14
A - Roll
B - Distance, 10 mm (0.39 in.)
Distance (B) of billhook (in the knotter) must be at least 10 mm (0.39 in.).Turn knotter manually until roll (A) at billhook is at the highest point of the curve.
Adjust Twine Retainer Disc Opening
E77646-UN-26NOV14
A - Stripper Blade
B - Worm Gear
C - Nut
D - Shaft End
E - Twine Disc Gear
F - Distance, 0 - 2 mm (0 - 0.080 in.)
Before the twine retainer disc can be adjusted, the following conditions must be complied with:- No twine in the twine retainer disc.
- Push the stripper blade (A) maximal to the left.
- Knotter must be in rest position.
Distance (F) between the left corners of the catch slots of twine retainer and lips of stripper blade must be 0 - 2 mm (0 - 0.080 in.). Adjust as followed:
-
Loosen nut (C).
-
Release worm gear (B) from shaft cone by cautiously tapping at the shaft end (D).
-
Rotate twine disc gear (E) until distance (F) is 0 - 2 mm (0 - 0.080 in.)
-
Tighten nut (C) to specification.
Nut Torque 35 N·m (26 lb.-ft.)
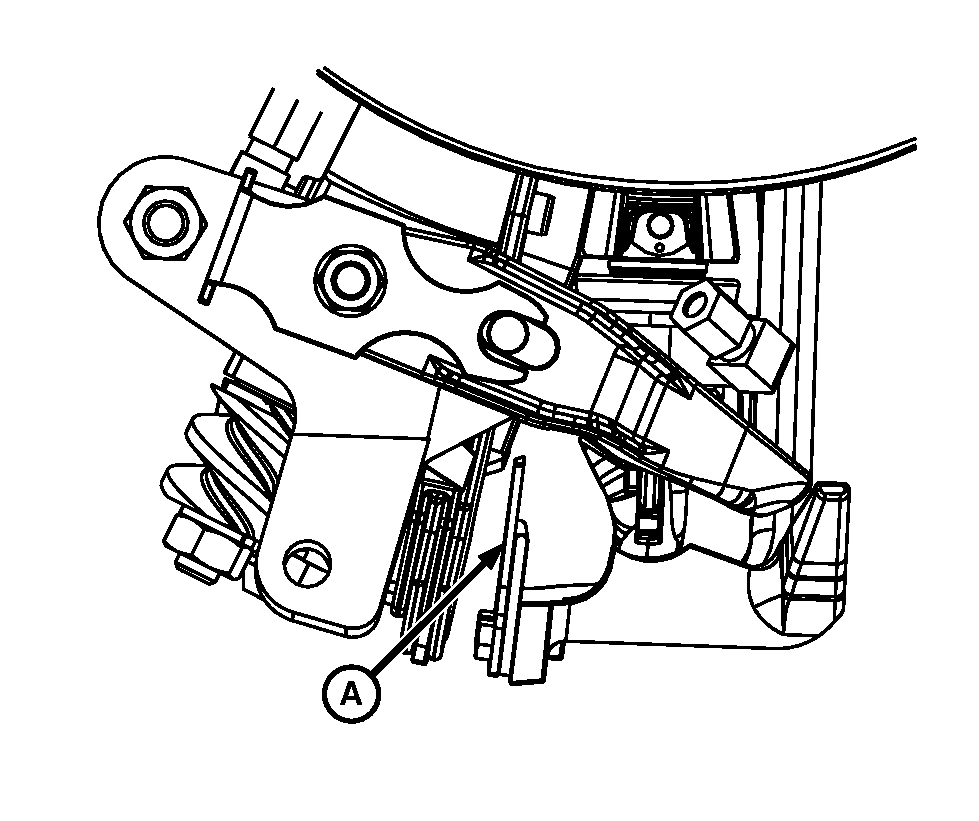
Adjust Clamping Force of Twine Retainer Spring
E77647-UN-26NOV14
A - Cap Screw
B - Twine Retainer Spring
C - Lock Nut
Clamping force of twine retainer has to be so much that the twine is not pulled out of the twine retainer mechanism during the making of the knot.
When clamping force is too high, twine can snap or fray.
Adjust as follows:
- Loosen lock nut (C).
- Turn cap screw (A) clockwise so that it just touches the twine retainer spring (B).
- Turn cap screw (A) clockwise for an extra 1.5 rotation.
- Tighten the lock nut (C).
Adjust Stripper Arm
E77648-UN-26NOV14
A - Billhook
B - Stripper Arm
C - Slight Contact
D - Aligned
Stripper arm (B) has to be aligned (D) with the billhook (A).
The stripper arm should slightly contact (C) the billhook for correct knot removal from the billhook.
Bend stripper arm slightly to correct this.
E77649-UN-01DEC14
A - Stripper Arm Stroke
The stroke length of stripper arm (A) at the bottom of the billhook should be about 15 mm (19/32 in.). If not, the twine will be damaged.Replace a damaged billhook or stripper arm.
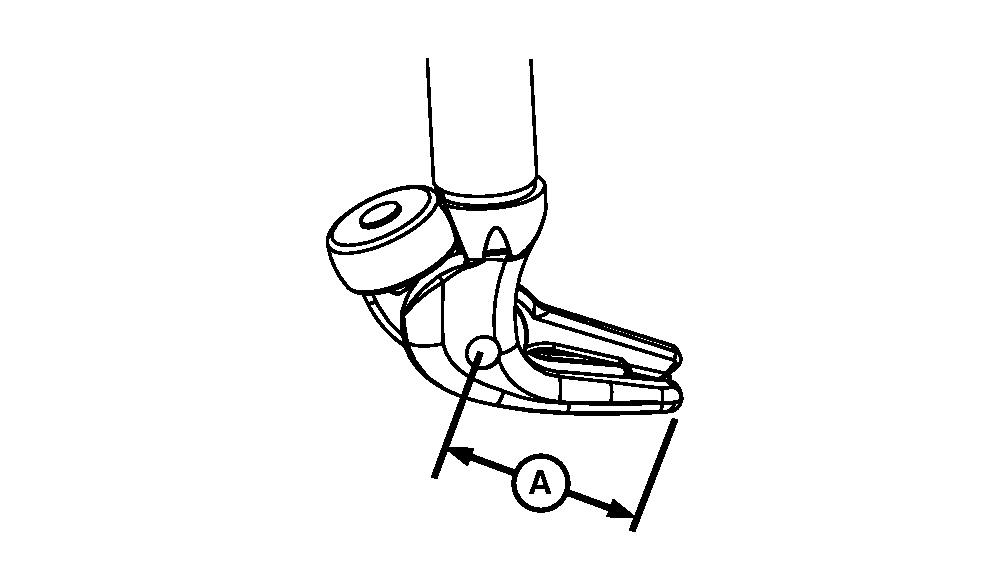
E77650-UN-26NOV14
A - Billhook Tip
B - Stripper Arm Comb
C - Distance
When the stripper arm is in the out most dead center, distance (C) between billhook tip (A) and the stripper arm comb (B) must be between 15 mm (19/32 in.) and 20 mm (25/32 in.).If the distance (C) is less than 15 mm (19/32 in.), check or replace the roller, knotter disc, or bearing.
Knotter Knife
E77651-UN-26NOV14
A - Knotter Knife
 Carefully handle the knotter knife (A). It can cause
severe physical injuries.
Carefully handle the knotter knife (A). It can cause
severe physical injuries.
Make sure that the knotter knife (A) is sharp at all times.
Replace a dull or damaged knife.
Replacing Knotter Knife:
-
Un-Pin knotter from frame and rotate up slightly to expose knife bolts.
-
Remove the two bolts and the old knife.
-
Install new knife in the same direction as old knife.
-
Tighten bolts.
Adjustment of the Needles
Adjusting the needles requires a fixed procedure. This procedure is as follows:
- The needles must be centered.
- The distance between needle and knotter must be set.
- The needle throw must have been adjusted.
Before any adjustments to the needles can be done, they must be in the top dead center.
Adjust as follows:
- Trip the tying mechanism.
- Turn the flywheel by hand to the right to raise the needles to the top dead center.
(See Adjust Needles to Plungerhead Timing in this section.)
|
SF04007,0000A35-19-20160104 |