Switch Between B-Wrap Automation Mode and Net or Twine Automation Mode
-
The automation mode switches according to the wrapping mode that is selected.
-
From the baler application main page, select the Wrap Setup softkey. The wrap setup page for the currently selected mode appears on the display.
E84878-UN-05OCT17 -
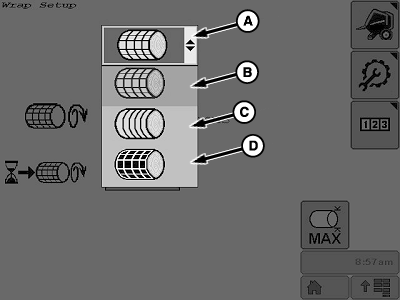
E85050-UN-18OCT17A - Current Wrap Mode
B - Net Wrap Mode Icon
C - Twine Mode Icon
D - B-Wrap Mode Icon
To change wrapping modes, select the current wrap mode indicator (A). A drop-down menu of wrapping modes appears on the screen. -
Select the desired wrapping mode icon (B—D). The setup page for the selected mode appears on the screen.
-
Select the main page softkey on the setup page to return to the application main page. Then, perform the following:
-
B-Wrap Mode:
-
If the preset target bale diameter is greater than 172.7
cm (68 in), the monitor defaults to 167.6 cm (66 in) bale diameter
when switching to the B-Wrap Mode.
Set the target bale diameter as desired, up to 172.7 cm (68 in). - Lock out the bale push bar. (See Lock Out Bale Push Bar in the Operating the Baler section.)
- Load B-Wrap material into the net wrap unit as normal.
-
If the preset target bale diameter is greater than 172.7
cm (68 in), the monitor defaults to 167.6 cm (66 in) bale diameter
when switching to the B-Wrap Mode.
-
Net Wrap or Twine Mode:
- Set the target bale diameter to the desired bale size.
- If necessary, engage the bale push bar. (See Engage Bale Push Bar in the Operating the Baler section.)
- Load Net Wrap material into the net wrap unit as normal. For the twine mode, install twine balls and route the twine from the twine boxes as normal.
-
-
The baler is now ready to begin baling.
|
DP99999,0000E5F-19-20171017 |