Adjust Twine Cutter to Twine Arm
-
 Twine arms can move unexpectedly. To avoid crushing,
keep hands out of the twine arm path. Turn off power BEFORE servicing
or adjusting twine arms or twine cutter mechanism.
Twine arms can move unexpectedly. To avoid crushing,
keep hands out of the twine arm path. Turn off power BEFORE servicing
or adjusting twine arms or twine cutter mechanism.Stay out of the path of twine arms at all times when power to twine arms is ON.
Twine knife has two sharp cutting edges. Be careful
when working around the knife.Remove crop material from the knife and hex anvil area.
-
Turn the tractor ignition key to the ON position. Do not start the tractor engine.
-
Select the Settings softkey on the baler application main page.
E84879-UN-09OCT17 -
Select the Baler Diagnostics softkey on the machine setup page.
E64643-UN-11MAY12 -
Select Test Output softkey on the diagnostics page.
E84890-UN-09OCT17 -
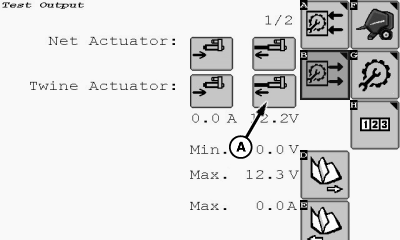
E85052-UN-23OCT17A - Actuator Extend Softkey
To move the front twine arm tube until centered over the hex anvil, select the twine arm Actuator Extend softkey (A). -
Turn the tractor ignition key to the OFF position and remove key.
-
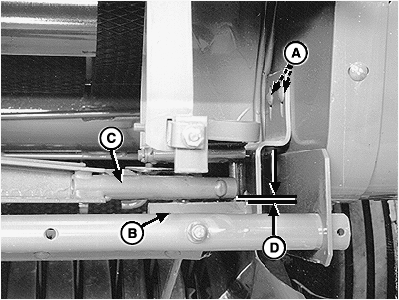
E66898-UN-25JUL12A - Carriage Bolt (2 used)
B - Knife Hex Anvil
C - Twine Arm Tube
D - Clearance
Measure clearance (D) between knife hex anvil (B) and front twine arm tube (C) and compare to specifications. -
If clearance (D) is not within specifications, adjust as follows:
-
Loosen carriage bolts (A).
-
Adjust position of the twine cutter bracket until clearance is within specifications. Bracket must be parallel with the bottom edge of frame.
-
Tighten carriage bolts.
-
-
If the minimum clearance (D) is obtained and the rear twine arm contacts the bottom side of the knife support, bend the twine cutter bracket so that the hex anvil is parallel to the twine arm.
-
Check the knife adjustment. (See Check and Adjust Twine Cutter Knife in this section.)
|
DP99999,0000E65-19-20171121 |