Attach Baler to Tractor Drawbar
-
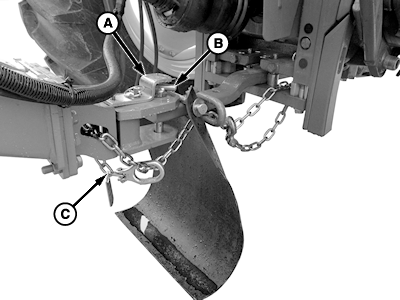
E61064-UN-30MAR12A - Bracket
B - Hitch Pin
C - Safety Chain
Remove the quick-lock pin, then raise and rotate bracket (A) 90°. Remove hitch pin (B). -
Back up the tractor to the baler. Align the tractor drawbar with the front of the baler tongue.
-
Engage the tractor parking brake and place the transmission in Park.
-
Shut off the tractor engine and remove the ignition key.
-
Install the hitch pin. Raise and rotate bracket (A) over the hitch pin. Install the quick-lock pin.
-
Route safety chain (C) through the loop on the drawbar (if equipped) and connect to tractor drawbar supporting structure, as shown. Do not fasten the chain to the drawbar. Remove all slack except for what is needed for turns.
-
Connect the PTO driveline. (See Connect PTO Driveline in this section.)
-
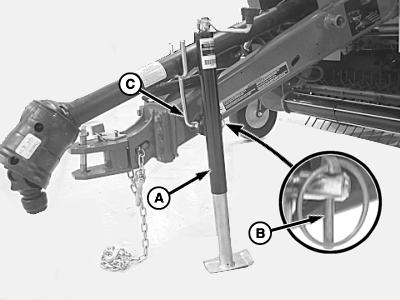
E83223-UN-31MAY17A - Jackstand
B - Quick-Lock Pin
C - PTO Support Rod
Turn the handle to take the load off the jackstand (A). -
Remove the quick-lock pin (B) and the PTO support rod (C) retaining the jackstand to the baler tongue.
-
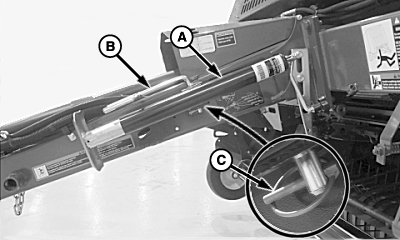
E83225-UN-05JUN17Jackstand (Storage Position)
A - Jackstand
B - PTO Support Rod
C - Quick-Lock Pin
Store jackstand (A) with the handle toward the baler to prevent water from entering the jack gearset.Install jackstand (A) in the storage position with the handle facing toward the baler. Install the PTO support rod (B) with the forked end toward the front of the tongue. Install quick-lock pin (C).
|
DP99999,0000D5F-19-20171010 |