Adjust Twine Arm Distance from Right-Hand Side (Electric) (460M)
-
Do not operate twine arms with the pickup in raised position or damage to pickup teeth can occur.
The twine cutter tension must be adjusted first before performing this procedure.
For 560M balers, the right-hand twine guide controls the twine distance from the right-hand end of the bale. The following adjustment procedure does not apply to these balers.
Lower the pickup.
-
Turn the tractor ignition key to the ON position. Do not start the tractor engine.
-
Turn the monitor-controller ON.
-
Move the twine arms all the way to the right-hand side of the baler using the monitor-controller EXTEND key.
-
Turn the monitor-controller OFF. Turn the tractor ignition key to the OFF position and remove the key.
-
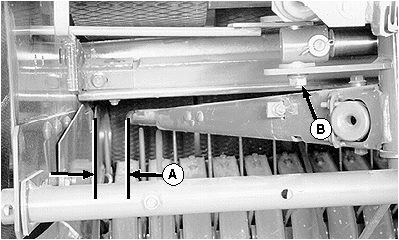
E39282-UN-19JUN96A - Twine Arm Distance
B - Nut
Measure the distance (A) from the side sheet to the twine arm. The distance must be within specifications with the actuator fully extended and the twine arm end play removed toward the rear.Distance (A) Distance 83—133 mm (3-1/4—5-1/4 in) -
To adjust the distance, loosen the nut (B) enough so the twine arms can be moved by hand, but with some resistance.
-
Move the twine arms toward the side sheet as far as possible, then move the twine arms to the rear to obtain the specified distance (A).
-
Tighten nut (B) enough to hold the actuator bolt in position on the twine arm when the twine arm is moved to the home position.
-
Turn the tractor ignition key to the ON position. Do not start the tractor engine.
-
Turn the monitor-controller ON.
-
Move the twine arms to the home position (actuator fully retracted) using the monitor-controller RETRACT key.
-
Turn the monitor-controller OFF. Turn the tractor ignition key to the OFF position and remove the key.
-
Tighten nut (B) to specification with the twine arms in home position.
Actuator Nut Torque 95 N·m (70 lb·ft) -
Recheck the distance (A) and repeat the adjustment as necessary.
-
Adjust the twine cutter tension. (See Adjust Twine Cutter Tension in this section.)
|
DP99999,0000DC8-19-20170804 |