Set Twine End Wrap Distance
Set Mechanical Twine Guide for End Wrap Distance
Model 460M baler is equipped with left-hand twine guide only. (See Twine Terms and Settings in this section.)
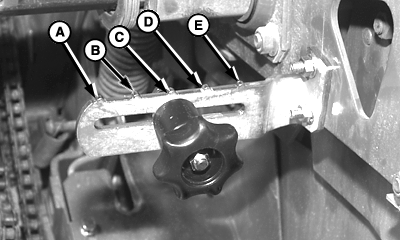
E47542-UN-06DEC99
Right-Hand Side Shown
A - Twine End Wrap Distance—89 mm (3.5 in)
B - Twine End Wrap Distance—114 mm (4.5 in)
C - Twine End Wrap Distance—140 mm (5.5 in)
D - Twine End Wrap Distance—165 mm (6.5 in)
E - Twine End Wrap Distance—190 mm (7.5 in)
The twine guide controls the twine wrap distance from the left-hand end of the bale. The twine wrap distance can be adjusted 89—190 mm (3.5—7.5 in) [A—E] at 25 mm (1 in) increments.For most baling conditions, adjust the twine guide to position (B). This setting positions the twine end wraps approximately 114 mm (4.5 in) from the end of the bale.
For dry, slick crops such as straw, coastal Bermuda grass, or flax, increase twine wrap distance to prevent twine from falling off bale.
For crops such as alfalfa, that fill the bale ends well and produces square shoulders, decrease the twine end wrap distance to improve bale appearance and reduce bale spoilage.
To adjust the guide:
-
Loosen knob.
-
Move knob as follows:
- Toward the baler side sheet to increase twine end wrap distance
- Away from the baler side sheet to decrease twine end wrap distance
-
Tighten knob.
Set Right-Hand and Left-Hand End Wrap Distance
-
Ensure that the mechanical twine guide controls the twine placement. Adjust the monitor-controller twine end wrap distance 1—3 cm (0.50—1.00 in) less than the mechanical twine guide setting. This adjustment increases the number of end wraps.
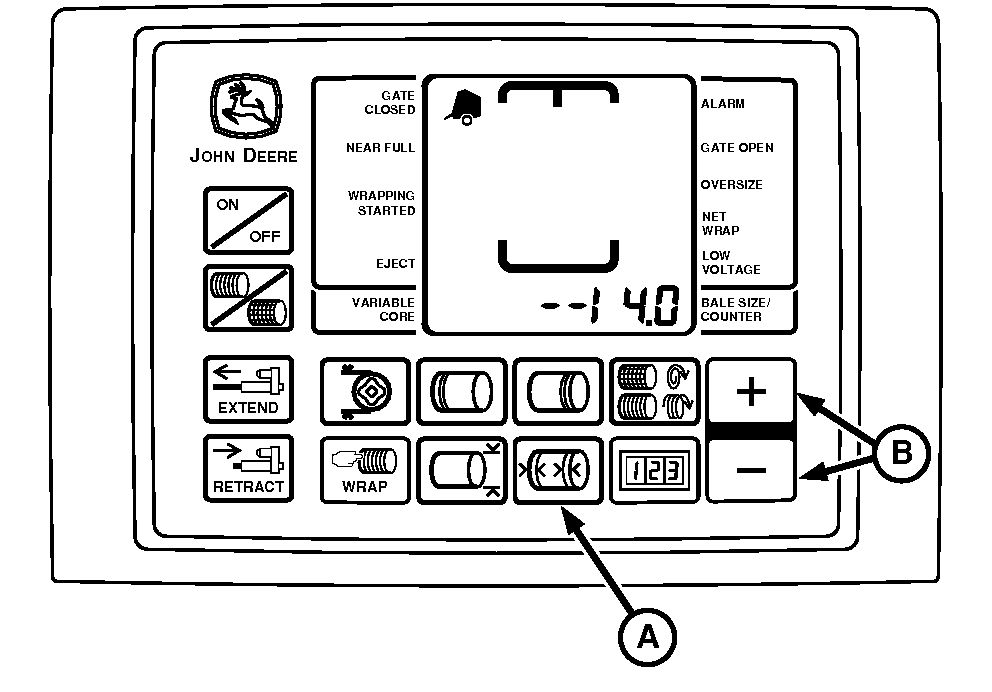
E52447-UN-29JUL03BaleTrak™ Pro Monitor
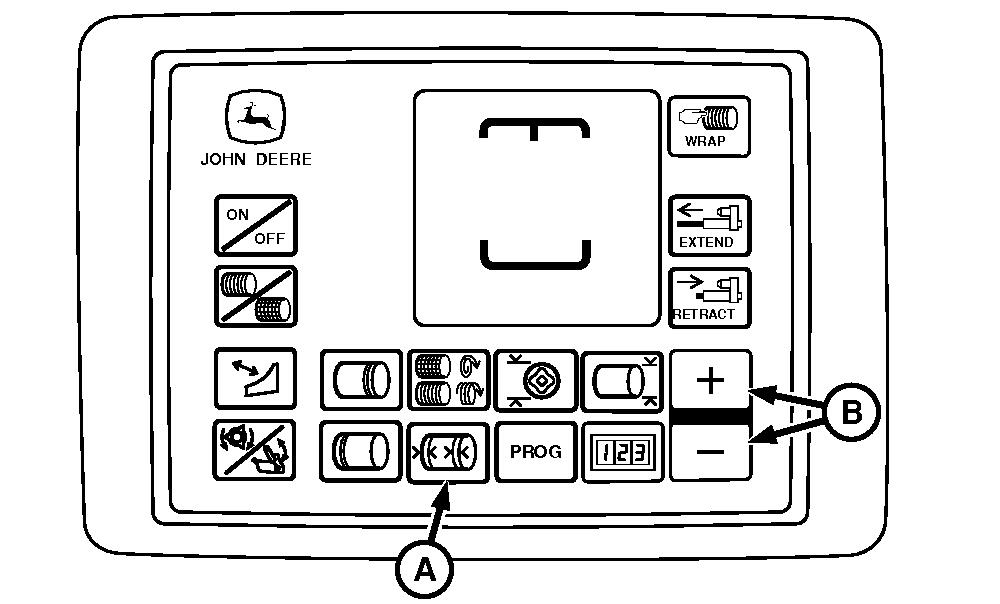
E84243-UN-28AUG17BaleTrak™ Plus Monitor
A - End Wrap Distance Key
B - Adjustment Keys
Turn the tractor ignition key to the ON position. Do not start the tractor engine. Turn the monitor-controller ON. -
End wrap distances are approximate.
To place twine the same distance from the edge on both ends, a slightly different setting can be required for each end.
Press the END WRAP DISTANCE key (A). The right-hand end wrap distance is displayed as shown. Press the plus (+) or minus (-) adjustment key (B) until the desired distance of 8—26 cm (3—10 in) appears in the digital display.
-
Press the END WRAP DISTANCE key a second time to set the left-hand end wrap distance. Set the desired distance using the adjustment keys.
-
Turn the monitor-controller OFF. Turn the tractor ignition key to the OFF position and remove the key.
|
DP99999,0000DD5-19-20171127 |