Changing Engine Oil and Filter
-
IMPORTANT: Operating in extreme conditions may require more frequent service intervals:
- Engine components may become dirty or plugged when operating in extreme heat, dust or other severe conditions.
- Engine oil can degrade if machine is operated constantly at slow or low engine speeds or for frequent short periods of time.
Run engine to warm oil.
-
Park machine safely on level surface. (See Parking Safely in the SAFETY section.)
-
IMPORTANT: Dirt and contamination can enter engine when checking oil level. Clean area around dipstick before loosening or removing.
Clean area around dipstick (A) to prevent debris from falling into crankcase.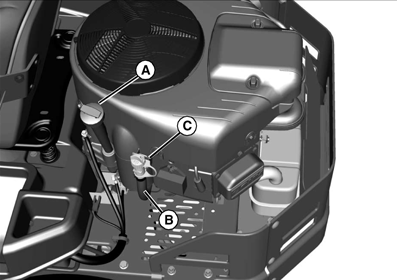
MXAL42828-UN-09APR13 -
Disconnect oil drain hose (B) from the side of the engine.
-
Remove the oil drain cap (C). Carefully lower the quick oil drain into an approved container.
-
Wipe dirt from around oil filter (D). Place a drain pan under oil filter, and remove filter.
MXAL42829-UN-09APR13 -
Wipe up any dripped oil from oil filter on engine pan.
-
Put a light coat of fresh, clean oil on the new filter gasket.
-
Install replacement oil filter by turning oil filter to the right (clockwise) until the rubber gasket contacts filter base. Tighten filter an additional one-half turn.
-
After oil has drained, install the drain cap (C) and attach drain hose assembly (A) to side of engine.
-
Add oil no higher than FULL mark on dipstick. Begin with specification. Do not overfill.
Item Measurement Specification Engine Oil Capacity 1.6 L (1.75 qt) (approx.) -
Tighten dipstick.
-
Start and run engine at idle to check for leaks. Stop engine. Fix any leaks before operating.
-
Check oil level. Add oil if necessary.
-
Wipe up any and all surfaces of any oil drippings.
|
MP47322,00F4655-19-20130315 |