Checking and Replacing Transaxle/Transmission Drive Belt
 CAUTION: Avoid injury! Entanglement in a belt or sheave can
cause serious injury. Stop engine and wait for all moving parts to
stop.
CAUTION: Avoid injury! Entanglement in a belt or sheave can
cause serious injury. Stop engine and wait for all moving parts to
stop.
NOTE: The transmission drive belts are self-adjusted using a spring tensioner and do not require a tension adjustment.
Checking Transaxle/Transmission Drive Belts
-
Park machine safely. (See Parking Safely in the SAFETY section.)
-
Inspect drive belt (A) for excessive wear, damage or stretching while in position on all machine sheaves.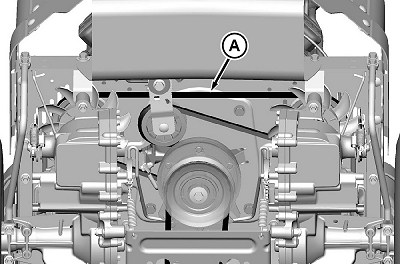
GXT002154-UN-13MAY15
Replacing Transaxle/Transmission Drive Belts
-
Park machine safely. (See Parking Safely in the SAFETY section.)
-
Remove mower deck.
-
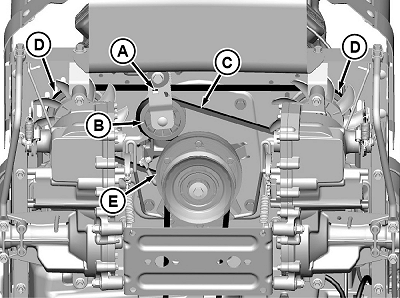
GXT002155-UN-13MAY15Components viewed from bottom.
Disconnect electric clutch wiring connector from main wiring harness connector. -
CAUTION: Avoid injury! Components are installed under spring
tension. Wear eye protection and use proper tools when installing
and removing components with spring tension.
Insert a 3/8 in. ratchet or breaker bar into the square hole (A) on the idler arm, rotate the spring-loaded idler arm to relieve belt tension on the idler sheave (B) and remove the drive belt (C) from the idler sheave. Release the spring tension from the arm and remove the tool.
-
Remove the drive belt from both transaxle sheaves (D).
-
Remove the drive belt from the engine sheave (E).
-
Position replacement belt onto engine sheave (E), and both transaxle sheaves (D).
-
Rotate the spring-loaded idler arm (A) and install the belt on the idler sheave (B).
-
Connect electric clutch wiring harness connector (A) to main wiring harness.
-
Install mower deck.
|
TH84124,00001AE-19-20150612 |