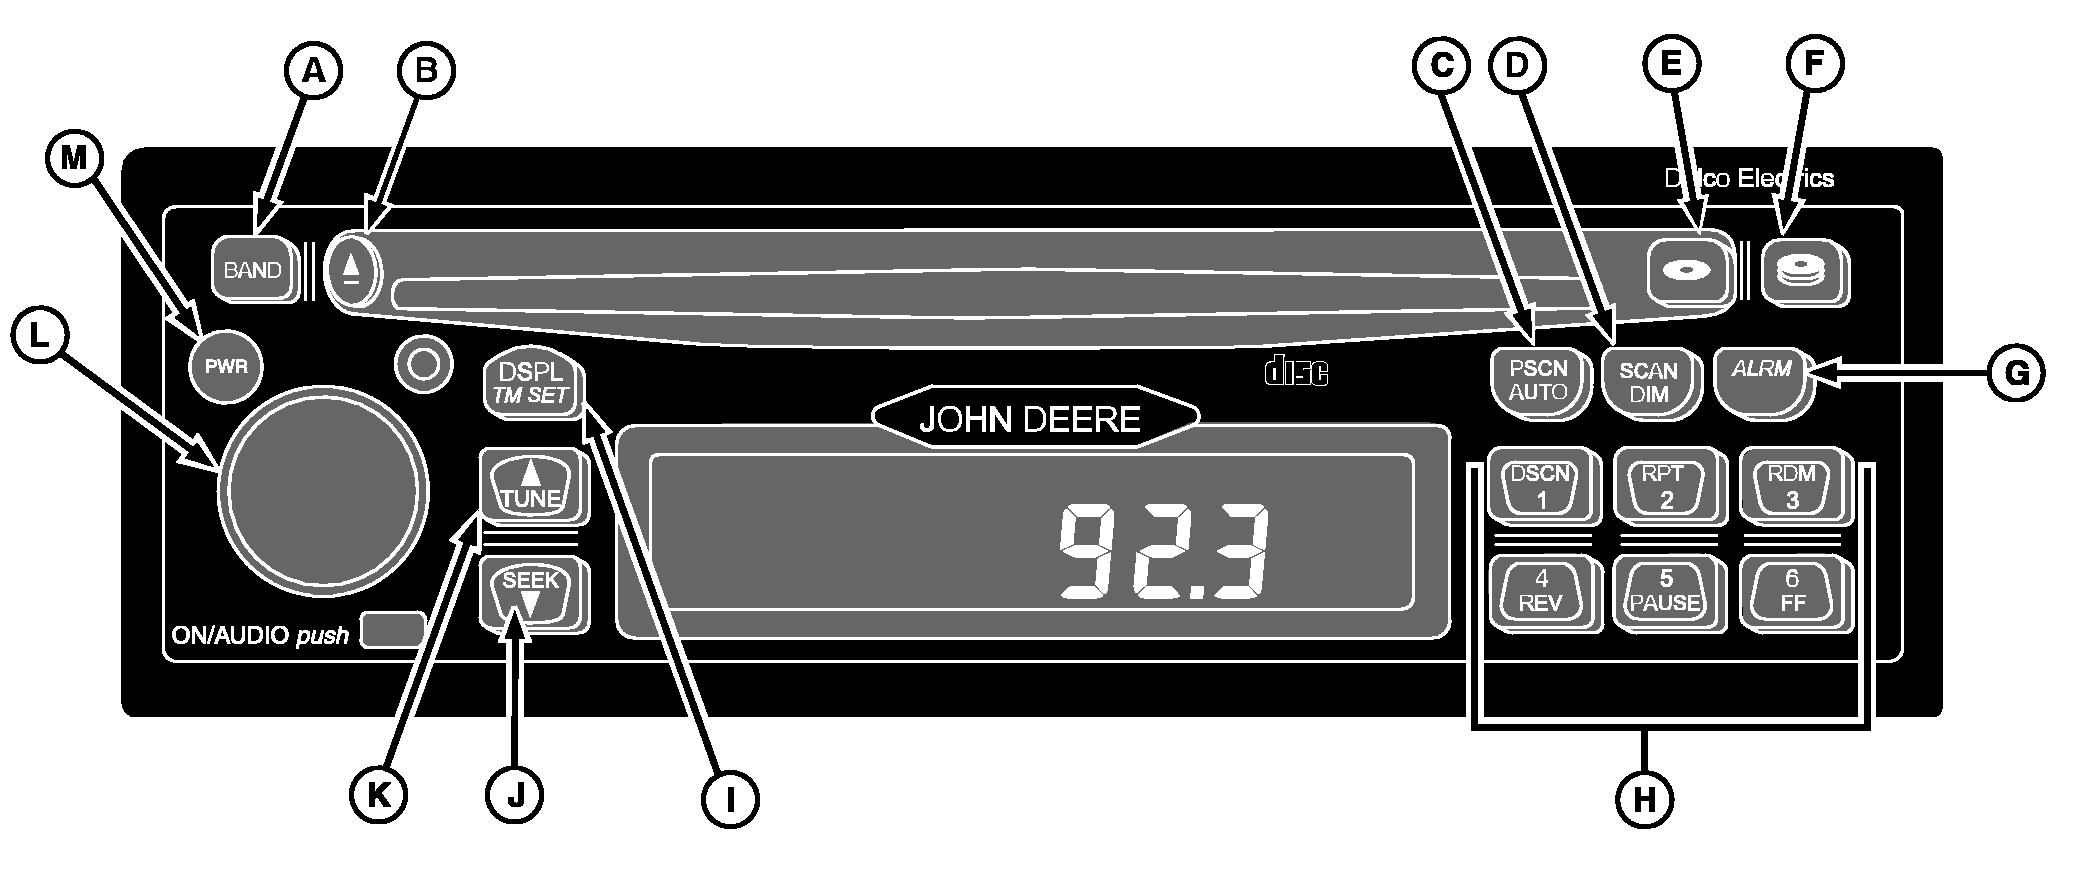
Deere-Delco AM/FM Radio With Weatherband and CD Player

|
|
|
|
|
|
Using the Clock
Your clock can function in a 12- or 24-hour mode. The 12-hour mode distinguishes between AM and PM. The 24-hour mode operates as military time. To toggle between the two modes: 1. Turn the ignition on. 2. Press and hold the DSPL/TM SET button (I) for two seconds until the digits flash. This indicates you are in the time set mode. 3. Press and release pushbutton 5 to toggle between 12-hour and 24-hour modes. After five seconds of inactivity, the display will return to the default, and the current mode will be set. Setting the Clock1. Turn the ignition on. 2. Press and hold the DSPL/TM SET button (I) until the hours digits flash. |
3. Press the TUNE (up arrow) (K) or SEEK button (down arrow) (J) to set the correct hour. 4. Press the DSPL/TM SET button again and the minutes digits will flash. 5. Press the TUNE (up arrow) or SEEK button (down arrow) to set the correct minute. The seconds are reset to zero when the minutes setting is changed. After five seconds of inactivity the display will return to the default and the clock will be set. Using the AlarmMomentarily pressing the ALRM button (G) will display the alarm set time. When you see the "ALARM' icon on the display, the alarm has been set. If the radio is on when the alarm sounds, you will hear a beeping noise. If th receiver is off, the alarm will turn on and play the radio at the alarm volume. The alarm will continue to sound until you activate snooze or you turn the alarm off. |
AG,OUO1035,1339 -19-04JAN00-1/3 |
|
Setting the Alarm
1. Press and hold the ALRM button (G) for two seconds until the "ALARM" icon illuminates and the hours digits of the alarm time flash. This indicates that you are in the alarm setting mode. 2. Press and release the TUNE button (K) or SEEK button (J) until the desired alarm hour appears on the display. 3. Press the ALRM button again to select the minutes display. 4. Press the TUNE or SEEK button until the desired alarm minutes appear on the display. Turning Off the AlarmPress and hold the ALRM button until you hear a "beep" and the "ALRM" icon on the display disappears. Activating SnoozePress any button or the AUDIO knob (L) when the alarm is sounding. The alarm will sound again in nine minutes. Setting the Alarm Volume1. Turn the receiver on. 2. Press and hold the ALRM button for two seconds until the "ALRM" icon illuminates and hours digits of the alarm time flash. Rotate the AUDIO knob to increase or decrease the volume as desired. After five seconds of inactivity, the receiver will return to the default display and the volume level at which the receiver was previously playing. NOTE: The alarm will be activated unless the ALRM button is held for two seconds again. General Receiver FunctionsYour receiver is equipped with three FM radio bands, FM1, FM2 and FM3. The three bands are the same, |
but allow you to set six presets in each band, for a total of 18 FM presets.
Turning On the Power
With the ignition on, the receiver may be turned on or off by pressing the PWR button (M). Pressing the ON/AUDIO knob (L) will also activate the receiver. After five seconds of inactivity, the receiver will return to the default display, and the "ALARM" icon will remain illuminated indicating the alarm is set. One-Hour TimerWith the ignition off, the receiver may be turned on by pressing the PWR button or the ON/AUDIO knob. This activates the one hour timer of the receiver. The receiver will turn off after one hour. The timer may be reactivated by pressing the PWR button or the ON/AUDIO knob again. DisplayThe receiver will display the time of day when the receiver is off. Momentarily pressing the DISPL/TM SET button (I) when the receiver is on allows you to toggle between displays.
1. Press and hold the DSPL/TM SET button for two seconds until the hours digits flash. 2. Press pushbutton 6 to change the display default. After five seconds of inactivity, the selected default will be displayed. |
AG,OUO1035,1339 -19-04JAN00-2/3 |
|
Adjusting the Brightness of the Display
If the dash dimmer does not control the brightness of the receiver display, or the receiver is operating under the One Hour Timer, then press and hold the SCAN/DIM button (D) until "DIM" and the brightness level appear on the display. Rotate the AUDIO knob clockwise to increase the brightness of the receiver display and counterclockwise to decrease it. Programmable Eject DefaultYour CD player is pre-programmed to return to the radio band once a CD is ejected. This default may be reset to "eject audio mute." When in the mode, the CD player acts as an independent source. Upon ejecting a |
CD, the audio volume will mute to zero, and the display will read "NO CD". The receiver will remain muted until the BAND button is pressed, enabling the radio.
To change the Eject default: 1. Press and hold the DSPL/TM SET button for at least two seconds until the hours digits flash. 2. Press the CD mode button (E) to toggle between P.PLAY and EJMUTE. The receiver will return to normal operation after five seconds of inactivity. |
AG,OUO1035,1339 -19-04JAN00-3/3 |