Bleeding the Fuel System
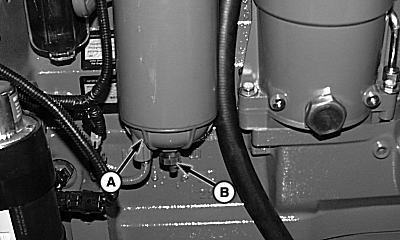
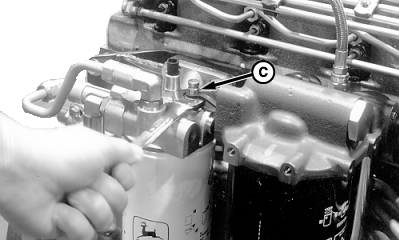
1. Check fuel level and add diesel if necessary. 2. Place a suitable container under water separator bowl (A) and momentarily open drain valve (B) to relieve any pressure within filter and to drain any water or contaminates, then close drain valve. This step will prevent pressure release from the diagnostic port as it is opened in step 3. 3. Thoroughly clean area around diagnostic port (C). Connect JT03472 coupler and hose to diagnostic port (C) and bleed fuel into suitable container. If coupler is not available, loosen the diagnostic fitting to allow air and fuel to escape. 4. Unlock and operate hand primer (D) until a steady fuel flow free of air flows out of the diagnostic port (C). (Primer must be pulled up fully between pumps). NOTE: It can take up to 350 primer strokes until fuel flows steadily from diagnostic port (C) if the system was emptied of fuel. 5. Close the diagnostic port while continuing to pump the hand primer.
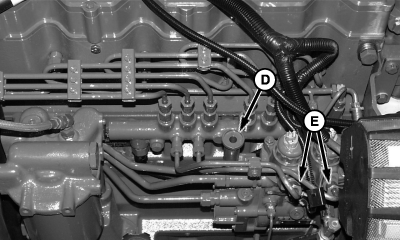
NOTE: DO NOT attempt bleeding the high pressure lines at the injector inlets on the cylinder head. 6. Completely loosen and unseat high pressure lines (E) at injection pump. Pump hand primer (D) until fuel is free of air and flows steadily from both open ports of injection pump. Reattach and tighten high pressure lines to specification and lock hand primer. Specification
|
|
 CAUTION:
If engine has not been cranked after pumping the hand primer, fuel lines will be under pressure. Wear face protection and loosen fittings slowly in order to relieve pressure and avoid excessive spraying of fuel.
CAUTION:
If engine has not been cranked after pumping the hand primer, fuel lines will be under pressure. Wear face protection and loosen fittings slowly in order to relieve pressure and avoid excessive spraying of fuel.
OUO6075,0002160 -19-11JUN02-1/2 |
|
NOTE: It can take an additional 150 primer strokes to prime fuel to the injection pump high pressure outlets. 7. Start engine and run 3 to 5 minutes at low idle. DO NOT crank engine for more than 30 seconds. If engine does not start or will not keep running, repeat step 6. |
OUO6075,0002160 -19-11JUN02-2/2 |