Adjusting Auger Position
Avoid serious injury. Shut off engine and remove key. Avoid serious injury from cutterbar movement when auger is turned. Remove knife drive belt (see Remove Knife Drive Belt From Drive Sheave in this section). 1. Raise platform and reel completely. 2. Set safety stops. 3. Set parking brake, turn OFF engine and remove key. 4. Loosen chain tension (see Adjust Auger Chain section in this section). NOTE: Retracted position for rear and floor strippers; round headed bolts are in front of slots and slot are open to rear (back sheet) of platform. 5. Verify adjustable rear and floor strippers are in the retracted positions. |
 CAUTION:
Avoid serious injury. Raise platform and reel completely, set safety stops.
CAUTION:
Avoid serious injury. Raise platform and reel completely, set safety stops.
OUO6091,000181B -19-28JUN04-1/2 |
|
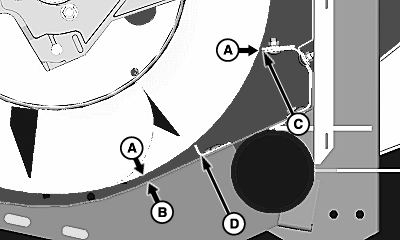
NOTE: See Adjusting Auger Height and Adjusting Auger Fore/Aft in this section for procedures. If step 7 causes the auger to interfere with floor stripper before clearance position is reached, adjust auger forward until interference is eliminated. Rotate Auger frequently during adjusting procedures. Adjust auger equally. Do not adjust one side completely to recommended clearance. Adjust auger ends equally to recommended clearance. 6. Using auger height and fore/aft adjustment procedures to position the auger flighting (A) 11 mm (7/16 in.) clearance to floor (B) and 11 mm (7/16 in.) to rear stripper (C). NOTE: Center auger finger clearance from floor to finger, 16 mm (5/8 in.), see Adjusting Center Auger Finger Timing section for procedures. 7. Set center auger finger timing (see Adjusting Center Auger Finger Timing in this section). 8. Adjust strippers (see Adjusting Rear Stripper and Adjusting Floor Stripper in this section for procedures). 9. Adjust auger drive chain tension (see Adjusting Auger Chain in this section for procedures). |
|
OUO6091,000181B -19-28JUN04-2/2 |