Fire Extinguisher-ChargingNOTE: Water fire extinguisher is shipped uncharged. Prior to delivery of machine the water fire extinguisher must be charged. When an antifreeze charge is used to freeze protect extinguisher, a complete discharge and maintenance is required.
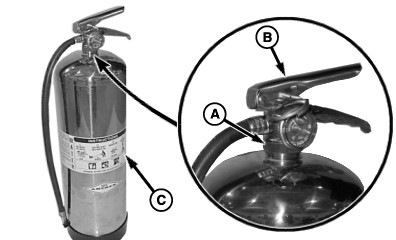
1. Discharge all remaining pressure and water (or antifreeze solution) making sure there is no remaining air pressure. 2. Loosen nut (A) and remove valve assembly (B) from cylinder (C). IMPORTANT: Fire extinguisher must not be exposed to freezing temperatures unless protected with antifreeze. See instructions decal on extinguisher for further information. NOTE: Corrosion inhibitor must be used, if water includes high levels of chlorides (40 ppm). 3. Fill cylinder with clean water or antifreeze solution until it overflows 9.5 L (2.5 gal.). |
|
 CAUTION:
Before attempting to recharge ensure that extinguisher is completely depressurized.
CAUTION:
Before attempting to recharge ensure that extinguisher is completely depressurized.
OUO6075,00001C0 -19-30OCT08-1/3 |
|
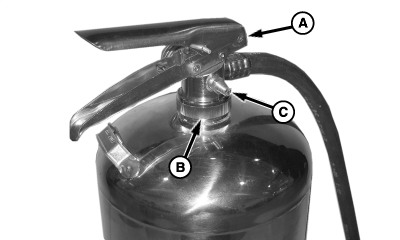
4. Install valve assembly (A) and tighten nut (B) to specification. Specification
5. Remove cap from pressurizing valve (C). NOTE: Set pressure regulator on air compressor to no more than 175 kPa (1.75 bar, 25 psi) higher than gauge operating pressure.
6. Pressurize fire extinguisher to specification using air or nitrogen. Specification
NOTE: Check nut, gauge, pressurizing valve, cylinder welds and valve orifice for leaks using leak detection fluid or a solution of soapy water. 7. Install previously removed cap on pressurizing valve. |
|
OUO6075,00001C0 -19-30OCT08-2/3 |
|
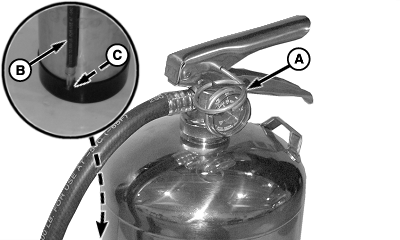
8.
Install pin (A) with ring facing towards front of extinguisher and install tamper seal.
9. Install hose and nozzle assembly (B) in holder (C). 10. Install fire extinguisher on machine.
|
|
OUO6075,00001C0 -19-30OCT08-3/3 |