Harvest Smart Feed Rate—System Adjustments

H94473-UN-31MAR10
Combine Setup Icon
H95950-UN-05OCT10
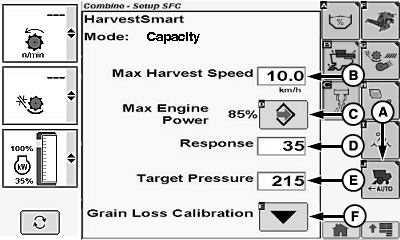
A - Harvest Smart Feed Rate Setup Icon
B - Max Harvest Speed
C - Max Engine Power Icon
D - Response
E - Target Pressure
F - Grain Loss Calibration Icon
Touch or press confirm switch when combine setup icon is highlighted.Touch or press confirm switch when Harvest Smart Feed Rate setup icon (A) is highlighted.
Touch or press confirm switch when one of the following is highlighted:
-
Max Harvest Speed (2.0 - 14.0 km/h) (1.2 - 8.6 mph) (B) –
use parameter to set maximum ground speed when Harvest Smart is active.
NOTE: Parameters can be modified to increase functionality and
optimize performance.
- Sets a comfortable maximum ground speed without having to move multi-function lever back. Otherwise, when crop conditions change from normal yields to light yields, system increases ground speed until target pressure or multi-function lever position speed is reached.
-
One option is to set maximum ground speed to 0.8—1.6 km/h
(0.5—1 mph) higher speed in lightest crop condition. By limiting
maximum ground speed to just above normal operating speed, system
is more efficient (not a large speed range to adapt to and learn parameters).
NOTE: Multi-function lever position always limits maximum ground
speed set by operator.
-
Max Engine Power Icon (C) – use this to set maximum allowable
engine load Harvest Smart will allow.
- If slug feeding is a concern, increase setting to allow for more cushion on engine load.
- Using engine load to control ground speed can be accomplished by setting value close to operating maximum engine power level. This can be done in crops where there are large header loads relative to threshing loads (example corn).
-
Response (0—100) (D) – use this to adjust how aggressively
Harvest Smart makes ground speed changes.
NOTE: Parameters can be modified to increase functionality and
optimize performance.
- It is best to start low and make large (10-20) increases until ground speed changes feel too aggressive. Back down numbers from there.
- Rates vary with header because of difference in feeding function (example: corn head might perform best at high rates, whereas a draper needs low rates).
- Rates need to be adjusted based on ground speed. At slow speeds a higher rate might perform better than at high speeds. In highly variable conditions (large density changes in short distances) it is recommended to keep response rate in mid range setting (40—60).
-
NOTE: Target pressure is not selectable if operating in Smart
Mode.
Target Pressure (30—420) (E) – use this to set target volume or throughput independently of VisionTrak loss monitor.- Parameter can be used when operator likes to adjust target volume (based on rotor load) without changing VisionTrak loss monitor calibration.
- Recommended way of adjusting target pressure is in Smart Mode using up/down arrow buttons on VisionTrak. By adjusting settings through VisionTrak this keeps target volume/loss relationship intact (example: if VisionTrak calibration factor is acceptable, but machine maintains a slow ground speed, increase target volume parameter by 20. If ground speed is high, decrease target volume parameter by 20).
- Grain Loss Calibration Icon (F) - desired grain loss values are set.
Non-Touchscreen or Touchscreen: Rotate selection dial until desired machine value is shown. Press confirm switch to save value.
Touchscreen Only: Enter desired machine value on numeric display. Touch enter/accept icon to save value.
Repeat as needed for other machine settings.
|
OUO6075,000070D-19-20120627 |