Power Shutdown Procedure
-
NOTE:
H95321-UN-02NOV10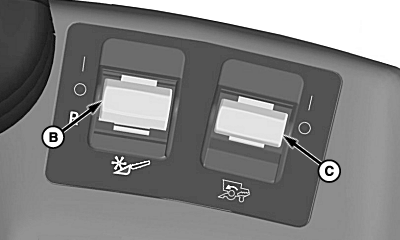
H96263-UN-04MAY10A - Key Switch
B - Header Engage Switch
C - Separator Engage Switch
A power shutdown is used to determine the machines performance in the threshing and separating areas by taking a "snap-shot" of the material in the separator. This is valuable in determining where the losses behind the machine are generated and what adjustments can be made to correct the condition.Verify that crop condition and material intake is similar for each shutdown.
Locate engine speed indicator on cornerpost display and threshing speed readout on armrest display.
-
Lock brake pedals together.
-
Operate machine at optimized throughput levels in desired crop.
-
Move steering wheel forward for free motion (both hands needed).
-
Press low idle engine speed switch on armrest.
-
Depress brake pedals.
-
Non-ProDrive machines: Fully depress brake pedals (quickly pulls engine speed down by loading propulsion system).
-
NOTE: ProDrive attempts to remain at set speed (machine will not slow with low idle). Pull multi-function lever to initiate some slowing of the machine.
ProDrive machines: Lightly depress brake pedals (ProDrive attempts to repower and will downshift changing machine dynamics if brakes are fully depressed).
-
-
As threshing speed drops to near low idle speed and engine speed drops to near low idle speed (1200 rpm), quickly disengage header (B) and separator engage (C) switches on armrest.
-
 CAUTION: ProDrive machines: Do not shut OFF key switch. Turning
key switch OFF and back ON while machine is moving will immediately
lock the parking brake.
CAUTION: ProDrive machines: Do not shut OFF key switch. Turning
key switch OFF and back ON while machine is moving will immediately
lock the parking brake.Quickly move multi-function lever to neutral position.
-
Allow engine to cool for a minute.
-
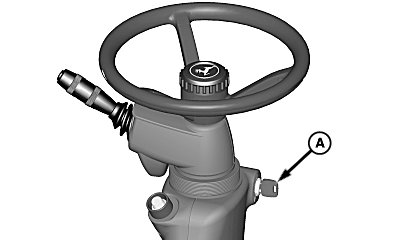
Turn key switch (A) to shut OFF engine, set parking brake and remove key.
-
Inspect for excessive grain damage, kernels left on the cobs, and free grain loss before making any adjustments.
-
Decide what adjustments are needed. Open threshing clearance and engage separator (avoids undue stress to cylinder drive area during cleanout).
-
Adjust machine to desired settings and continue harvesting.
-
Repeat this procedure and verify grain quality and losses behind machine.
-
Once acceptable loss levels are attained, calibrate VisionTrak Monitor and continue to harvest.
|
OUO6075,0000B1B-19-20110125 |