Setup of Prescriptions with Spreadstar
-
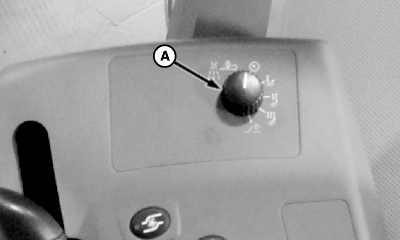
N98782-UN-24APR13A - Rate Selection Switch
Turn rate selection switch (A) to “AUX” position to put Spreadstar in prescription mode.NOTE: Verify product rate mode and correct product for each bin is selected in Bin Setup tab of Spreadstar Dryrate Controller.
-
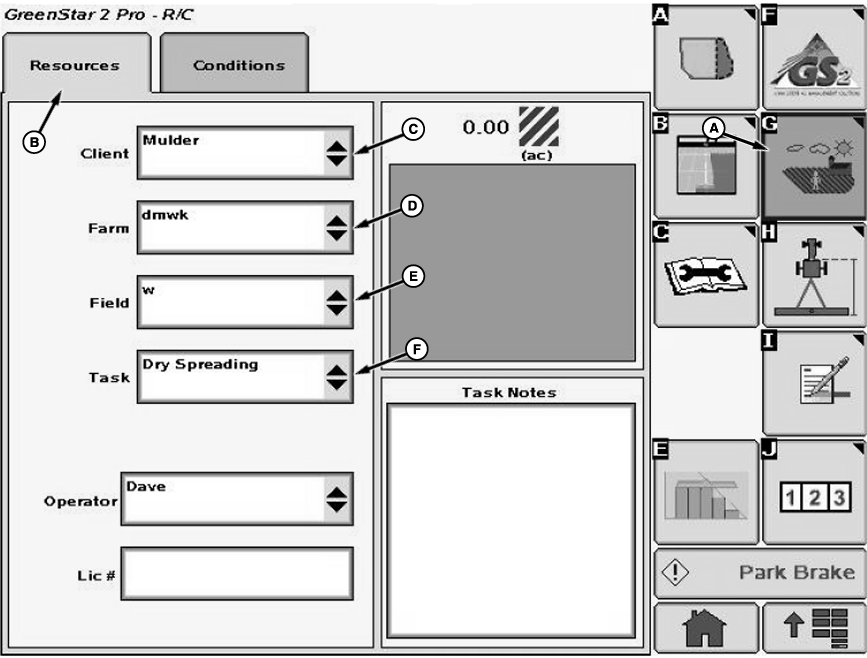
N78784-UN-16NOV07A - Resources/Conditions Softkey
B - Resources Tab
C - Input Box
D - Input Box
E - Input Box
F - Input Box
Select the Resources/Conditions softkey (A) from the GreenStar menu. -
Select the Resources tab (B). Resources screen will be shown.
-
Select input boxes (C—F) to input the Client, Farm, Field, and Task into Spreadstar.
-
N82573-UN-08DEC08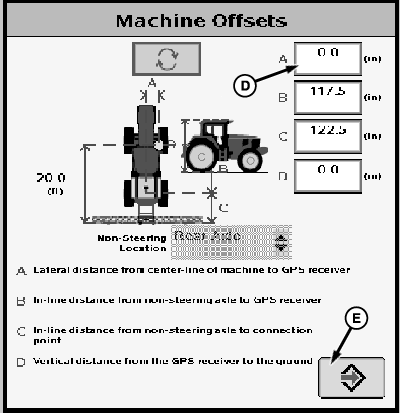
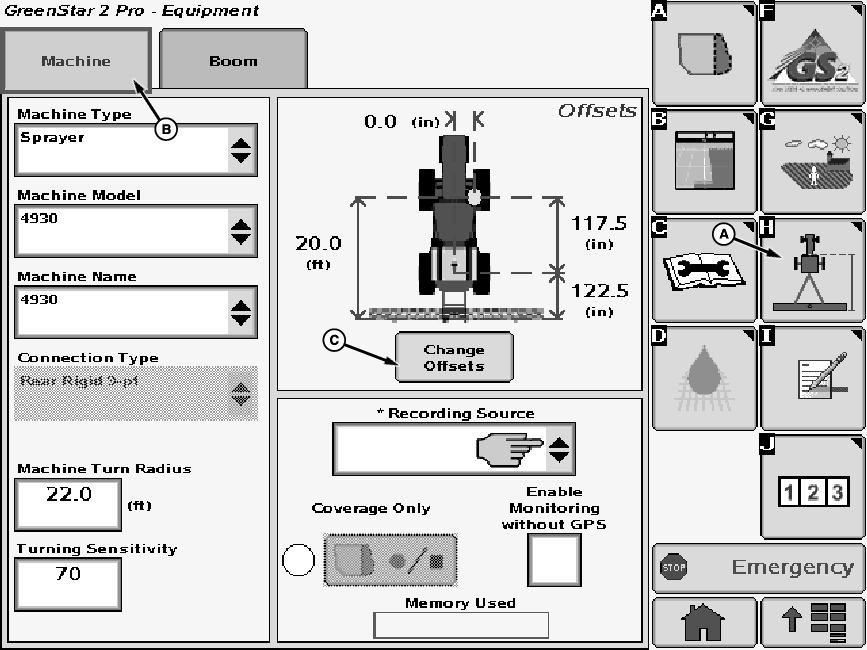
N82576-UN-08DEC08A - Equipment Softkey
B - Machine Tab
C - Change Offsets Button
D - Input Box (4 used)
E - Enter Button
Select the Equipment softkey (A) from the GreenStar menu. -
NOTE: Most settings are automatically filled in.
Select the Machine tab (B). Machine screen appears. Select the proper machine type, model, and name from the drop-down menus.
-
To change machine offset settings, select “Change Offsets” button (C). Machine Offsets menu appears.
-
Enter correct machine offset settings in input boxes (D) according to definitions A—D listed on the screen.
-
Press “Enter” button (E) to accept new values.
-

N82574-UN-08DEC08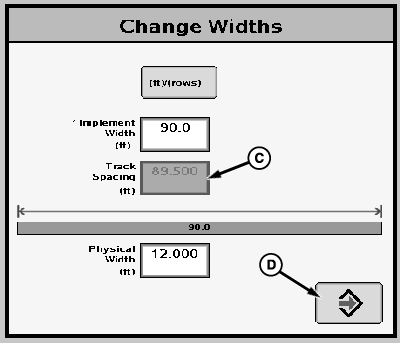
N82575-UN-08DEC08A - Boom Tab
B - Change Widths Button
C - Input Box
D - Enter Button
Select the Boom tab (A). Boom screen will be shown. Set the implement name. -
Select “Change Widths” button (B) to change vehicle track spacing. Change Widths menu appears.
-
Select input box (C) and set vehicle track spacing for product being applied. Actual implement spread width (grayed out box) comes from Spreadstar controller product setup information. (See GreenStar Parallel Tracking System operators manual for more information.)
-
Press “Enter” button (D) to accept new values.
-
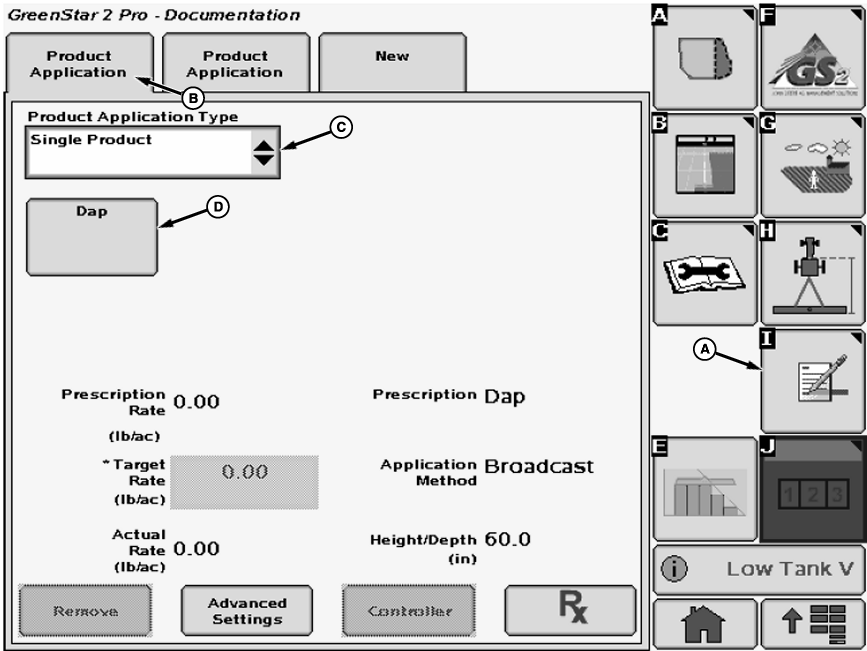
N78787-UN-16NOV07A - Documentation softkey
B - Product Application tab
C - Drop-down Box
D - Button
Select Documentation softkey (A) from the GreenStar menu.NOTE: For dual bin systems, two Product Application tabs are automatically created. The left tab is for Bin 1 (front bin), the right tab for Bin 2 (rear bin).
-
Select the Product Application tab (B).
-
Select “Single Product” from Product Application Type drop-down box (C).
-
NOTE: The product selected in Spreadstar setup does not automatically carry over to GreenStar display Documentation.
Select “Add Product” from button (D). Product Application screen will appear.
-
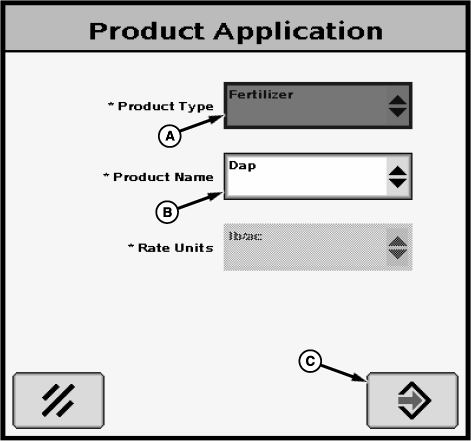
N78788-UN-16NOV07A - Drop-down Box
B - Drop-down Box
C - Enter Button
Select the product type (A) and the product name (B). Add desired product name by selecting “New” and using keyboard to name the specific product being applied. -
NOTE: Rate units are grayed out to lb./ac.
Select Enter button (C) to return to Product Application tab.
-
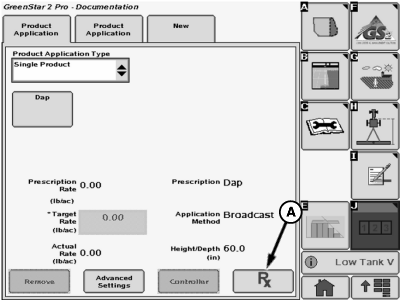
N78795-UN-16NOV07A - Prescription Button
Select the Rx button (A). Prescription screen will be displayed. -
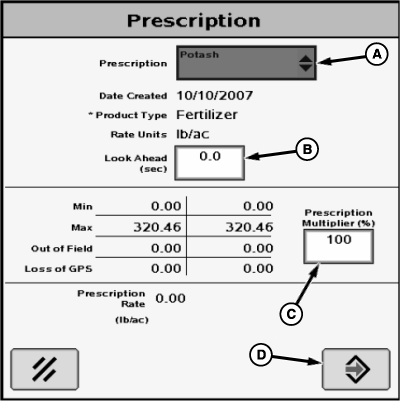
N78789-UN-16NOV07A - Drop-Down List
B - Input Box
C - Input Box
D - Enter Button
Select the prescription name from drop-down list (A). -
Select input box (B) and enter Look Ahead time. This setting is optional and controls how many seconds the system begins to change the rates before crossing into the next rate zone.
-
Select input box (C) and enter Prescription Multiplier (%). This feature allows the operator to make in-cab adjustments to the prescriptions.
-
Select Enter button (D) to return to Product Application tab.
-
NOTE: Once a prescription is selected, the name (A) is displayed and the target rate (B) is “grayed” out. The rate displayed is the rate called for by the prescription for the current spreader vehicle location. If vehicle is outside of the field, the rate may be 0.00.
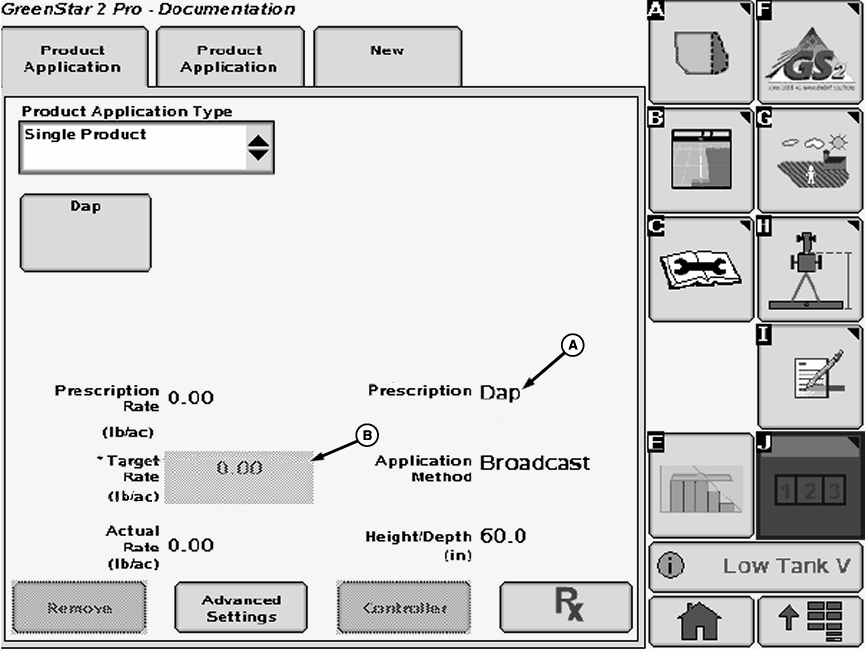
N78796-UN-16NOV07A - Prescription Name
B - Target Rate
Repeat for second bin, if equipped. -
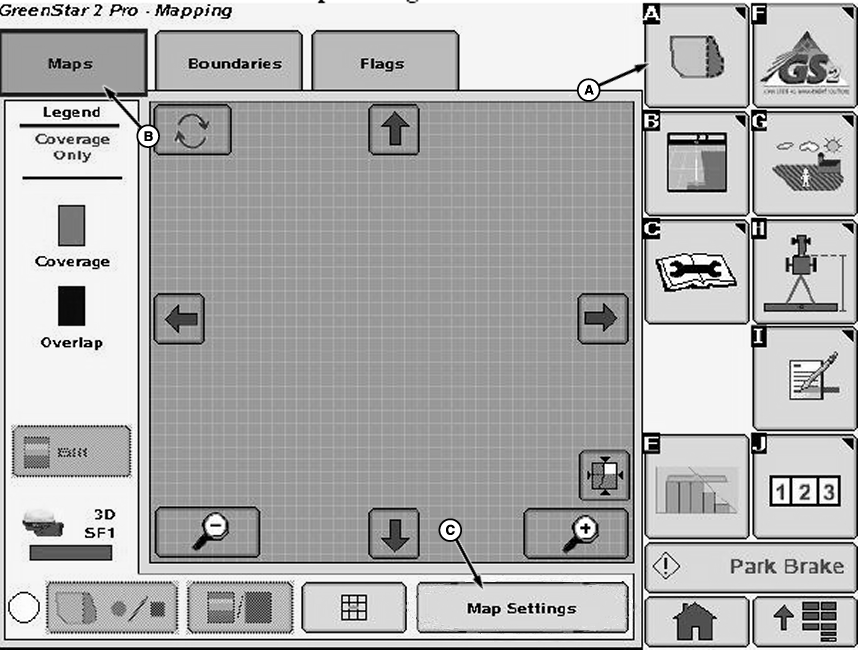
N78791-UN-16NOV07A - Mapping Softkey
B - Maps Tab
C - Button
Select Mapping softkey (A) from the GreenStar menu. -
Select Maps tab (B).
-
Select Map Settings button (C). Map Settings screen will appear.
-
NOTE: Only one prescription at a time can be viewed as a background layer, but by choosing the correct Swath Control Pro main run page under GreenStar Display layout manager the operator can toggle between bin 1 and 2 quickly.
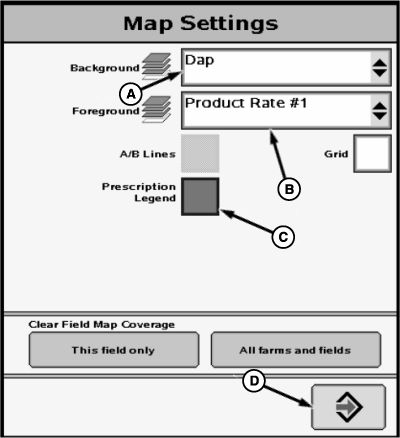
N78792-UN-16NOV07A - Drop-Down Box
B - Drop-Down Box
C - Check Box
D - Enter Button
Select the prescription name from the drop-down box (A) to set the prescription as a background layer. -
To set an as applied map, select “Product 1” (Bin 1) or “Product 2” (Bin 2) from drop-down box (B).
-
NOTE: If prescription was made with a program other than Apex, the Prescription Legend colors may not be accurate in relation to the Background map colors.
Select check box (C) next to “Prescription Legend” to set the as-applied map legend to match prescription background colors.
-
Press Enter button (D) to return to Maps tab.
-
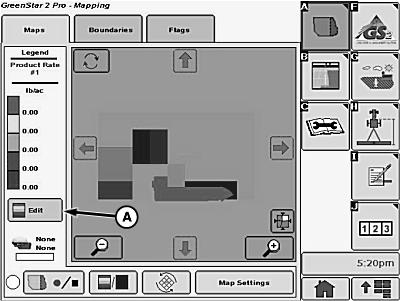
N78793-UN-16NOV07A - Edit Button
Set as applied map legend. If Prescription Legend is not used, the legend ranges can be manually assigned with the edit button (A). -
Configure the home page as desired. You are now ready to begin spreading.
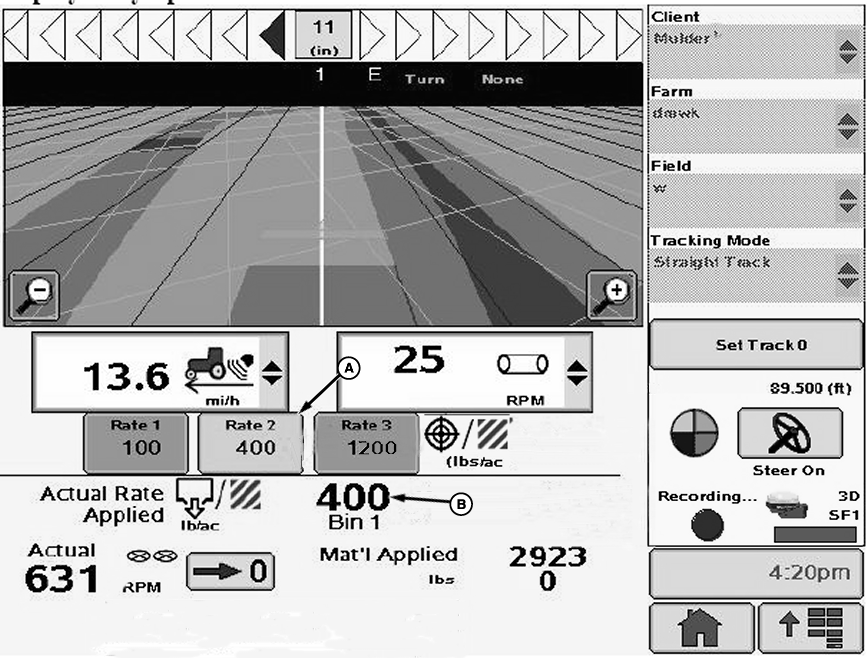
N91126-UN-16FEB11
A - Target Rate
B - Actual Rate
Following are some things to keep in mind:- The best indications of the current rates are the Target (A) and Actual (B) rates displayed by Spreadstar
- Operator can view only one prescription background map and as-applied map at a time. To change maps, go to GreenStar Display Pro-Mapping >> Map Settings
- As-applied map colors may not match the background map colors
- Refer to latest GreenStar Display operator's manual for information on loading and application, prescription application, and software updates
|
CS12167,0000338-19-20130604 |