Service Sprayer Coupler
-
 CAUTION:
Operator must wear appropriate personal protection equipment when servicing sprayer coupler.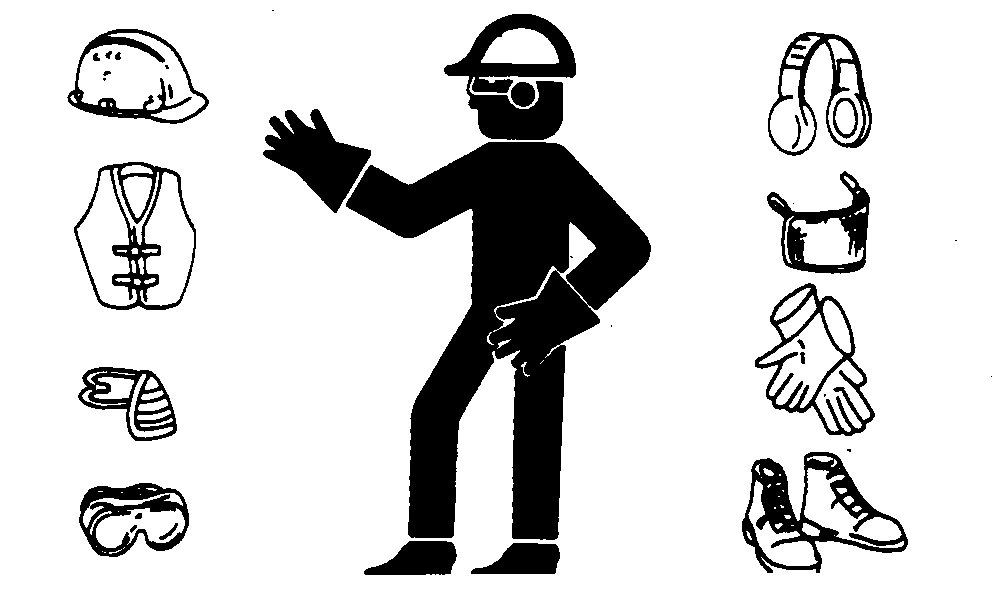
TS206-UN-15APR13 CAUTION: Servicing may result in solution loss. Run evacuation
and rinse procedures to prevent solution loss. Collect remaining solution. CAUTION: Coupler cylinder is spring-loaded with compression
spring and could cause serious injury to you or others.Place container under coupler to collect any remaining fluid in system.
-
Evacuate and rinse Load Command system before servicing sprayer coupler. Collect remaining solution.
-
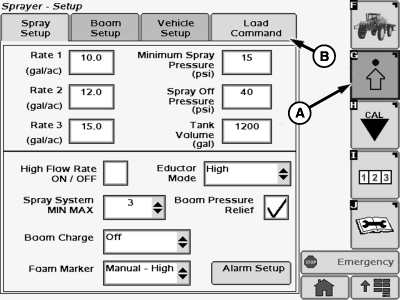
N87273-UN-11NOV09A - Setup Softkey
B - Load Command Tab
From GS3 Display Main Menu select Sprayer icon. -
Select Setup softkey (A).
-
Select “Load Command” tab (B).
-
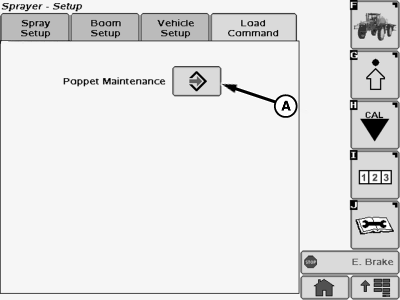
N87282-UN-11NOV09A - “Enter” Button
Select “Enter” button (A) next to “Poppet Maintenance”. -
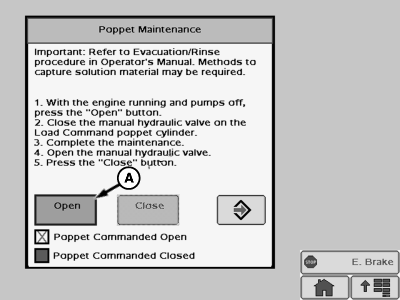
N87274-UN-11NOV09A - Button
Select “Open Valve” button (A) to extend poppet. -
N87275-UN-11NOV09A - Button
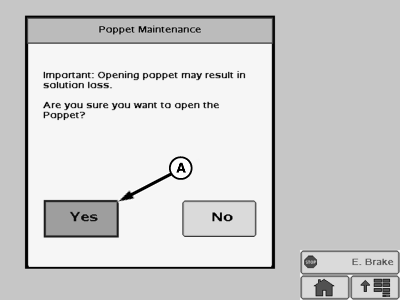
Select “Yes” button (A) to verify the choice to open the poppet. -
N108286-UN-05NOV13A - Closed Valve
Close shut-off valve (A) by turning knob clockwise so knob is tight. -
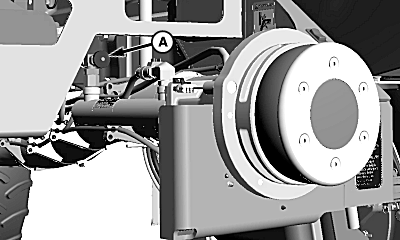
IMPORTANT: Clean air seal (A) using mild detergent and damp cloth. Clean proximity sensors (B) using damp cloth. Do NOT pressure wash.
NOTE: Step 10 applies to only basic maintenance of coupler. When finished, proceed to Step 20.
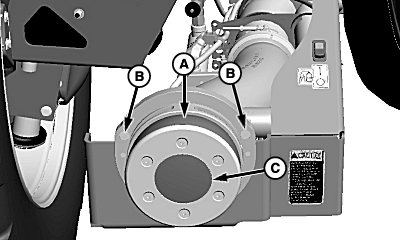
N107970-UN-05NOV13Poppet shown closed.
A - Air Seal
B - Proximity Sensor (2 Used)
C - Poppet
Perform maintenance on air seal (A), proximity sensors (B), and coupler poppet (C) as needed. -
NOTE: Steps 11–19 apply to only full sprayer coupler service.
NOTE: Poppet will retract if machine shut off before closing shut-off valve.
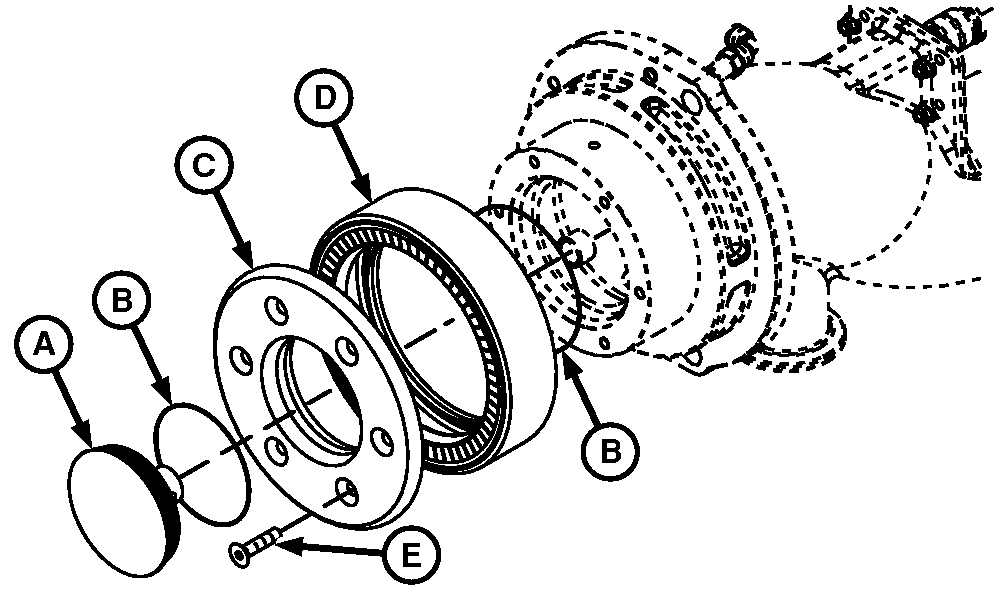
N83154-UN-02FEB09A - Poppet
B - O-Ring (2 Used)
C - Air Seal Retainer Plate
D - Air Seal
E - M35 Flat Head Screw (6 Used)
Return to cab and shut off engine. -
IMPORTANT: Poppet should stay extended and not drift in. If drifting occurs tighten or service shut-off valve as necessary.
Remove and clean poppet (A) by removing cotter pin.
-
Remove and clean air seal retainer plate (C) by removing screws.
-
Slide air seal (D) off coupler and clean coupler.
-
Clean air seal using mild detergent and inspect for damage.
-
Replace O-rings (B) if necessary.
-
Reinstall clean air seal, or use new one if needed.
-
IMPORTANT: Use anti-seize on threads. Coupler threads are aluminum.
Reinstall retainer plate using flat head screws (E). Tighten to specification.
Item Measurement Specification Retainer Plate Flat Head Screws Torque 10 N·m +/- 2
(7.4 lb.-ft.) +/- 2 -
Install poppet on end of cylinder rod using cotter pin.
-
IMPORTANT: Shut-off valve must be completely opened for Load Command to function.
N108286-UN-05NOV13A - Open Valve
Open shut-off valve (A) by turning counterclockwise until fully open and knob is tight. -
NOTE: Step 21 applies to only coupler poppet maintenance. Machine should still be on.
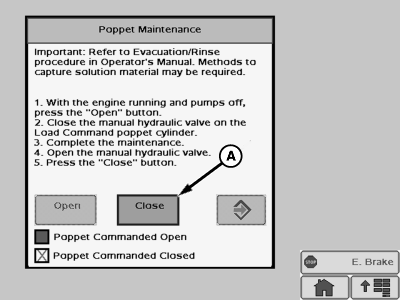
N87277-UN-11NOV09A - Button
Select “Close Valve” button (A) to close poppet. -
Select “Yes” button (A) to verify the choice to close the poppet.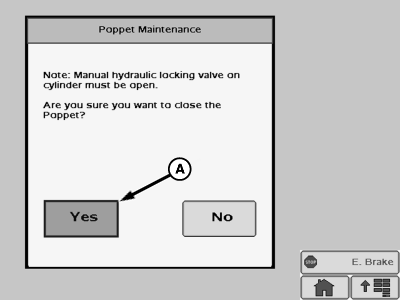
N87283-UN-11NOV09
|
CS12167,00004A1-19-20131024 |