Setup Camera Triggers—If Equipped
N109502-UN-28JAN14
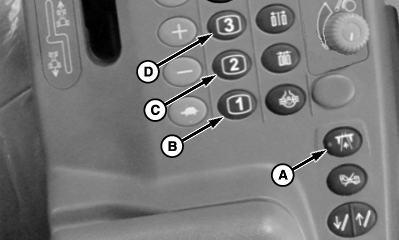
A - Transport Lock Switch
B - Programmable Hot Key 1
C - Programmable Hot Key 2
D - Programmable Hot Key 3
When cameras are installed on the machine they can be activated by predetermined trigger functions. Video image will be displayed on the GS3 display while the trigger is on. Cameras can be associated with multiple triggers. If no camera is associated with a trigger then no video will be displayed when that trigger is on. See Video section in the display Operator’s Manual for other video setup options.The following actions will trigger the cameras associated with them:
- Placing machine in reverse
- Pressing transport lock switch (A)
- Pressing programmable hot key 1 (B)
- Pressing programmable hot key 2 (C)
- Pressing programmable hot key 3 (D)
- Bin 1 level sensor reading empty
- Bin 2 level sensor reading empty
Setup is completed using the GS3 display and the following procedure.
-
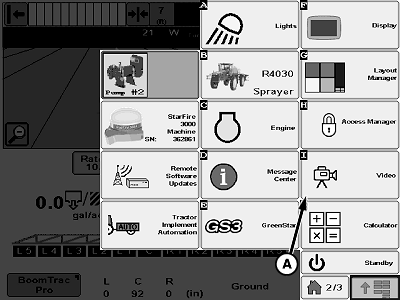
N109494-UN-20JAN14A - Video Button
Press video button (A) on application menu. -

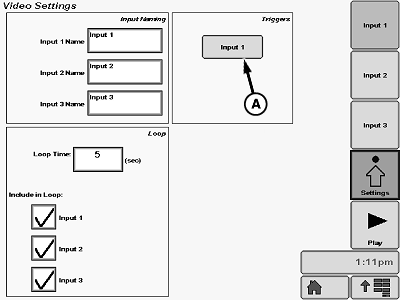
N109496-UN-20JAN14A - Settings Softkey
Press settings softkey (A) on video screen. -
N109500-UN-20JAN14
N109503-UN-28JAN14A - Softkey
B - Check Box
C - Machine in Reverse Trigger
D - Transport Lock Enabled
E - Programmable Hot Key 1
F - Programmable Hot Key 2
G - Programmable Hot Key 3
H - Bin 1 Level Sensor
I - Bin 2 Level Sensor
J - Drop-Down Box
K - Softkey
L - Automatic Trigger Status Indicator
M - Enter Button
Press softkey (A) to access trigger setup. -
Select one of the two potential cameras to be activated using the check box (B) next to the icon for the activating trigger. Triggers include:
- Machine in reverse (C)
- Transport lock enabled (D)
- Programmable hot key 1 (E)
- Programmable hot key 2 (F)
- Programmable hot key 3 (G)
- Bin 1 level sensor (H) reading empty
- Bin 2 level sensor (I) reading empty
-
NOTE: Video will remain on for the time selected after the trigger is off.
Default setting is 5 seconds.
Select delay time drop-down box (H) to set delay time. Choices include:
- 0 seconds
- 5 seconds
- 10 seconds
- 15 seconds
- 20 seconds
- 30 seconds
- 60 seconds
- 99 hours (continuous)
-
Press softkey (I) to set automatic video triggering on or off.
NOTE: Automatic trigger status indicator (J) will be highlighted in green when automatic triggering is on and will appear with a slash when off.
When automatic triggering is off no video will be displayed even if there is a camera associated with that function.
-
Press enter button (K) when setup is complete to return to video settings page.
|
CS12167,000052C-19-20140128 |