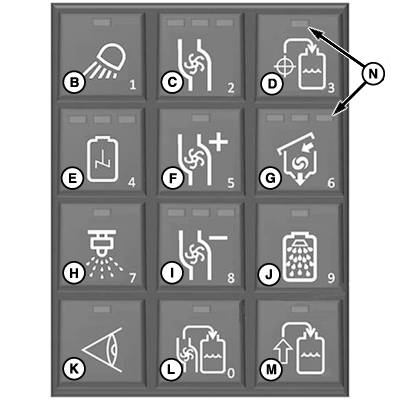
Load Station Keypad
N103597-UN-13MAY13
N103596-UN-13MAY13
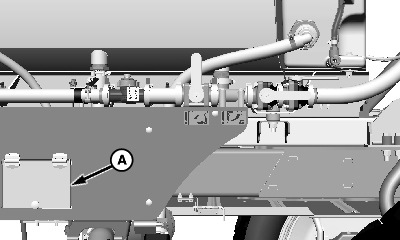
A - Cover
B - Load Station Light Button
C - Solution Pump On-Off Button
D - Target Fill Button
E - Agitation Button
F - Pump Speed Increase Button
G - Eductor Button
H - Spray On-Off Button
I - Pump Speed Decrease Button
J - Rinse Button
K - Nozzle Check Button
L - Pull-On Fill Button
M - Push-On Fill Button
N - Indicator
Raise cover (A) to access keypad.Keypad button functions are as follows:
- Load Station Light Button (B)—turns load station light on-off
- Solution Pump On-Off Button (C)—turns solution pump on-off (Solution pump runs at 50 percent speed until adjusted)
- Target Fill Button (D)—operator can load tank to a pre-specified level automatically.
- Agitation Button (E)—turns agitation on-off (Agitation volume must be set from GS3 display in cab)
- Pump Speed Increase Button (F)—increases pump speed at set intervals per button push until maximum pump speed is achieved.
- Eductor Button (G)—turns eductor on-off (Default eductor volume must be set from GS3 display in cab)
- Spray On-Off Button (H)—turns enabled spray sections on-off (Spray sections must be enabled or disabled using switches on CommandARM Side Console)
- Pump Speed Decrease Button (I)—decreases pump speed at set intervals per button push until minimum pump speed is achieved
- Rinse Button (J)—begins rinse procedure, full system, or boom rinse can be selected using the micro display.
- Nozzle Check Button (K)—allows operator to perform nozzle check (See Perform Nozzle Check in this section)
- Pull-on Fill Button (L)—pressing button begins fill process, press button again to stop fill process
- Push-on Fill Button (M)—press button to begin filling with nurse pump, press button again when fill is complete
Indicators (N) display the status (on-off) of the function controlled by that button. Indicator light ON indicates the function is ON. Indicators can also display at what setting the function is operating.
Buttons (B—J and L) can be used to enter values 0 - 9 on the micro display when required.
|
CS12167,0000731-19-20150311 |