Change the Engine Coolant
T6642EK-UN-01NOV88
 CAUTION: Shut off the engine. Only remove the expansion tank
cap when cool enough to touch with bare hands. To relieve the pressure,
slowly loosen the expansion tank cap to the first stop before removing
completely.
CAUTION: Shut off the engine. Only remove the expansion tank
cap when cool enough to touch with bare hands. To relieve the pressure,
slowly loosen the expansion tank cap to the first stop before removing
completely.
IMPORTANT: Follow the specifications and coolant change interval according to instructions in Fuel, Lubricants, and Coolant section.
Draining Procedure
-
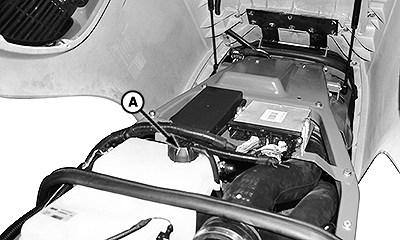
Carefully loosen the expansion cap (A) and remove it.
BM010494-UN-18SEP15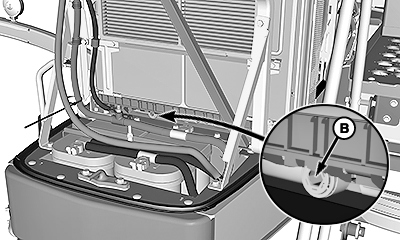
BM017263-UN-14MAR17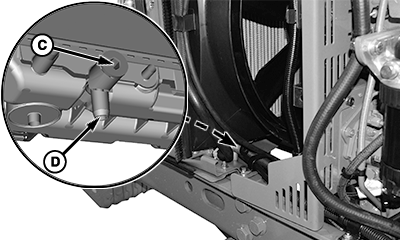
BM010475-UN-11NOV15A - Expansion Tank Cap
B - Connect/Disconnect Control
C - Drain Valve
D - Drain Line
-
Turn the connect/disconnect control (B) counterclockwise as far as it goes.
-
Place a suitable container under the drain line (D).
-
Open the drain valve (C).
-
Drain all coolant.
-
Close the drain valve (C).
-
Replace the engine thermostat. See Replace Engine Thermostat in this section.
-
Flush the cooling system according to the Flushing Procedure.
Flushing Procedure
-
Remove the expansion tank cap (A).
BM010494-UN-18SEP15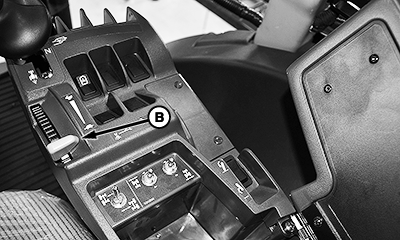
BM027557-UN-13NOV18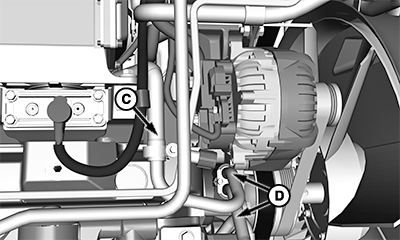
BM027558-UN-13NOV18A - Expansion Tank Cap
B - Hand Throttle
C - Hose
D - Lines
-
Fill the cooling system with clean water through the expansion tank.
IMPORTANT: Never fill the system when the engine is hot. Wait until engine cools down.
NOTE: Check the coolant capacity in Specifications section.
-
Install and close the expansion tank cap (A).
-
Start up the engine and move the hand throttle (B) to low idle position.
-
Squeeze hose (C) gently with your fingers to determine whether the pump is pumping coolant.
-
If not pressure can be felt, shut off the engine.
-
Loosen lines (D) until coolant/water emerges from lines (D).
-
Retighten lines (D).
-
Start up the engine and move the hand throttle (B) to low idle position.
-
Check the pressure at hose (C) again. If necessary, loosen the hose (C) at the charge air cooler. Once coolant emerges or pressure is felt, retighten hose (C).
-
Let the engine running until it reaches the operating temperature.
-
Shut off engine.
-
Repeat the Draining Procedure.
-
Flush the cooling system one more time.
-
Fill the cooling system according to Filling Procedure.
Filling Procedure
IMPORTANT: Never pour cold water or coolant into a hot engine. Always use warm water or wait until engine has cooled down.
-
Remove the expansion tank cap (A).
BM010494-UN-18SEP15
BM027557-UN-13NOV18
BM027558-UN-13NOV18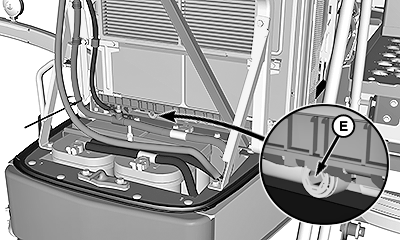
BM027556-UN-13NOV18A - Expansion Tank Cap
B - Hand Throttle Lever
C - Hose
D - Lines
E - Connect/Disconnect Control
-
Fill the cooling system with the specified coolant through the expansion tank. Add coolant up to the maximum level mark.
NOTE: Check the coolant capacity in Specifications section.
NOTE: Check the specified coolant in Fuel, Lubricants, and Coolant section.
-
Install the expansion tank cap (A).
-
Start up the engine and move the hand throttle (B) to low idle position.
-
Squeeze hose (C) gently with your fingers to determine whether the pump is pumping coolant.
-
If not pressure can be felt, shut off the engine.
-
Loosen lines (D) until coolant emerges from lines (D).
-
Retighten lines (D).
-
Start up the engine and move the hand throttle (B) to low idle position.
-
Check the pressure at hose (C). If necessary, loosen the hose (C) at the charge air cooler. Once coolant emerges or pressure is felt, retighten hose (C).
-
Shut off the engine.
-
Remove the expansion tank cap (A).
-
Add coolant up to the maximum level mark.
-
Turn the connect/disconnect control (E) clockwise as far as it goes.
-
Install and close the expansion tank cap (A).
-
Clean the radiator, coolers, and air conditioner condenser. Remove any dust or oil. (See Clean Radiator and Air Conditioner Condenser in Service—As Required section.)
|
KK69021,000040E-19-20181113 |