Using Front 3-Point Hitch (If equipped)
Installing A-Frame
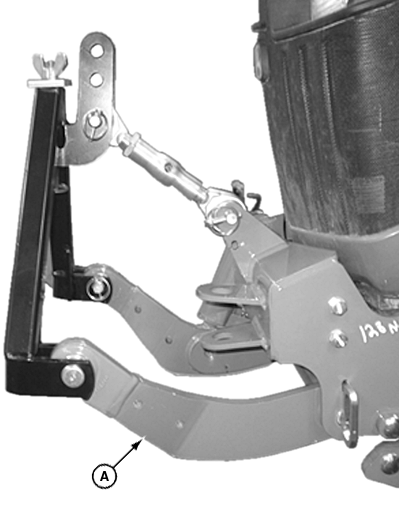
List of parts for reference:
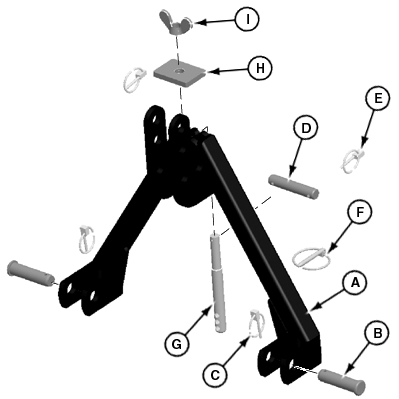
LV17893-UN-31MAY13
A - A-Frame
B - Cylinder pins
C - Lynch pins
D - Hinge pin
E - Lynch pin
F - Quick lock pin
G - Retainer rod
H - Retainer plate
I - Wing nut
-
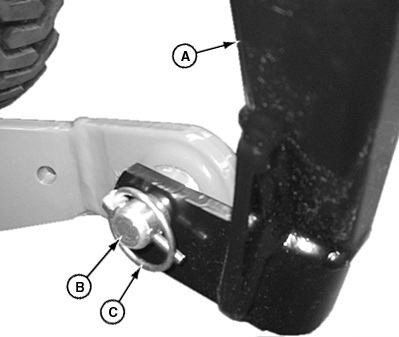
LV17894-UN-29MAY13A - A-Frame
B - Cylinder pins
C - Lynch pins
Install A-Frame (A) on lift arms. Insert cylinder pins (B) through A-Frame and lift arms and secure with lynch pins (C). -

LV17895-UN-29MAY13D - Hinge pin
E - Lynch pin
Install front hitch center link on bottom hole of A-Frame with hinge pin (D) and lynch pin (E). -
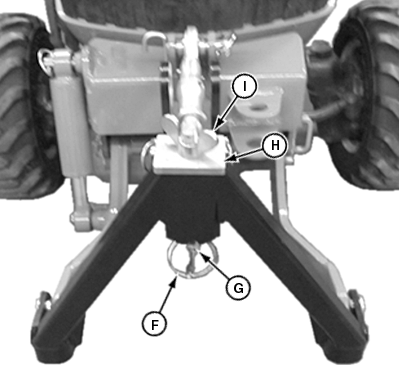
LV17896-UN-29MAY13F - Quick lock pin
G - Retainer rod
H - Retainer plate
I - Wing nut
Install quick lock pin (F) in retainer rod (G). Install retainer rod on A-frame using retainer plate (H), wing nut (I) and quick lock pin. -
Reverse procedure to remove A-frame.
Raising and Lowering Hitch
-
Check to be sure hitch is not in transport lock position.
-
Review instructions on using hydraulic dual selective control valve (SCV) and dual selective control valve lock lever included in your tractor operator’s manual.
-
Move the tractor dual SCV lever:
- To raise the hitch, move the lever rearward.
- To lower the hitch, move the lever forward.
Operating and Installing Loader with Front Hitch Installed
-
LV17900-UN-29MAY13A - Lift Frame
B - Cylinder Assembly
Remove the front hitch lift frame (A) and cylinder assembly (B).- Disconnect hydraulic hoses from mid SCV couplers.
- Remove the top retaining clip from the upper cylinder mount.
- Pull cylinder off the upper cylinder mount, replace retaining clip for future use.
- Remove the lift frame retaining clip from the lift frame pivot.
- Remove the lift frame pivot, lift frame, cylinder and hydraulic hose assembly.
-
NOTE: Loader cannot be used in combination with the mid driven
front PTO. Remove the mid driven front PTO if installed.
Install and operate loader.
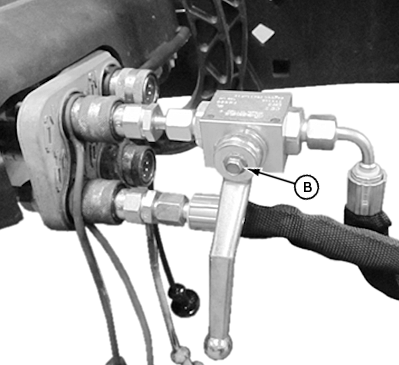
Using Rate of Drop Adjustment
-

LV17897-UN-29MAY13A - Lower nut
B - Fitting
Loosen lower nut (A). - Turn upper part of fitting (B) clockwise or counterclockwise to adjust.
- Tighten lower nut (A) to lock fitting.
To adjust the rate of drop:
Using Transport Lock Position
To place hitch in transport lock position:
-
LV17898-UN-29MAY13A - Lift frame
Fully raise lift frame (A). -
LV17899-UN-29MAY13B - Valve
Rotate valve (B) to the lock position.
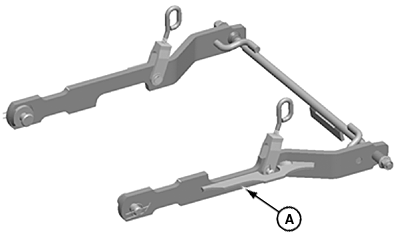
Installing Implements on Front Hitch with A-Frame
Installing Implement:
-
Loosen wing nut and remove quick-lock pin.
-
Remove retainer rod with wing nut and retainer plate from A-frame.
-
Check to be sure that the implement hydraulic hoses are out of the way if applicable.
-
Drive tractor forward slowly and align A-frame with mount on implement.
-
Raise hitch to install A-frame on mount.
-
Install retainer rod with wing nut and retainer plate through mount and A-frame. Position wing nut as needed to install quick-lock pin in retainer rod.
-
Tighten wing nut to secure implement to A-Frame.
Removing Implement:
-
Loosen wing nut and remove quick-lock pin.
-
Remove retainer rod with wing nut and retainer plate from A-frame.
-
Disconnect and secure hydraulic hoses if applicable.
-
Lower the hitch to disengage A-frame from implement.
-
Back tractor away from implement slowly to remove A-frame from implement.
-
Install retainer rod with wing nut and retainer plate through mount and A-frame. Install quick-lock pin in retainer rod for future use.
Installing and Using Front Hitch with AutoConnect Mid-Mower
- When using the front hitch only, it is not necessary to remove any of the AutoConnect parts.
- When using the front hitch with the optional push brace kit installed, it is not necessary to remove any of the AutoConnect parts or hitch parts.
-
LV17966-UN-04JUN13A - Mower Deck Lift Assembly
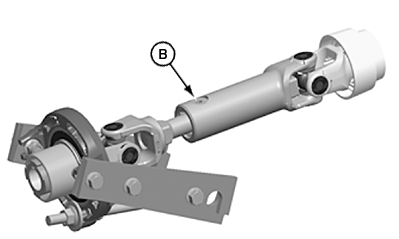
LV17967-UN-04JUN13B - AutoConnect Drive Shaft
When using the front hitch with a mid driven front PTO kit, the mower deck lift kit and AutoConnect drive shaft must be removed, if installed. -
To remove mower deck lift kit and AutoConnect drive shaft
-
Disconnect the AutoConnect drive shaft (A) from tractor.
LV18140-UN-17JUN13 - Remove retaining clips and pins (B) from left and right side of mower deck lift arms.
- Remove retaining clips and pins (C) from left and right side of mower deck lift arms
- Rotate P-hooks (D) and remove from lift brackets from left and right side.
-
Installing mid mount mower with front hitch:
-
Make sure lift frame is in the transport / highest position.
-
Install mower deck.
Removing and Storing Front 3-Point Hitch
The front hitch can be left on tractor when not in use.
The lift frame with hydraulic cylinder and center link can be removed easily, if desired, when hitch is not in use.
LV17900-UN-29MAY13
A - Front Hitch Lift Frame
B - Cylinder Assembly
Remove the front hitch lift frame (A) and cylinder assembly (B):-
Disconnect hydraulic hoses from mid SCV couplers.
-
Remove the top retaining clip of the upper cylinder mount.
-
Pull cylinder off the upper cylinder mount, replace retaining clip for future use.
-
Remove the lift frame retaining clip from lift frame pivot.
-
Remove the lift frame pivot, then remove the lift frame, cylinder and hydraulic hose assembly.
|
UP00731,0000018-19-20130619 |