Using 3-Point Hitch
NOTE: The 3-point hitch on your machine is classified as a category I hitch.
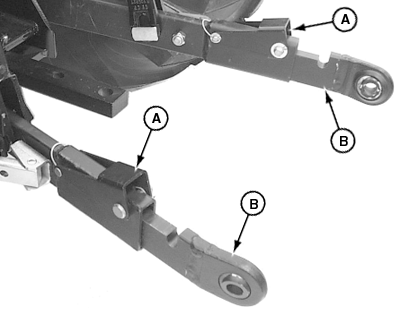
Center Link Storage Position
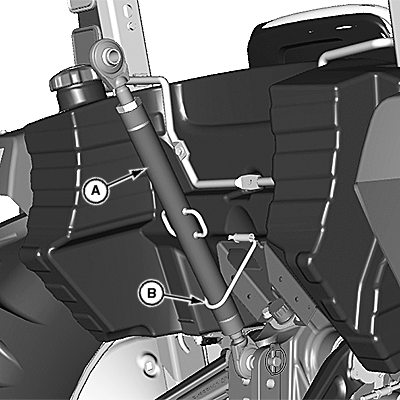
LV17918-UN-30MAY13
A - Center Link
B - Storage Hook
Place center link (A) in storage hook (B) when hitch is not in use.
Positioning Center Link
-
LV16754-UN-05MAR13A - Center Link
B - Bottom Hole
C - Middle Hole
D - Top Hole
For light and medium draft loads: Install center link (A) in bottom hole (B) of mounting bracket. Example of a light or medium draft load implement is a landscape rake. A category I implement tilts forward while rising in this position.
- For medium and heavy draft loads: Install center link in middle hole (C) of mounting bracket. Example of a medium or heavy draft load implement is a tiller or box blade. A category I implement tilts forward slightly while rising in this position.
- For very heavy draft loads: Install center link in top hole (D) of mounting bracket. Example of a very heavy draft load implement is a plow or ripper. A category I implement rises, but angle remains constant.
Using Rockshaft Control Lever

LV17864-UN-23MAY13
Open Operator Station

LV17865-UN-23MAY13
Cab
A - Rockshaft Control Lever
B - Rockshaft Depth Stop
C - Rockshaft Position Identifiers
Use rockshaft control lever (A) to raise and lower equipment attached to 3-point hitch.
The six rockshaft position identifiers (C) do not signify specific operating depths. When rockshaft control lever is moved forward, draft arms lower closer to the ground.
Lower Implement: Push rockshaft control lever forward.
Raise Implement: Pull rockshaft control lever rearward.
The rockshaft depth stop (B) can be adjusted to maintain a particular implement operating depth. To use the depth stop knob:
-
Operate implement for a few minutes to determine the desired operating depth.
-
Loosen the depth stop knob.
-
Move knob against rockshaft control lever.
-
Tighten knob to keep the depth stop in position. Implement will operate in same position each time rockshaft control lever is pushed against the depth stop.
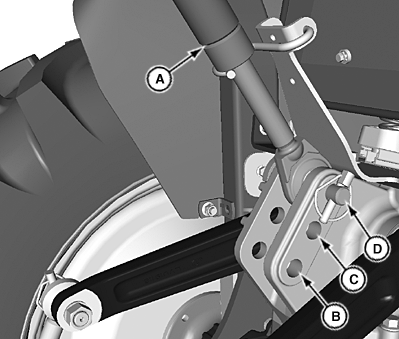
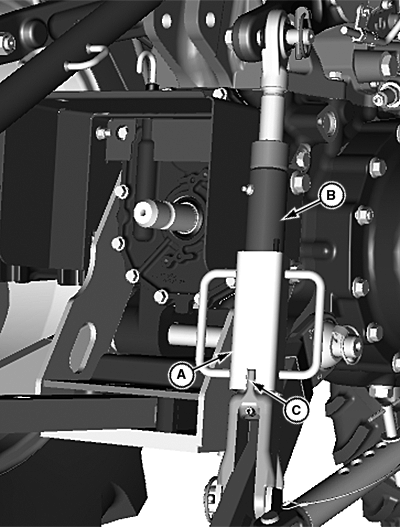
Using Rate-of-Drop/Lock Valve
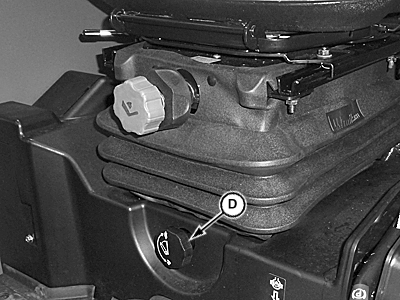
LV19326-UN-08OCT13
D - Rate-of-Drop/Lock Valve
 CAUTION: Avoid injury! Excessive rate-of-drop may cause injury
or damage. Fully lowering implement takes at least 2 seconds.
CAUTION: Avoid injury! Excessive rate-of-drop may cause injury
or damage. Fully lowering implement takes at least 2 seconds.
The rate-of-drop/lock valve (D) controls the rate of rockshaft drop when rockshaft control lever is operated. This valve provides direct rate-of-drop control for 3-point hitch mounted implements. The valve can be used to hydraulically lock rockshaft from lowering (3-point hitch) in a desired position. The tractor can be operated with rate-of-drop/lock valve closed. The rockshaft can be raised with the rate-of-drop valve closed.
Increase Rate-of-Drop: Rotate rate-of-drop/lock valve (D) counterclockwise to make drop faster.
Decrease Rate-of-Drop: Rotate rate-of-drop/lock valve (D) clockwise to make drop slower.
CAUTION: Avoid injury! Do not use the rate-of-drop/lock valve
for holding an attachment in raised position for service work. Loss
of hydraulic pressure could result in sudden drop of attachment. Lower
attachment onto blocks or remove from machine before servicing.
Lock 3-Point Hitch: Rotate rate-of-drop/lock valve (D) clockwise until tight.
Unlock 3-Point Hitch: Rotate rate-of-drop/lock valve (D) counterclockwise.
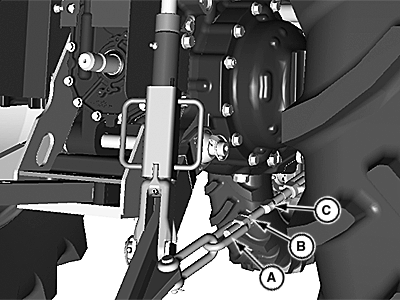
Using the Draft Links
-
CAUTION: Avoid injury! Look down and behind before and while
backing. Clear area of all bystanders before backing machine.
Slowly back machine into position to align draft links with implement lift brackets.
-
Park machine safely. (See Parking Safely in the Safety section.)
-
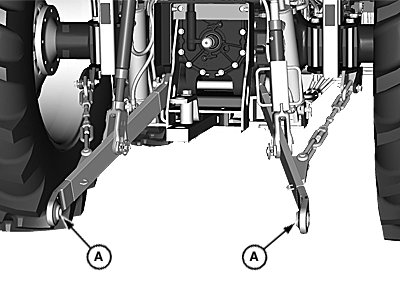
LV19327-UN-08OCT13A - Draft Links
Connect draft links (A) to the implement. -
Secure implement with lynch pins.
Telescoping Draft Link (Optional)
LV18421-UN-19JUL13
A - Locking Lever
B - Link
CAUTION: Avoid injury! Fingers and hands can be pinched or crushed.
Be aware of potential pinch points and keep hands away.
IMPORTANT: Avoid damage! Telescoping draft link locking levers must be in locked position before operating the machine or link damage could occur.
NOTE: Machines equipped with optional telescoping draft links can be connected two different ways.
Option 1
-
Slowly back machine into position to align draft links with implement lift brackets.
-
Park machine safely. (See Parking Safely in the SAFETY section.)
-
Raise locking lever (A) and pull link (B) to extend as needed.
-
Connect draft links to the implement.
Option 2
-
Sit on operator’s seat and start engine.
-
Back machine until each lock lever snaps and secures each draft link in the locked position.
Leveling Implement Front-to-Rear
-
Park machine safely. (See Parking Safely in the Safety section.)
-
NOTE: When the 3-point hitch is not being used, return center link to storage hook (A).

LV17876-UN-23MAY13A - Storage Hook
B - Lock Nut
C - Center Link Body
Lower implement to ground to relieve pressure on center link. -
Loosen lock nut (B).
-
IMPORTANT: Avoid damage! Do not turn center link body past the stops, or threads may be damaged.
Rotate center link body (C) to lengthen or shorten the center link until implement is level from front to rear.
-
Tighten lock nut (B).
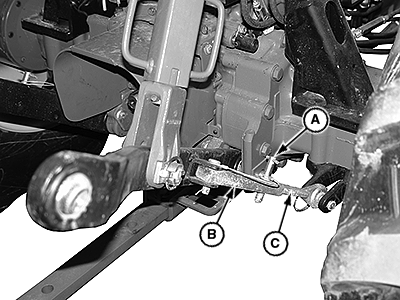
Leveling Implement Side-to-Side
Use turnbuckle collar (A) on the right adjustable lift link (B) to level a 3-point hitch implement side-to-side.
-
LV17873-UN-23MAY13A - Turnbuckle Collar
B - Lift Link
C - Turnbuckle Collar Lock
Park machine safely. (See Parking Safely in the Safety section.) -
Lower any rear-mounted implement to the ground.
-
Slide up and rotate turnbuckle collar (A) to raise or lower draft link until 3-point hitch mounted implement is level from side to side.
-
Slide down and line up the slot in turnbuckle collar (A) with turnbuckle collar lock (C) to secure position.
Adjusting Implement Side-to-Side Sway Chains
LV17877-UN-23MAY13
A - Sway Link
B - Lock Nut
C - Sway Link Adjusting Rod
NOTE: Check implement operator’s manual procedure for adjusting sway links. When sway links have been properly adjusted, side sway of implement is controlled by position of links. A small amount of sway, 13—25 mm (1/2—1 in.), is needed for many implements.
Use left and right sway links (A) to adjust 3-point hitch implement side-to-side sway.
-
Park machine safely. (See Parking Safely in the Safety section.)
-
Lower any rear-mounted implement to the ground.
-
Loosen lock nut (B).
-
Rotate sway link adjusting rod (C) to adjust 3-point hitch implement side-to-side sway.
-
Tighten lock nut (B).
Adjusting Implement Side-to-Side Sway Bars
LV17577-UN-29APR13
A - Locking Pin
B - Sway Link Adjusting Shaft
C - Sway Link
NOTE: Check implement operator’s manual procedure for adjusting sway links. When sway links have been properly adjusted, side sway of implement is controlled by position of links. A small amount of sway, 13—25 mm (1/2—1 in.), is needed for many implements.
Use left and right sway links (C) to adjust 3-point hitch implement side-to-side sway.
-
Park machine safely. (See Parking Safely in the Safety section.)
-
Lower any rear-mounted implement to the ground.
-
Remove locking pin (A).
-
Slide stabilizer sway link adjusting shaft (B) to adjust 3-point hitch implement side-to-side sway.
-
Replace locking pin (A).
Adjusting Draft Links to Float Position
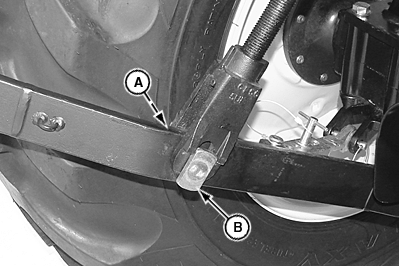
LV18422-UN-19JUL13
Float Position
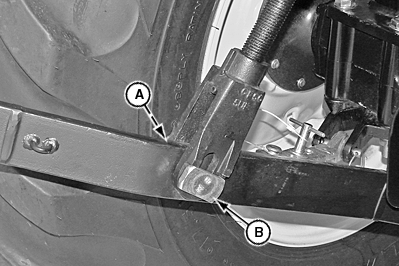
LV18423-UN-19JUL13
Rigid Position
A - Spring Locking Pin
B - Stop Pin
Adjusting 3-point hitch stops to the float position will allow both draft links to rise slightly as the implement follows ground contour.
Adjust stops to the float position for 3-point hitch implement such as cultivators or mowers. These implements have ground gauging skids or wheels, which may otherwise cause the implement to twist relative to the machine.
-
Park machine safely. (See Parking Safely in the Safety section.)
-
Remove spring locking pin (A) and rotate stop pin (B) 90 degrees to position shown.
Adjusting Draft Links to Rigid Position
Adjusting 3-point hitch stops to the rigid position will restrict movement of the draft links as the implement follows ground contour.
Adjust stops to the rigid position for 3-point hitch implements such as plows and ground engaging implements that should not twist relative to the machine.
-
Park machine safely. (See Parking Safely in the SAFETY section.)
-
Remove spring locking pin (A) and rotate stop pin (B) 90 degrees to position shown.
|
KN52281,1004A0C-19-20131031 |