Using IV and V Rear Outlet Selective Control Valve (SCV)—If Equipped
 CAUTION: Avoid injury! Escaping fluid under high pressure can
penetrate the skin and cause serious injury. Avoid the hazard by relieving
pressure before connecting hydraulic or other lines. Tighten all connections
before applying pressure.
CAUTION: Avoid injury! Escaping fluid under high pressure can
penetrate the skin and cause serious injury. Avoid the hazard by relieving
pressure before connecting hydraulic or other lines. Tighten all connections
before applying pressure.
• Search for leaks with a piece of cardboard. Protect hands and body from high-pressure fluids.
• If an accident occurs, see a doctor immediately. Any fluid injected into the skin must be surgically removed within a few hours or gangrene may result. Doctors unfamiliar with this type of injury should reference a knowledgeable medical source. Such information is available from Deere & Company Medical Department in Moline, Illinois, U.S.A. In the United States and Canada only, this information may be obtained by calling 1-800-822-8262.
This machine model series can be equipped with an optional IV and V rear outlet selective control valve (SCV) and outlets to operate hydraulically driven implements.
The machine-mounted hydraulic outlets are female quick couplers.
NOTE: Some continuous flow attachments can elevate tractor oil temperature. Make sure to refer to the OM of the attachment and supply the device the proper flow rate. In the event that the tractor hydraulic system overheats, the valve will disengage, and the light will remain lit. Operate the tractor for 10 minutes at mid engine speed to cool it down, identify the cause of the overheating, and resume work.
LV19432-UN-22OCT13
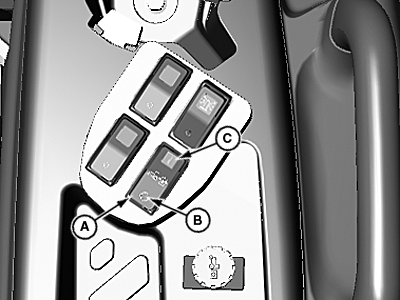
M—Series IV and V Rear Outlet Activation Switch OOS
LV19433-UN-22OCT13
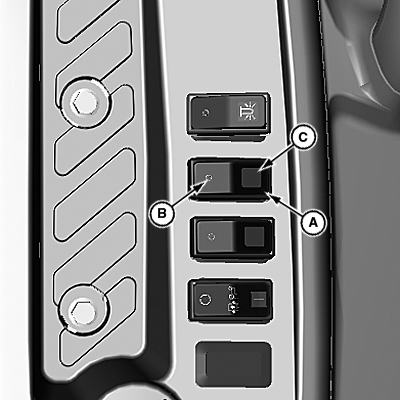
R—Series IV and V Rear Outlet Activation Switch OOS
A - Switch
B - Position
C - Position
Open Operator Station
LV18020-UN-11JUN13

LV18021-UN-11JUN13
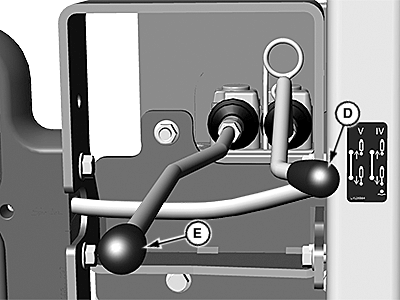
D - Control Lever
E - Control Lever
F - Right - Side Set of Outlets
G - Left - Side Set of Outlets
The IV and V rear outlet selective control valve is mechanically operated using the control levers (D and E) on the right side of the machine.
• Lever (D) controls the flow to the right side outlets (F).
• Lever (E) controls the flow to the left side outlets (G).
Float Position
Float position allows implement to move up and down freely while traveling over rough ground.
- To engage float position push control lever (D) down.
- To disengage float position manually return control lever to neutral position.
Using the Rear V Selective Control Valve Continuously
-
On selective control switch (A) press position (C) while raising the rear outlet lever (E) to the upper stop position. Switch light indicator will be on to indicate switch enabled.
-
Release the rear outlet lever.
-
To deactivate press position (B) and slowly lower rear outlet lever.
See your implement operator’s manual for implement functions which correspond to quick couplers used.
IMPORTANT: Avoid damage! To prevent contamination of female quick couplers, color-coded hose ends should be installed in the couplers when not being used.
Some continuous flow attachments can elevate tractor oil temperature. Make sure to refer to the OM of the attachment and supply the device the proper flow rate. In the event that the tractor hydraulic system overheats, the valve will disengage, and the light will remain lit. Operate the tractor for 10 minutes at mid engine speed to cool down, identify the cause of the overheating, and resume work.
Cab

LV18022-UN-11JUN13

LV18023-UN-11JUN13
A - Switch
B - Position
C - Position
D - Control Lever
E - Control Lever
F - Lower Outlets
G - Upper Outlets
The IV and V rear outlet selective control valve is mechanically operated using the control levers (D and E) on the right side of the machine.
• Lever (D) controls the flow to the right side outlets (F).
- Full-down for lever (D) is a dented position used for "float" operations.
• Lever (E) controls the flow to the left side outlets (G).
IMPORTANT: Avoid damage! To prevent contamination of female quick couplers, color-coded hose ends should be installed in the couplers when not being used.
Using the Rear Selective Control Valve Continuously
-
On selective control switch (A) press position (C) while pulling the rear outlet lever (E) rearward to the rear stop position. Switch light indicator will be on to indicate switch enabled.
-
Release the rear outlet lever.
-
To deactivate press position (B) and slowly lower rear outlet lever.
|
KN52281,1004A84-19-20131114 |