Remove and Install Oil Suction Screen
-
Park the machine safely. (See Parking Safely in Safety Section.)
-
Remove backhoe, if installed.
-
 CAUTION: Avoid injury! The machine can fall or slip from an
unsafe lifting device or supports.
CAUTION: Avoid injury! The machine can fall or slip from an
unsafe lifting device or supports.- Use a safe lifting device rated for the load to be lifted.
-
Lower machine onto jack stands or other stable supports and
block wheels before servicing.
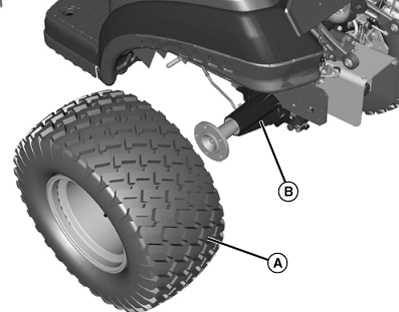
LVAL38341-UN-21AUG12A - Left Rear Wheel
B - Jack stand Location
Raise rear of machine, and remove left rear wheel (A).
-
Lower machine onto jack stand under left side of transmission (B).
-
Place a drain pan under left side of transmission. Drain transmission.
-
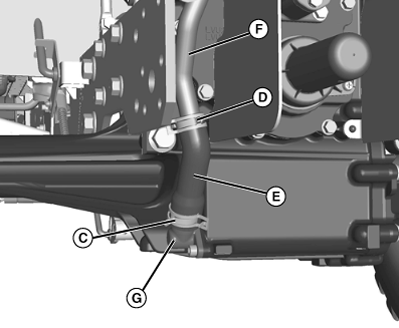
LVAL38342-UN-21AUG12C - Hose Clamp
D - Hose Clamp
E - Hose
F - Suction Pipe
G - Lower Manifold
Raise bottom hose clamp (C), and lower top hose clamp (D) onto hose (E). -
Remove hose (E) from suction pipe (F) and lower manifold (G).
-

LVAL38343-UN-21AUG12G - Bolt
H - Lower Manifold
I - Suction Screen
Remove bolt (H). securing lower manifold to transmission case. -
NOTE: If suction screen does not come out with the lower manifold, reach in and remove screen from transmission. Be certain all O-Rings remain on assemblies.
Remove lower manifold (G) and suction screen (I).
-
NOTE: Depending upon your machine, you may have one, two, or four magnets in screen.
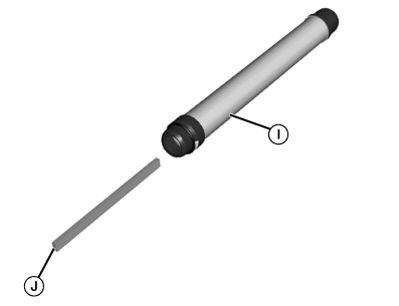
LVAL38344-UN-21AUG12I - Suction Screen
J - Magnets
Clean the suction screen (I). Remove the magnet(s) (J) from the screen. Clean magnet(s) and install into screen. -
LVAL38345-UN-21AUG12G - Lower Manifold
I - Suction Screen
Lubricate and install suction screen (I) to lower manifold (G). Make sure screen is fitted straight into elbow to aide proper alignment to transmission opposite side cover. -
IMPORTANT: Avoid damage! Make sure that the free end of the suction screen is aligned and fitted to the socket in the transmission right side cover during assembly. Improper installation could result in crushing of the suction screen and subsequent hydraulic pump failure.
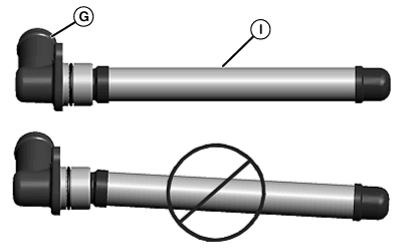
NOTE: Suction screen must remain perpendicular to lower manifold as shown below for it to align properly into flange area (K) on opposite side of transmission.
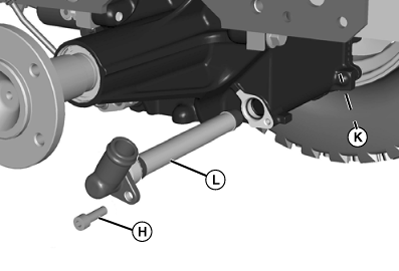
LVAL38346-UN-21AUG12H - Bolt
K - Flange Area
L - Screen Assembly
Install suction screen assembly (L) into transmission. Make sure end of screen fits into socket inside transmission right side cover. -
Install bolt (H). Tighten bolt to 28 N•m (248 lb-in.).
-
NOTE: If upper suction pipe (F) was removed from hydraulic pump, replace O-ring (M) before installing pipe. Tighten bolts (N) to 11 N·m (97 lb-in.).
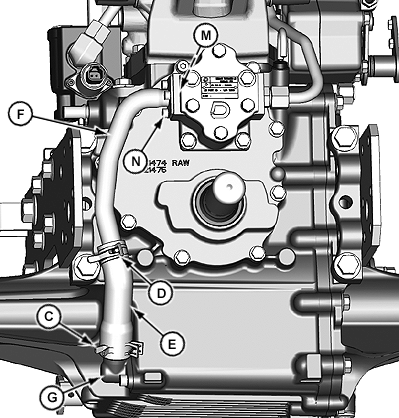
LVAL38752-UN-05OCT12C - Lower Clamp
D - Upper Clamp
E - Hose
F - Suction Pipe
G - Lower Manifold
M - O-Ring
N - Bolt
Install hose (E) onto suction pipe (F) and lower manifold (G). Secure upper with upper clamp (D) and lower clamp (C). -
Install left wheel onto machine. Tighten wheel bolts to 120 N•m (89 lb-ft).
-
Raise machine and remove jack stand. Lower machine.
-
Fill transmission with oil, Check for proper oil level.
|
KN52281,1003F27-19-20121005 |