Battery Removal and Installation
Battery Removal—Open Operator Station
-

LV17941-UN-04JUN13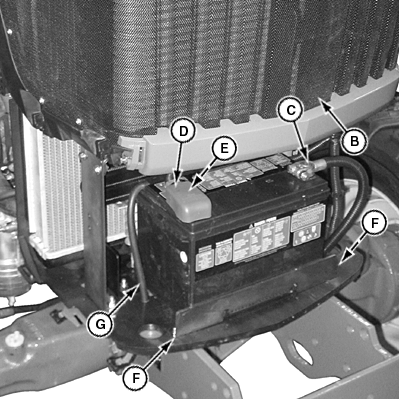
LV17950-UN-04JUN13A - Grille Latch (4 used)
B - Grille
C - Black Negative Cable
D - Red Positive Terminal Cover
E - Red Positive Cable
F - Cap Screw (2 used)
G - Vent Tube
Park machine safely. (See Parking Safely in the Safety section.) -
Raise hood. (See Raising and Lowering Hood in the Service Miscellaneous section.)
-
Remove side panels. (See Removing and Installing Side Panels in the Service Miscellaneous section.)
-
Release grille latches (A) and unhook from grille frame.
-
Disconnect headlight wiring harness.
-
Raise grille (B), rotate rearward, and lower slightly into slide track detents.
-
Disconnect black negative (—) cable (C) from battery terminal first.
-
Slide red positive terminal cover (D) back and disconnect red positive (+) cable (E) from battery terminal.
-
Remove cap screw (F) from each side of the battery hold-down bracket.
-
Pull battery vent tube (G) from battery tray.
-
Remove battery.
Battery Installation—Open Operator Station
-
Position battery in machine.
-
Route battery vent tube (G) through hole in battery tray.
-
Install hold-down bracket and install cap screws (F) securing battery to battery tray.
-
Connect red positive (+) cable (E) to battery first, then attach black negative (—) cable (C) to battery.
-
Apply spray lubricant on battery terminals to help prevent corrosion.
-
Position red positive terminal cover (D) on red positive (+) cable.
-
Lower grille (B) and attach grille latches (A).
-
Connect headlight wiring harness.
-
Install side panels. (See Removing and Installing Side Panels in the Service Miscellaneous section.)
-
Lower hood. (See Raising and Lowering Hood in the Service Miscellaneous section.)
Battery Removal—Cab
LV18513-UN-31JUL13
LV18514-UN-31JUL13
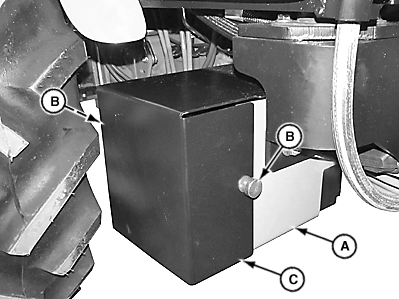
A - Battery Box
B - Thumb Screws
C - Battery Box Cover
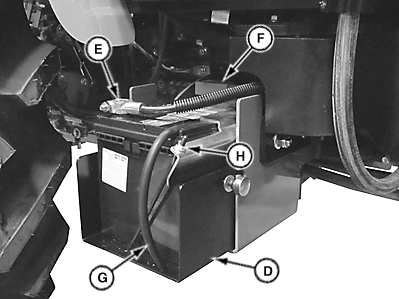
D - Battery Tray
E - Negative (—) Battery Cable
F - Red Cover
G - Vent Tube
H - Hold-Down Nut
-
Park machine safely. (See Parking Safely in the Safety Section.)
-
Locate battery box (A) on the right side of tractor.
-
Loosen thumb screws (B) on both sides of the battery box.
-
Slide battery box cover (C) off.
-
Slightly lift battery tray (D) and pull out.
-
Disconnect negative (—) battery cable (E).
-
Push red cover (F) back away from positive (+) battery cable and remove cable from battery.
-
Lift vent tube (G) from vent tube hole.
-
Remove battery hold-down nut (H) and remove battery hold-down rod.
-
Remove battery.
Battery Installation—Cab
-
Position battery in battery tray.
-
Apply spray lubricant to terminals to prevent corrosion.
-
Connect positive (+) cable to battery positive (+) terminal first, then negative (—) cable to battery negative (—) terminal.
-
Slide red cover over positive battery cable.
-
Support battery tray and slide back into position slightly lifting.
-
Install battery hold-down nut and battery hold-down rod.
-
Slide vent tube into vent tube hole.
-
Slide battery cover on and tighten thumb screws.
|
KN52281,1004BE7-19-20140207 |