Check PTO Driveshaft Length
Avoid Damage! The PTO driveshaft is a standard length. Certain driveshaft applications cause contact with transmission. Shorten driveshaft length to avoid contact.
Checking PTO Driveshaft
-
Check PTO driveshaft movement before operating implement.
Park machine safely.
-
Install driveshaft on implement.
-
Attach implement to tractor. Do not install the driveshaft on tractor.
-
Check the fully shortened position of the driveshaft.
-
Push the driveshaft in to its shortest length by hand.
-

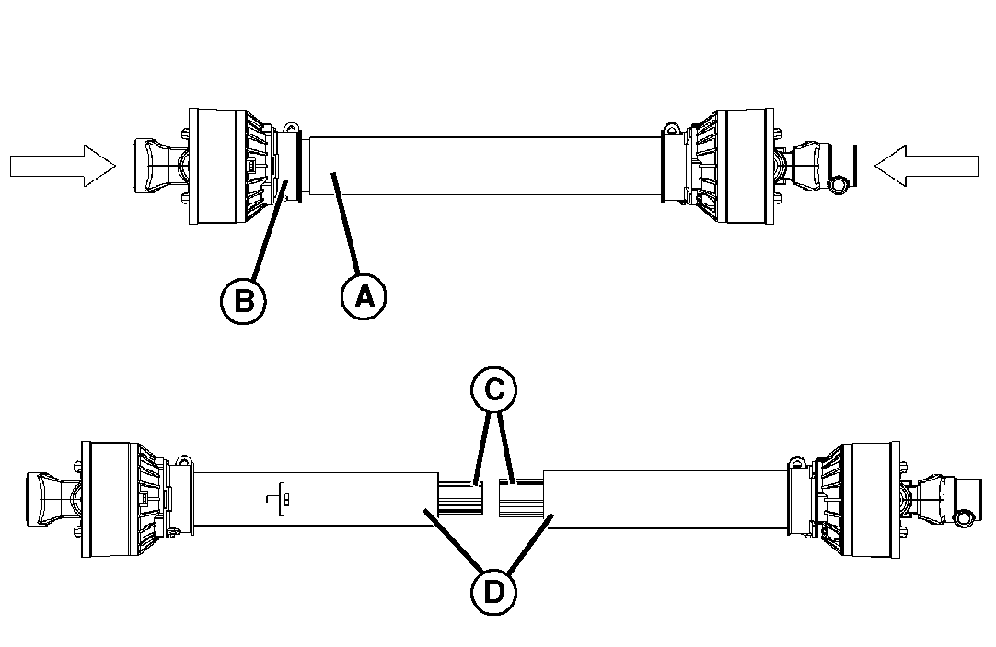
LVAL38278-UN-21AUG12A - Outer Tube Shield
B - Shield Bell
C - Ends of the Driveshaft
D - Ends of the Shield Tubes
Check the area where the outer tube shield (A) meets the shield bell (B). -
If the outer tube shield does not touch the shield bell, make a mark on the inner tube where the outer tube shield ends.
-
-
Install driveshaft on tractor and adjust the center link to level the implement for operating while in lowered position. (See Operating 3-Point Hitch.)
-
Have an observer stand a safe distance from the implement to tell you when the driveshaft is fully shortened.
-
Set the tractor at low idle and raise the implement. Stop raising the implement when the outer tube shield reaches the mark on the inner tube, or the outer tube shield touches the shield bell.
- If the implement is fully raised and the driveshaft does not reach the fully shortened position, with either the outer tube shield at the mark or touching the bell shield, the driveshaft is ready for operation.
- If the driveshaft reaches the fully shortened position before the implement is fully raised, the driveshaft requires shortening.
Shortening the PTO Driveshaft
-
 Avoid Injury! Check to make sure that driveshaft is
covered before operating.
Avoid Injury! Check to make sure that driveshaft is
covered before operating.Remove 25 mm (1 in) from the ends of the driveshaft (C) and the ends of the shield tubes (D). Or, see your John Deere dealer for assistance.
-
Check driveshaft length again and shorten further if needed.
|
KN52281,1003EC2-19-20190114 |