Service the Alternator Belt
 Avoid injury! Rotating parts can catch fingers, loose
clothing, or long hair. Wait for engine and all moving parts to stop
before leaving operator station to adjust or service machine.
This procedure requires a John Deere belt tension gauge, or equivalent.
Checking Belt Tension
-
Park machine safely. (See Parking Safely in Safety Section.) Allow engine to cool.
-
Raise hood.
-
Remove left side panel.
-

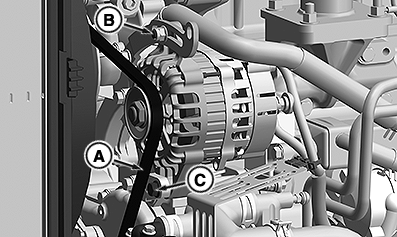
LV28537-UN-19MAY17A - Thumb Position
B - Adjusting Bolt
C - Pivot Bolt
Check tension by using the belt tension gauge to apply pressure to the belt midway between pulleys at location (A). Belt should deflect 9 mm (3/8 in) at 75 lb (334 N). -
Adjust belt tension if not within specifications.
Belt Tension Force 75 LB (or 334 N) Belt Deflection Inward Pressure 9 mm (3/8 in.)
Adjusting Belt Tension
-
Loosen adjusting bolt (B) and pivot bolt (C).
-
Apply outward pressure to alternator housing until tension is correct.
-
Tighten bolts (B) and (C).
-
Check belt tension.
-
Install left side panel.
-
Lower hood.
Replacing Belt
Replace alternator belt if excessive wear, damage, or stretching is detected.
-
Park machine safely. (See Parking Safely in Safety Section.) Allow engine to cool.
-
Raise hood.
-
Remove left side panel.
-
Loosen adjusting bolt (B) and pivot bolt (C).
-
Apply inward pressure to alternator housing.
-
Remove belt from alternator pulley, fan pulley, and crankshaft pulley.
-
Route belt over fan and remove.
-
Install new belt over fan and onto pulleys.
-
Apply outward pressure to alternator housing until tension is correct.
-
Tighten bolts (B) and (C).
-
Check belt tension. Adjust as necessary.
-
Install left side panel.
-
Lower hood.
|
DB71512,0000254-19-20171221 |