Installing Rockshaft Attachment (RSA) Mounting Plate (4500-4700 Tractors)Preparing Tractor for RSA Mounting Plate Kit InstallationNOTE: Retain all cap screws, washers, and other hardware removed from the tractor during this procedure. Hardware that is not re-used during installation of the RSA mounting plate kit must be reinstalled if the kit is ever removed from the tractor. 1. Raise rear of tractor and support rear axles with jack stands.NOTE: Removing rear tires is not required, but makes installation and tightening of hardware easier. 2. Remove rear tires. |
OUO1085,00002D0 -19-21NOV00-1/21 |
|
NOTE: For tractors without mid-mount lift assemblies, skip this step. Go to step 4. 3. For tractors equipped with mid-mount lift assemblies:
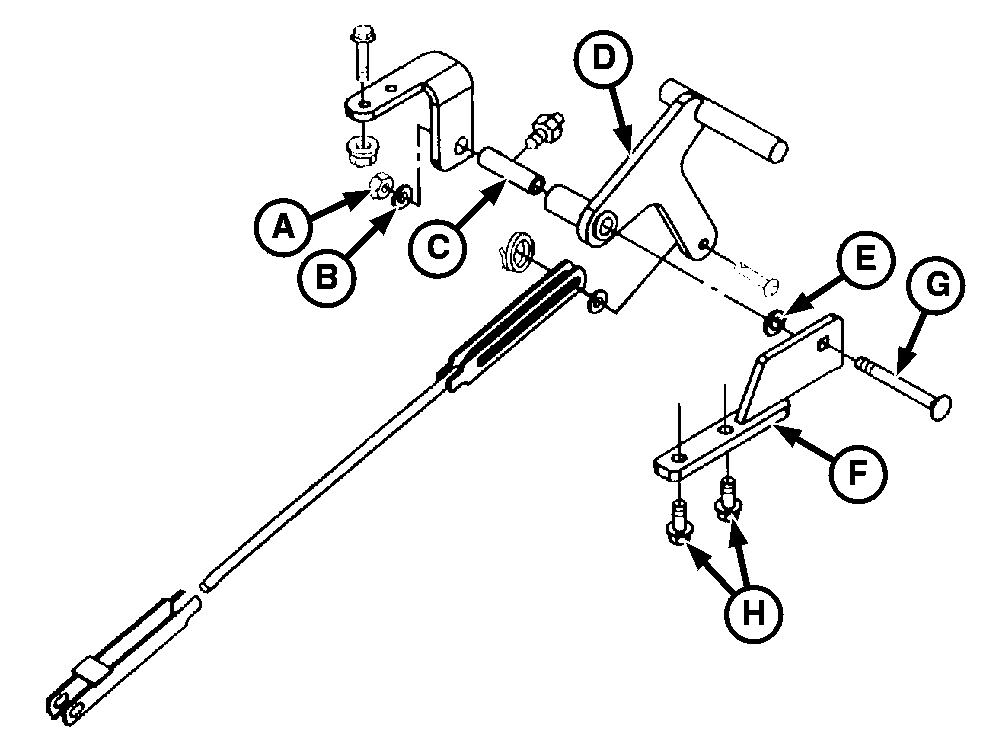
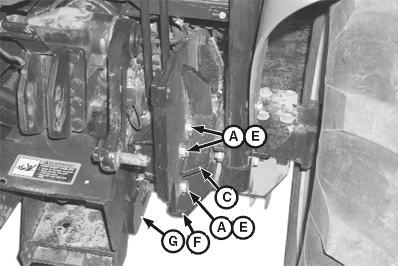
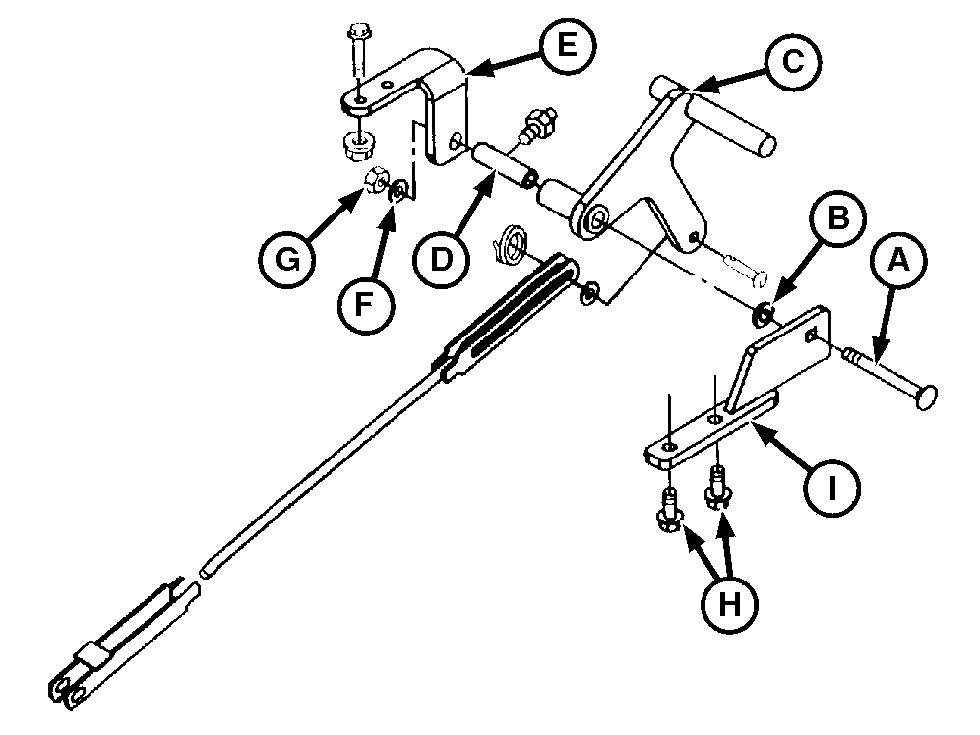
a. On each side of tractor, remove and retain nut (A) and washer (B). b. On the right side of the tractor only, loosen the ROPS mounting bolt (I) and move the spring bracket (J) out of the way. c. On each side of the tractor, remove and retain carriage bolt (D), spacer (C), and washer (E). Remove and retain M16x40 cap screws (H). Remove and retain pivot plate (F).
|
|
 CAUTION:
PREVENT POSSIBLE INJURY AND/OR MACHINE DAMAGE. SUPPORT THE MID-MOUNT MOWER DECK, IF INSTALLED, BEFORE REMOVING THE PIVOT PLATES.
CAUTION:
PREVENT POSSIBLE INJURY AND/OR MACHINE DAMAGE. SUPPORT THE MID-MOUNT MOWER DECK, IF INSTALLED, BEFORE REMOVING THE PIVOT PLATES.

OUO1085,00002D0 -19-21NOV00-2/21 |
|
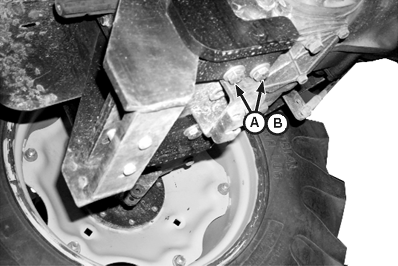
4.
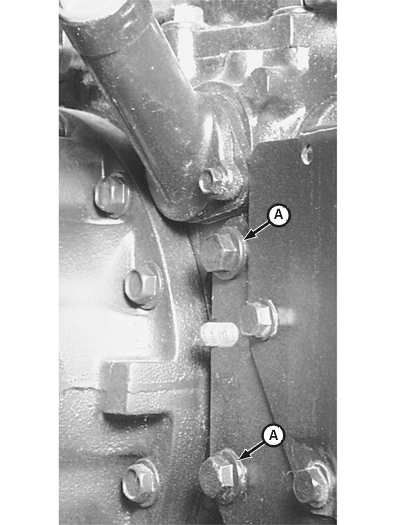
On each side of the tractor, remove the two M12 cap screws with washers (A), which secure the drawbar hitch support to the transaxle.
|
|
OUO1085,00002D0 -19-21NOV00-3/21 |
|
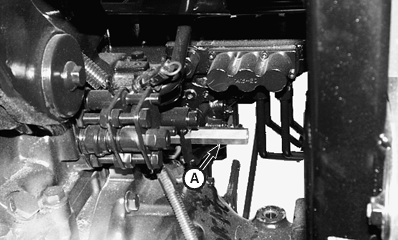
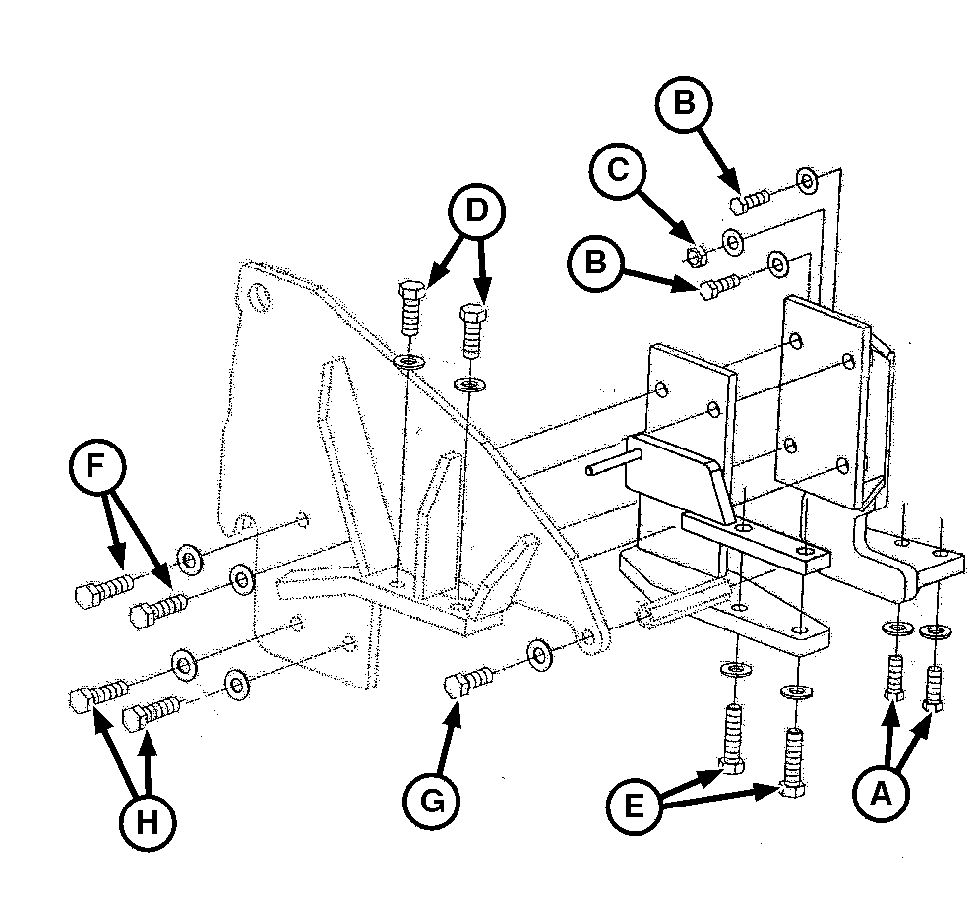
Installing the Hook Weldments, Mount Block Weldments, and Other Installation Hardware
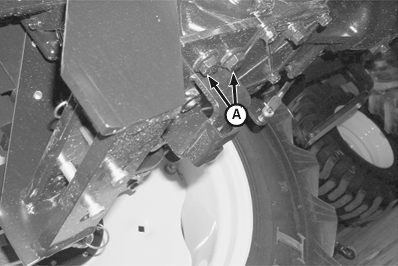
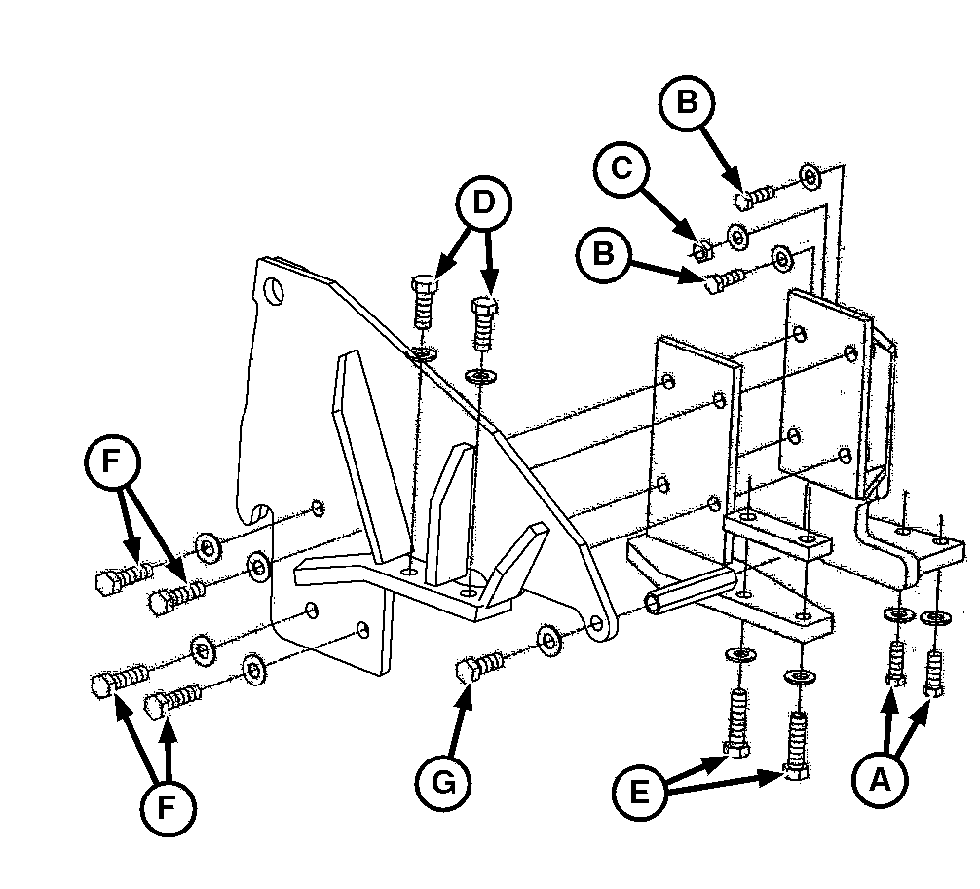
NOTE: Do not tighten cap screws or other mounting hardware unless instructed to do so. RSA mounting plates are installed onto hook weldments and mount block weldments. Aligning holes will be easier if hardware is left loose. Hardware will be tightened to final specification after RSA mounting plates have been installed. (See Final Installation in this section.) NOTE: Complete steps 1-4 for one side of the tractor, then repeat for the other side. 1. Remove the two M14 cap screws with lock washers (A) from under the drawbar hitch support. |
|
OUO1085,00002D0 -19-21NOV00-4/21 |
|
2.
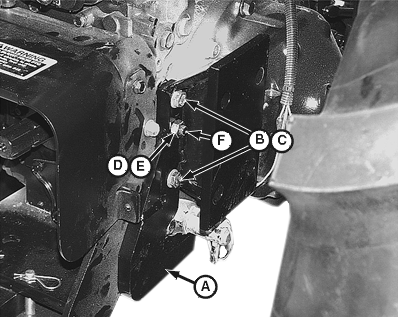
Install hook weldment and two M12x55 cap screws (C) with hardened washers (B) on the drawbar hitch support. Do not tighten hardware.
3. Install M12 hex nut (E) and hardened washer (D) on stud of transmission (F). Do not tighten hardware.
|
|
OUO1085,00002D0 -19-21NOV00-5/21 |
|
4.
Install two M14x45 cap screws (B) with hardened washers (A) thorugh the underside of the hook weldment, into the underside of the drawbar hitch support.
NOTE: Tighten these cap screws only enough to prevent hitch movement during the rest of the installation process. They will be tightened further after the RSA mounting plate is installed. (See Final Installation in this section.) Tighten the M14x45 cap screws (B) to temporary specification. Specification
5. Repeat steps 1-4 for the other side of the tractor. |
|
OUO1085,00002D0 -19-21NOV00-6/21 |
|
6.
On each side of tractor, install one threaded hex spacer (A). Tighten to final specification.
Specification
THE CAP SCREWS MUST TURN FREELY BY HAND. THIS WILL REDUCE THE POSSIBILITY OF COMPONENTS LOOSENING DUE TO INADEQUATE CLAMPING FORCES. 7. On each side of the machine, use a M16x2 tap to clean paint and debris from the two M16-tapped holes in the underside of the rear axle housing before installing the mount block weldments. |
|
OUO1085,00002D0 -19-21NOV00-7/21 |
|
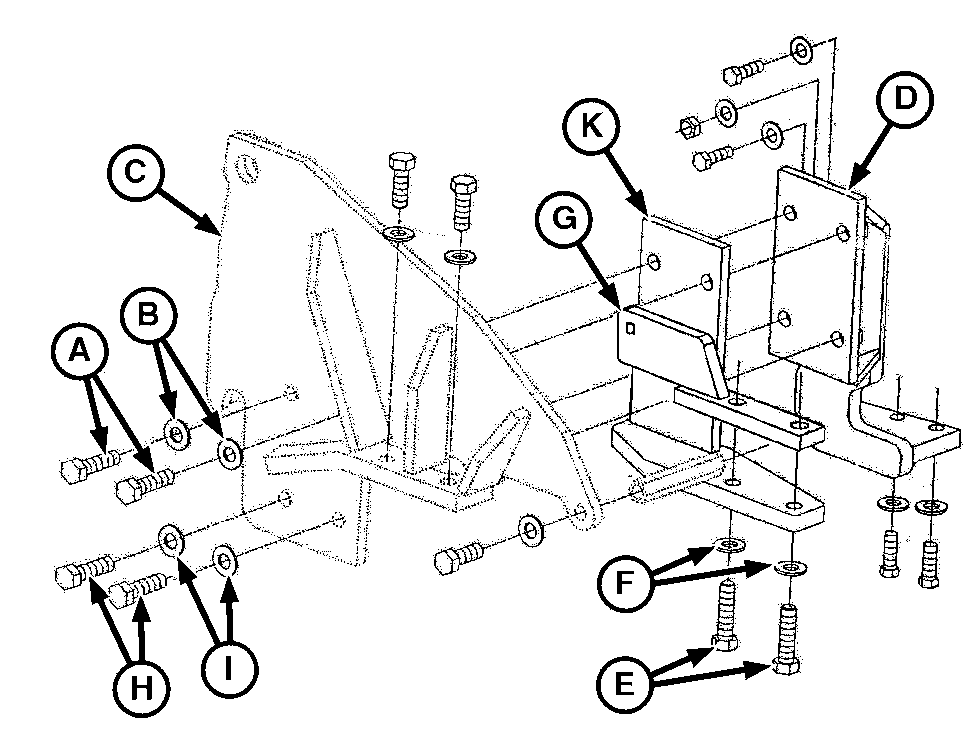
NOTE: For tractors with mid-mount lift assemblies, skip this step. Go to step 9. 8. For tractors without mid-mount lift assemblies: On each side of machine, install mount block weldment (A) onto the underside of the rear axle housing, using M16x60 cap screws (C), hardened washers (B), and spacer (D). Tighten cap screws to temporary specification. Specification
|
|

OUO1085,00002D0 -19-21NOV00-8/21 |
|
NOTE: For tractors without mid-mount lift assemblies, skip this step. Go to Final Installation in this section. 9. For tractors with mid-mount lift assemblies: On each side of machine, install mount block weldment (A) onto the underside of the rear axle housing, using M16x60 cap screws (D), hardened washers (C), and pivot plate (B). Tighten to temporary specification. Specification
NOTE: The left-side RSA mounting plate has a large hole, to permit access to the transaxle oil filler tube. Be sure to install the correct RSA mounting plate on each side of the tractor.
THE CAP SCREWS MUST TURN FREELY BY HAND. THIS WILL REDUCE THE POSSIBILITY OF COMPONENTS LOOSENING DUE TO INADEQUATE CLAMPING FORCES. 1. On each side of the machine, use a M16x2 tap to clean paint and debris from the two M16-tapped holes in the top of the rear axle housing before installing the RSA mounting plates. |
|

OUO1085,00002D0 -19-21NOV00-9/21 |
|
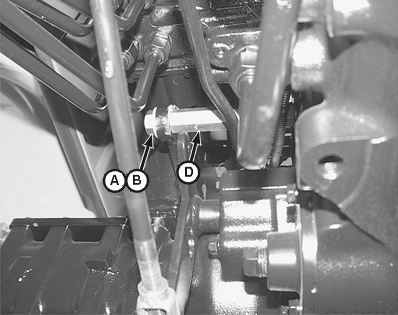
NOTE: Complete steps 2-6 for one side of the tractor, then repeat for the other side. 2. Insert the RSA mounting plate from the rear of the tractor. Avoid pinching any electrical wires between the RSA mounting plate and the transaxle housing. 3. Install two M16x45 cap screws (B) and hardened washers (A) through the RSA mounting plate, into the holes on top of the rear axle housing. Do not tighten hardware. 4. Install one M16x45 cap screw (A) and hardened washer (B) through the RSA mounting plate, into the threaded hex spacer (D). Do not tighten hardware.
|
|
OUO1085,00002D0 -19-21NOV00-10/21 |
|
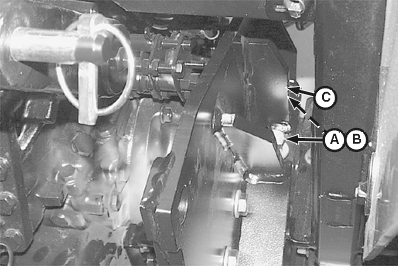
5.
Install four M16x60 cap screws (E) with hardened washers (A) through the RSA mounting plate (C) and mount block weldment (F), into the weldnuts on the hook weldment (G). Do not tighten hardware.
|
|
OUO1085,00002D0 -19-21NOV00-11/21 |
|
IMPORTANT: Avoid possible damage. Proper tightening sequence is critical in achieving maximum clamping forces. Do not overtighten hardware. Damage to the transaxle case will result. 6. Tighten all hardware to specification, in the following order: a. Tighten two M14x45 cap screws (A), attaching hook weldment to underside of rear axle housing. Specification
b. Tighten two M12x55 cap screws (B), on the drawbar hitch support. Specification
c. Tighten one M12 hex nut (C), on the stud of transmission. Specification
d. Tighten two M16x45 cap screws (D), attaching RSA mounting plate to top of rear axle housing. Specification
e. Tighten two M16x60 cap screws (E), attaching mount block weldment and spacer to underside of rear axle. |
|
OUO1085,00002D0 -19-21NOV00-12/21 |
|
Specification
|
OUO1085,00002D0 -19-21NOV00-13/21 |
|
f. Tighten four M16x60 cap screws (F), attaching RSA mounting plate and mount block weldment to hook weldment. Specification
g. Tighten one M16x45 cap screw (G), attaching RSA mounting plate to threaded hex spacer. Specification
7. Repeat steps 2-6 for other side of tractor. 8. Install fenders, if removed. 9. Adjust rear tires to wide offset position. Install rear tires. Tighten wheel bolts to specification. Specification
10. Inflate rear tires to maximum pressure recommended by the tire manufacturer. 11. Continue with Disassembling Shipping Pallet in this section. |
|
OUO1085,00002D0 -19-21NOV00-14/21 |
|
Final Installation-Tractors With Mid-Mount Lift Assemblies
NOTE: The left-side RSA mounting plate has a large hole, to permit access to the transaxle oil filler tube. Be sure to install the correct RSA mounting plate on each side of the tractor.
THE CAP SCREWS MUST TURN FREELY BY HAND. THIS WILL REDUCE THE POSSIBILITY OF COMPONENTS LOOSENING DUE TO INADEQUATE CLAMPING FORCES. 1. On each side of the machine, use a M16x2 tap to clean paint and debris from the two M16-tapped holes in the top of the rear axle housing before installing the RSA mounting plates. |
OUO1085,00002D0 -19-21NOV00-15/21 |
|
NOTE: Complete steps 2-9 for one side of the tractor, then repeat for the other side. 2. Insert the RSA mounting plate from the rear of the tractor. Avoid pinching any electrical wires between the RSA mounting plate and the transaxle housing. 3. Install two M16x45 cap screws (B) and hardened washers (A) through the RSA mounting plate, into the holes on top of the rear axle housing. Do not tighten hardware. 4. Install one M16x45 cap screw (A) and hardened washer (B) through the RSA mounting plate, into the threaded hex spacer (D). Do not tighten hardware.
|
|
OUO1085,00002D0 -19-21NOV00-16/21 |
|
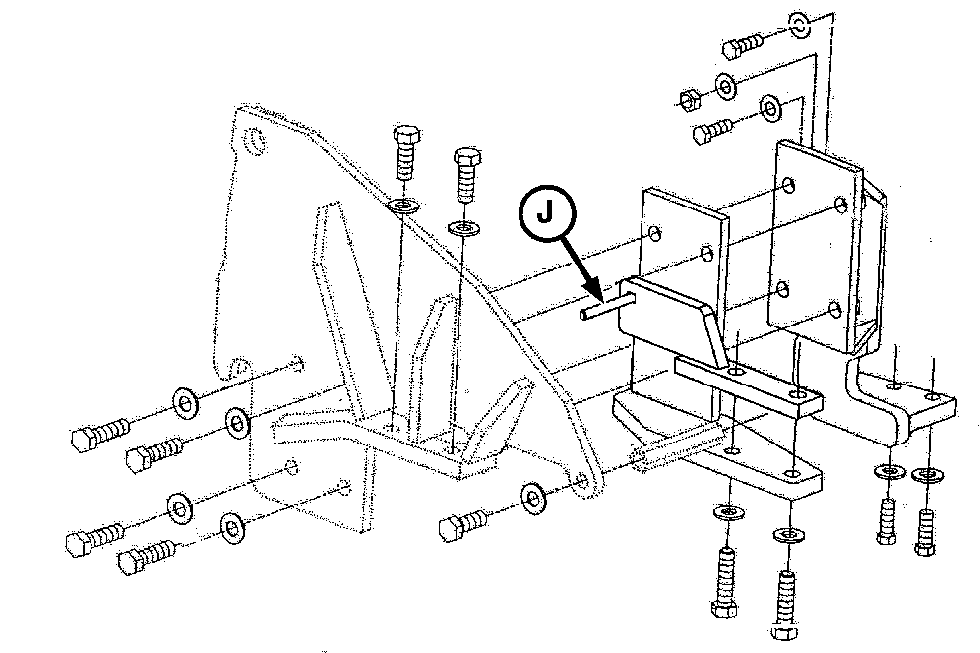
5.
Install four M16x60 cap screws (A and H) with hardened washers (B and I) through the upper pair of holes in the RSA mounting plate (C) and mount block weldment (K), into the weldnuts on the hook weldment (D). Do not tighten upper pair of M16x60 cap screws.
NOTE: Mower deck pivot plates must be removed in order to tighten lower cap screws. 6. Remove two M16x60 cap screws and hardened washers (F) from underside of left and right axles. Retain hardware for later installation. Remove and retain each mower deck pivot plate (G) using a hammer and punch. NOTE: Tighten only the lower M16x60 cap screws at this time. The upper M16x60 cap screws is tightened in a later step. 7. Tighten the lower pair of M16x60 cap screws (H), attaching RSA mounting plate and mount block weldment to hook weldment. Specification
8. Install the original M16x155 carriage bolt (J) into the square hole in the pivot plate (G). 9. Install mower deck pivot plate (G) between mount block weldment (K) and underside of rear axle. Install M16x60 cap screws (E) and hardened washers (F). DO NOT tighten hardware. |
|
OUO1085,00002D0 -19-21NOV00-17/21 |
|
IMPORTANT: Avoid possible damage. Proper tightening sequence is critical in achieving maximum clamping forces. Do not overtighten hardware. Damage to the transaxle case will result. 10. Tighten all hardware to specification, in the following order: a. Tighten two M14x45 cap screws (A), attaching hook weldment to underside of rear axle housing. Specification
b. Tighten two M12x55 cap screws (B), on the drawbar hitch support. Specification
c. Tighten one M12 hex nut (C), on the stud of transmission. Specification
d. Tighten two M16x45 cap screws (D), attaching RSA mounting plate to top of rear axle housing. Specification
e. Tighten two M16x60 cap screws (E), attaching mount block weldment and pivot plate to underside of rear axle. |
|
OUO1085,00002D0 -19-21NOV00-18/21 |
|
Specification
f. Tighten the upper pair of M16x60 cap screws (F), attaching RSA mounting plate and mount block weldment to hook weldment. Specification
|
OUO1085,00002D0 -19-21NOV00-19/21 |
|
11.
Assemble the pivot plate to lift arm with the original hardware:
a. Install one washer (B) on the M16x155 carriage bolt (A). b. Insert carriage bolt through lift arm (C) and add bushing (D). c. Insert carriage bolt through plate (E) and secure with washer (F) and M16 nut (G). 12. Repeat steps 2-9 for other side of tractor. |
|
OUO1085,00002D0 -19-21NOV00-20/21 |
|
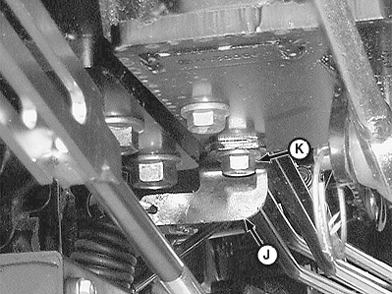
13.
On right side of tractor only, move spring bracket (J) back to its original position. Tighten ROPS bolt (K) to specification.
Specification
14. On each side of tractor, tighten one M16x45 cap screw (G), attaching RSA mounting plate to threaded hex spacer. Specification
15. Install fenders, if removed. 16. Adjust rear tires to wide offset position. Install rear tires. Tighten wheel bolts to specification. Specification
17. Inflate rear tires to maximum pressure recommended by the tire manufacturer. 18. Continue with Disassembling Shipping Pallet in this section. |
|
OUO1085,00002D0 -19-21NOV00-21/21 |