Servicing Drive Belt and Clutches
1. Park the machine safely. (See Parking Safely in SAFETY.)
Remove Seat and Seat Base
-
Tip seat forward.
-
Hold onto seat and remove all screws (A).
MXAL45736-UN-09APR13 -
Remove seat and seat bracket (B) from seat bushings (C).
-
Remove seven flange head screws (D) retaining console cover.
MXAL45737-UN-09APR13 -
Carefully pry cap (E) from shift knob.
-
Remove lock nut (F) securing shift knob to lever.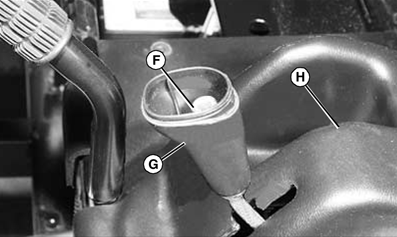
MXAL45738-UN-09APR13 -
Remove knob (G).
-
Remove console (H).
Remove Air Intake Plenum
-
Release eight rubber strap retainers (A) securing cover.
MXAL45739-UN-09APR13 -
Remove air cleaner element (B).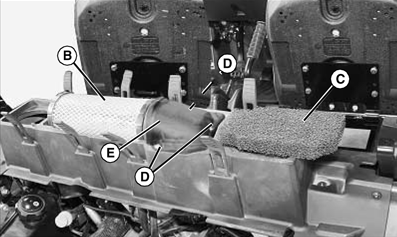
MXAL45740-UN-09APR13 -
Remove CVT cooling air screen (C).
-
Remove three screws (D) securing intake duct cover.
-
Remove cover (E).
-
Loosen hose clamp (F) securing air inlet duct. Separate duct from plenum fitting.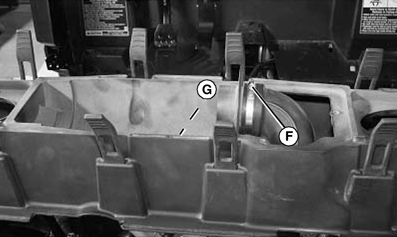
MXAL45741-UN-09APR13 -
Remove flange-head screw (G) at center of plenum.
-
Remove three flange-head screws (H) securing left and right side at back of air plenum.
MXAL45742-UN-09APR13 -
Remove five flange-head screws (I) securing left and right sides at front of air plenum.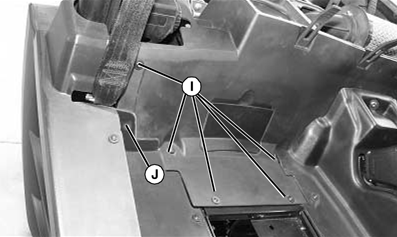
MXAL45743-UN-09APR13 -
Remove center screw (J) and expansion fastener securing filler panel to plenum.
-
Remove plenum.
Remove Center Frame
-
Remove spring locking pin (A) from transmission shift rod.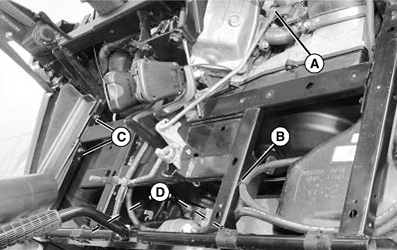
MXAL45744-UN-09APR13 -
Remove shift rod from transmission shift arm.
-
Remove fuel tank vent hose retainer (B) from center frame.
-
NOTE: Carriage bolts on driver side are retained with push nuts and should not be removed.
Remove two lock nuts (C) and carriage bolts securing passenger side seatbase center frame. Remove two locknuts only on driver side.
-
Remove two screws (D) securing center frame.
-
Separate seat belt wire harness connector (E).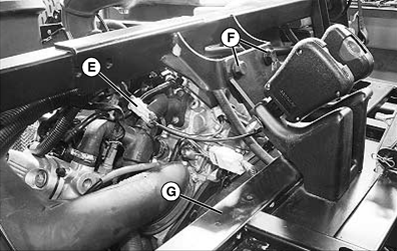
MXAL45745-UN-09APR13 -
Remove two lock nuts and hex bolts (F) securing center frame.
-
Remove center frame (G).
Remove Driveshaft and Clutch Cover
-
Remove snap ring (A) and rolled pin (B) securing drive shaft to transmission. Slide drive shaft off of splined shaft. Remove shaft from front transmission and slide forward for clearance.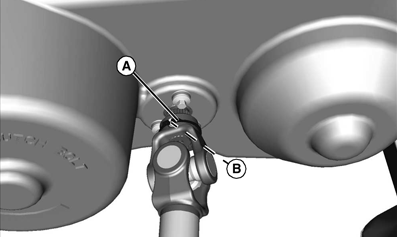
MXAL45746-UN-09APR13 -
Remove ten bolts (C) securing outer side of clutch cover transmission and three bolts (D) securing cover to output shaft bracket. Remove clutch cover.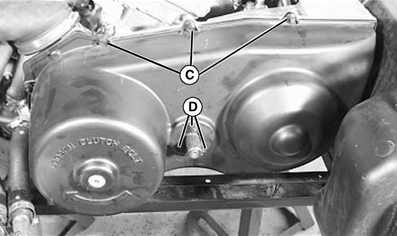
MXAL45747-UN-09APR13
Checking Clutches
-
Clean drive clutch (A) and driven clutch (B) by blowing off with compressed air.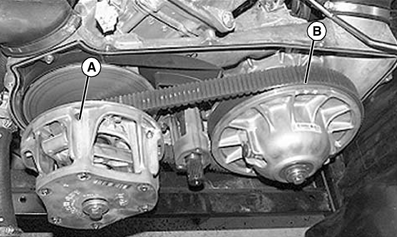
MXAL45748-UN-09APR13 -
Check the clutches for wear and cracking.
-
Contact your John Deere dealer for replacement.
Checking Drive Belt
-
Rotate and inspect drive belt (A) for wear or damage.
MXAL45749-UN-09APR13 -
Replace belt if needed.
Replacing Drive Belt

MXAL45750-UN-09APR13
1. Remove drive belt (A). Pull top section of belt towards front of machine while turning driven clutch clockwise to derail the belt. It maybe necessary to spread the driven clutch.
Checking Drive Clutch Shaft Bearing
-
Spin drive clutch bearing (A).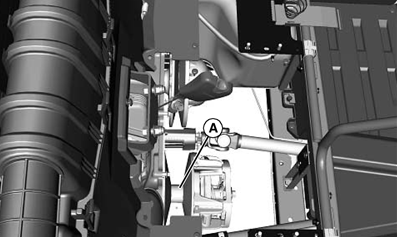
MXAL45751-UN-09APR13 -
Confirm bearing rotates smoothly. If not, contact your John Deere dealer for possible bearing replacement.
Install Driveshaft and Clutch Cover
-
Install cover and ten bolts (E) securing outer side of clutch cover transmission and three bolts (F) securing cover to output shaft bracket.
MXAL45752-UN-09APR13 -
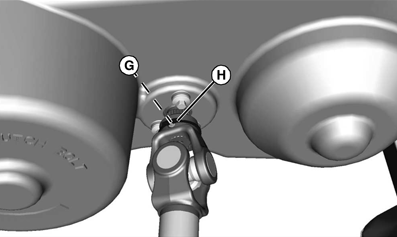
MXAL45753-UN-09APR13Seat support has been removed for better view and easier clutch removal.
Install shaft on front transmission. Slide drive shaft on splined shaft. Install drive shaft, rolled pin (G) and snap ring (H) securing drive shaft to transmission.
Install Center Frame
-
Install center frame.
-
Install two lock nuts and hex bolts (I) securing center frame Tighten to specification.
MXAL45754-UN-09APR13Item Measurement Specification Center Frame Bolts Torque 125 N·m (92 lb-ft) -
Install seat belt wire harness connector (J).
-
Install two screws (K) securing center frame. Tighten to specification.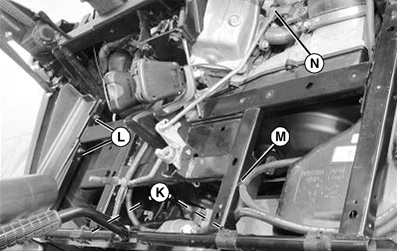
MXAL45755-UN-09APR13Item Measurement Specification Center Frame Screws Torque 20 N·m (15 lb-ft) -
Install two lock nuts (L) and hex bolts securing left and right sides of seatbase center frame. Tighten to specification.
Item Measurement Specification Seatbase Center Frame Bolts Torque 24 N·m (18 lb-ft) -
Install fuel tank vent hose retainer (M) from center frame.
-
Install spring locking pin (N) to transmission shift rod.
Install Air Intake Plenum
-
Install air intake plenum (A), fitting air inlet duct (B) to plenum fitting.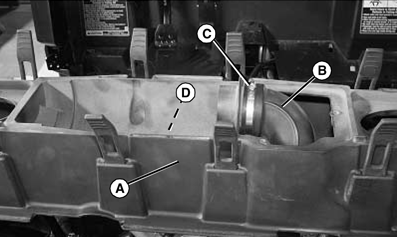
MXAL45756-UN-09APR13 -
Tighten hose clamp (C) securing inlet duct.
-
Align holes and loosely install flange-head screw (D) to center of plenum.
-
Install air filter element (E).
MXAL45757-UN-09APR13 -
Install inlet duct cover (F) and secure with three screws (G).
-
Align holes and loosely install five flange-head screws (H) securing left and right sides at front of plenum.
MXAL45758-UN-09APR13 -
Install expansion fastener (I) and center screw securing left and right filler panels to plenum.
-
Align holes and loosely install three flange-head screws (J) securing left and right sides at rear of plenum.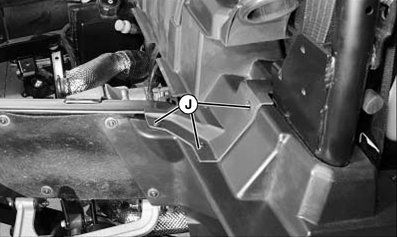
MXAL45759-UN-09APR13 -
Tighten all fasteners.
-
Position CVT cooling air inlet screen (K) in air intake cover cavity. Hold screen in place.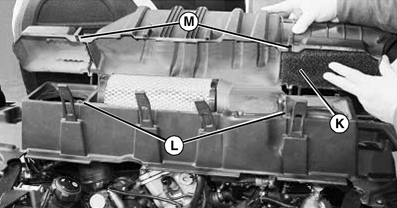
MXAL45760-UN-09APR13 -
Install cover to air plenum, with locating posts (L) fitted to cover slots (M).
-
Secure cover with eight retainers (N).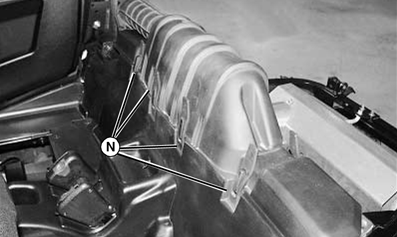
MXAL45761-UN-09APR13
Install Seat and Seat Base
-
Install console.
-
Install knob (A).
MXAL45762-UN-09APR13 -
Install lock nut (B) securing shift knob to lever.
-
Install cap (C) on to shift knob.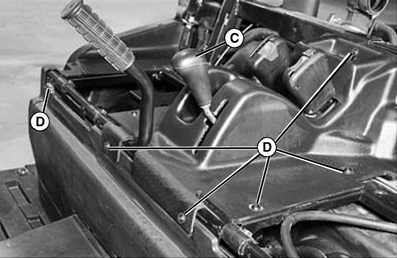
MXAL45763-UN-09APR13 -
Install seven flange head screws (D) retaining console cover.
-
Install seat and seat bracket (E) to seat bushings (F).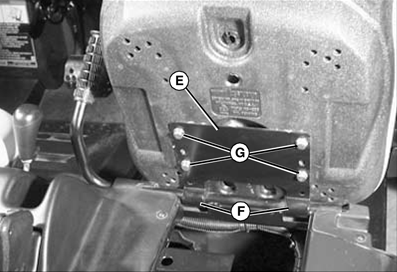
MXAL45764-UN-09APR13 -
Install four screws (G) into seat.
|
RH75544,00001BF-19-20130409 |