Changing HFWD System Hydraulic Oil and Filter (Transaxle and HFWD Front Axle)
-
NOTE: On HFWD equipped models, hydraulic fluid is shared between the transaxle and HFWD front axle. Hydraulic fluid is to be changed in both axles when filter is replaced.
Park machine safely. (See Parking Safely in the Safety section.)
-
 CAUTION: Avoid Injury! Remove wheels safely.
- Use a safe lifting device and support machine securely on jack stands.
- Block front and rear of wheel not raised to prevent machine movement.
- Wheel can be heavy or difficult to handle when removing.
Remove front wheels and tires.
-
Place drain pans under the transaxle drain plug, the center drain plug, and the drain plug at the bottom of each front axle drive unit (left and right). The system is to be drained completely. Make sure that containers are of adequate size.
-
Remove transaxle drain plug (A) and drain oil.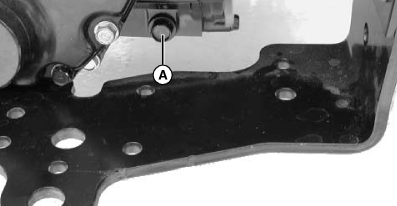
MXAL42744-UN-22MAR13 -
Remove center drain plug (B) and drive unit drain plugs (C) and drain oil.
MXAL42745-UN-22MAR13 -
Install and tighten all drain plugs when fluid has drained.
-
Put drain pan under the transaxle filter (D).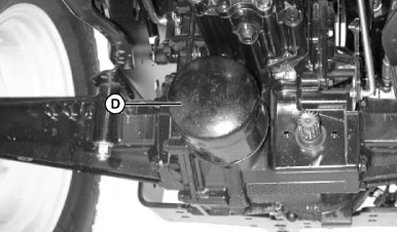
MXAL42746-UN-22MAR13 -
Remove the filter by turning it counterclockwise with a filter wrench.
-
Put a film of clean transmission oil on gasket of the new filter.
-
Install filter. Turn filter clockwise until gasket contacts the mounting surface. Tighten 2/3 to 1 turn more.
-
Slide seat fully forward.
-
Tilt hood forward.
-
IMPORTANT: Avoid Damage! Contamination of oil could cause transmission damage or failure. Clean area around vent plugs and filler plug before removing.
NOTE: Follow the correct sequence when filling the HFWD system with hydraulic fluid. Fill the front axle first, and fill the transaxle last.
Remove the filler plug (E) at the right side of the axle and the vent plugs (F) at the top of each drive unit.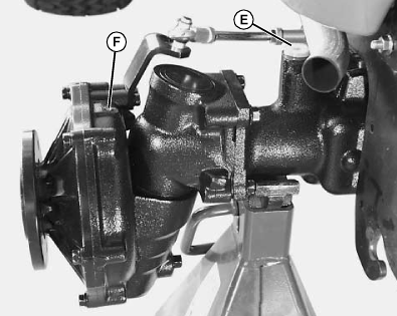
MXAL42747-UN-22MAR13 -
Slowly fill the front axle until the hydraulic oil level reaches the vent plug holes at each side. The axle accepts a specified amount of hydraulic fluid.
Item Measurement Specification Front Axle Oil Capacity 5.0 L (5.3 qt) -
Install the vent plugs and filler plug.
-
IMPORTANT: Avoid Damage! Contamination of oil could cause transmission damage or failure. Clean area around dipstick before removing.
Remove transaxle dipstick (G). Add specified amount of John Deere Low Viscosity Hy-Gard™ (J20D) transmission oil through dipstick fill opening, or until fluid is at the full level on dipstick: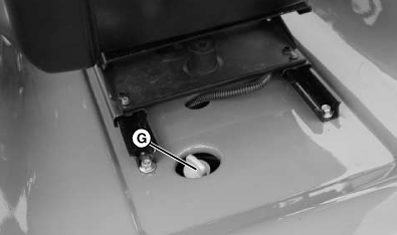
MXAL42748-UN-22MAR13Item Measurement Specification All Four-Wheel Steer Transaxle Oil Capacity 5.7 L (6.0 qt) All Two-Wheel Steer Transaxle Oil Capacity 7.7 L (8.1 qt) -
Install and tighten the dipstick.
-
Start engine and check for oil leaks around the filter base and drain plug.
-
Return seat to operating position, apply brake, and cycle transmission forward and in reverse three times to ensure proper circulation.
-
Stop engine. Wait a minimum of 3 minutes for transaxle to get cold.
-
Check oil level. Add oil as needed.
|
Hy-Gard is a trademark of Deere & Company |
OUO1082,0006679-19-20190612 |