Servicing Air Cleaner Element
IMPORTANT: Dirt and debris can enter engine when air cleaner canister is opened. Do not open canister unless required for scheduled service. This will keep contamination of the intake system to a minimum.
Check filter element more frequently if operating in dusty conditions.
-
Park the vehicle safely. (See Parking Safely in the SAFETY section.)
-
Allow engine to cool.
-
Release latches (A) and remove air cleaner canister cover (B).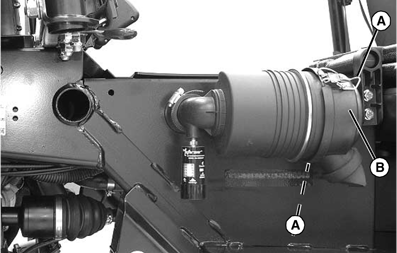
MXAL44552-UN-28MAR13 -
Remove and discard filter element (C). Replace with a new filter element.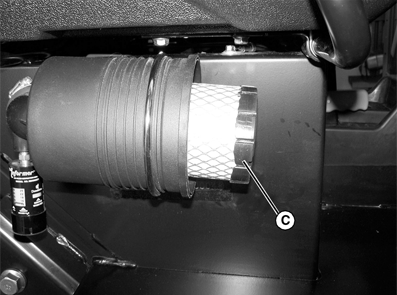
MXAL44553-UN-28MAR13 -
Install air cleaner canister cover with rubber dust unloading valve pointing downward. Check instruction molded into canister cover for proper installation.
-
Hook the canister cover latches.
-
Press reset button at end of air restriction indicator (D).
MXAL44554-UN-28MAR13 -
Start engine and run at slow idle.
-
Check reading (E) on air restriction indicator with engine running.
-
Shut off engine and wait for all moving parts to stop.
-
IMPORTANT: Do not service secondary air filter element unless air restriction indicator rises above 2.5 kPa (10 in. of H2O) after primary element was replaced.
If restriction indicator is above restriction specification, change secondary air filter element.
Item Measurement Specification Air Restriction Vacuum 2.5 kPa (10 in. of H2O) -
Remove air cleaner canister cover.
-
Remove primary air filter element.
-
Pull secondary air filter element (F) from canister. Discard the filter element.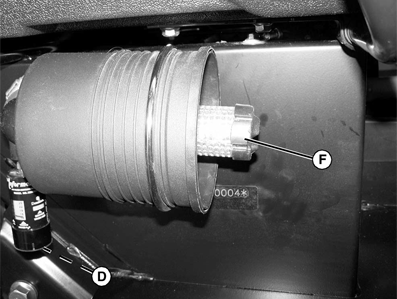
MXAL44555-UN-28MAR13 -
Install new secondary air filter element.
-
Install primary air filter element.
-
Install canister cover.
-
Push reset button (D) on air restriction indicator.
-
|
MX00654,0000108-19-20130906 |