Checking and Adjusting Mower Deck Level
 CAUTION: Rotating blades are dangerous. Before adjusting or
servicing mower:
CAUTION: Rotating blades are dangerous. Before adjusting or
servicing mower:
- Disconnect spark plug wire(s) or battery negative (-) cable to prevent engine from starting accidently.
- Always wear gloves when handling mower blades or working near blades.
NOTE: Mower wheels should not contact the ground when leveling the deck.
-
Park machine safely on a flat surface. (See Parking Safely in the SAFETY section).
-
Inflate tires to the correct pressure:
Item Measurement Specification Front Tire Pressure 97 kPa (14 psi) Rear Tire Pressure 69 kPa (10 psi) -
The label for the cutting height knob is located on the console of the machine. This label shows deck leveling position (A) and location of deck leveling adjustment points (B). The location of adjustment points will vary slightly between decks: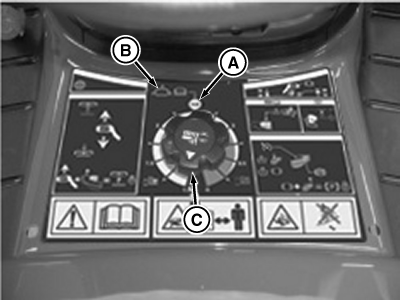
MXT015175-UN-14JUL15- Adjustment point 1 is located on the left rear deck rim.
- Adjustment point 2 is located on the right rear deck rim.
- Adjustment point 3 is located on the front deck hanger bracket.
-
Set mower cutting height knob (C) to the deck leveling position and lower deck against stop.
Once adjusted at deck leveling position, the deck will be level and calibrated for all cut height positions.
-
Adjust mower deck gauge wheels as necessary so they do not contact the ground surface.
-
Lift seat and remove the deck level wrench (A) and mower deck level gauge (B).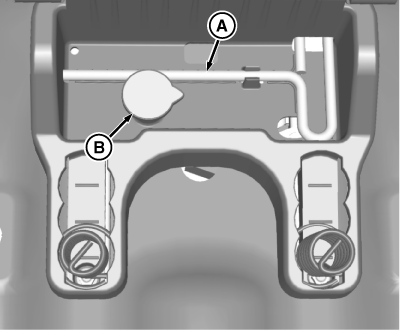
MXT014339-UN-12JUN15 -
Adjust mower deck side-to-side level:
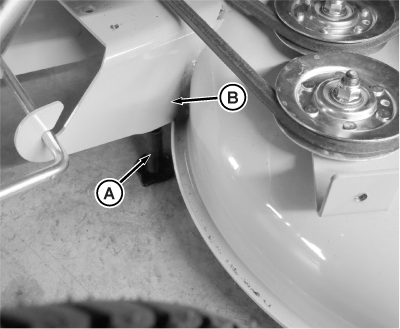
NOTE: Adjustment points 1 and 2 have a raised marker (A).
-
Use gauge (B) to check height between floor and deck rim at adjustment points 1 and 2. The gauge should just slip under the deck rim.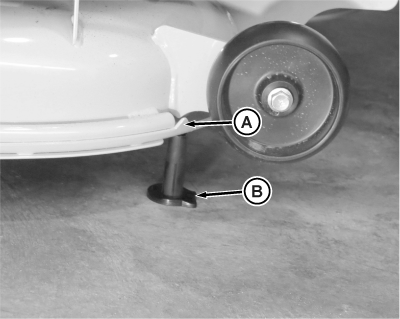
MXT014599-UN-01JUN15 -
MXT014610-UN-01JUN15Shields Removed for Clarity
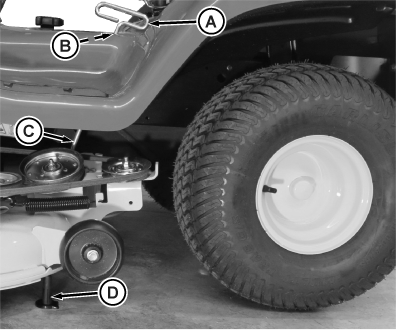
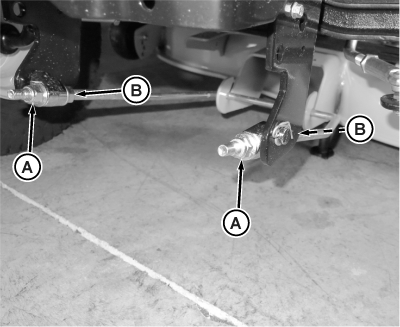
If adjustments are necessary, first move seat to rear most position, then insert provided deck level wrench (A) into top port opening (B) on fender deck until end of wrench mates with adjustment bolt (C). -
Rotate wrench counterclockwise to lower or clockwise to raise deck until gauge (D) just slips under deck at adjustment point 1. Shake the deck slightly to ensure that it has settled into position.
-
Repeat procedure on right side of deck for adjustment point 2.
-
NOTE: If an adjustment of more than 1/8 in is required, adjust both points alternately. A large adjustment on one side can move the other side in the opposite direction.
Repeat step b, c, and d, as necessary.
-
-
Adjust mower deck front-to-back level:
-
NOTE: Adjustment point 3 has a flat on bottom of front deck hanger bracket (B).
MXT014611-UN-01JUN15Shields Removed for Clarity
Use gauge (A) to check the height between the floor and front deck hanger bracket (B) at adjustment point 3. The gauge should just slip under the bracket. -
MXT014612-UN-01JUN15Shields Removed for Clarity
If necessary, use an 18 mm wrench to adjust the front of the deck by loosening rear nut (A) equally on each side of front lift rod. Turn front nut (B) equally on each side clockwise to raise front of mower or counterclockwise to lower it until gauge just slips under adjustment point 3. If draft rod is not tight against both draft hooks, tighten loose side until both sides are tight against draft hooks. Shake the deck slightly to ensure that it has settled into position. Tighten rear nuts after adjustment is complete.
-
-
NOTE: Before storing gauge, verify that deck will latch in transport position. If it does not latch, return to adjustment points 1 and 2 and turn both rear adjusting nuts counterclockwise equally to lower rear of deck until deck latch will engage. Recheck adjustment point 3, and adjust if necessary.
Return the gauge and deck leveling wrench to their storage position, under seat.
|
MX52301,0000B79-19-20150714 |