Servicing Cooling System
IMPORTANT: Avoid damage! Follow all service procedures exactly. If not equipped to perform this work, see your John Deere dealer for service.
Prepare Vehicle
-
Park the vehicle safely. (See Parking Safely in the SAFETY section.)
-
Raise cargo box.
-
Tip seats forward.
-
Open hood.
-
Remove storage tray.
-
When the coolant system service is completed:
- Install storage tray.
- Close hood.
- Tip seats back.
- Lower cargo box.
Draining Cooling System
-
Make sure engine has cooled completely.
-
Place drain pan under engine.
 CAUTION: Avoid injury! The radiator will be hot and can burn
skin. Built-up pressure may cause explosive release of coolant when
the radiator cap is removed:
CAUTION: Avoid injury! The radiator will be hot and can burn
skin. Built-up pressure may cause explosive release of coolant when
the radiator cap is removed:• Shut off the engine and allow to cool.
• Do not remove the cap unless the radiator and the engine are cool enough to touch with bare hands.
• Slowly loosen the cap to the first stop to release all pressure. Then remove the cap.
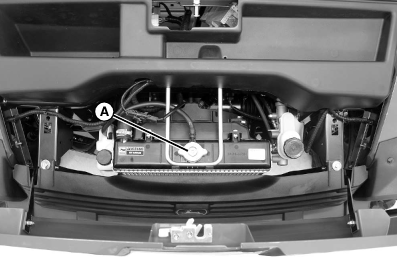
MXAL43215-UN-19MAR13 -
Slowly open radiator cap (A) to the first stop to release all pressure.
-
Remove cap after all pressure is released.
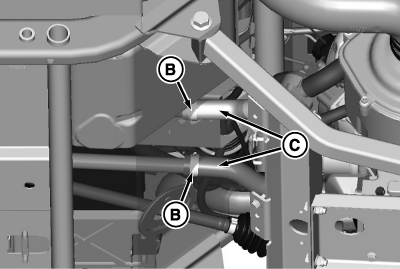
MXT012239-UN-09SEP14View from under left (driver) side.
-
Loosen hose clamps (B), and disconnect radiator hoses (C) from intermediate tubes.
-
Route radiator hoses over the drain pan and allow coolant to drain into drain pan.
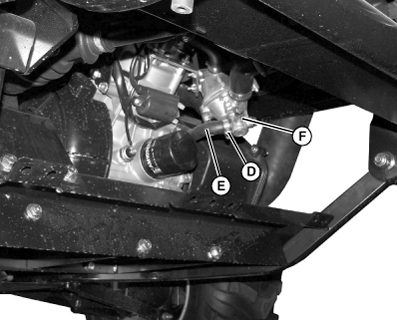
MXAL43217-UN-19MAR13View from under right (passenger) side.
-
Loosen clamp (D) on coolant hose (E). Remove hose from thermostat housing (F), and allow engine coolant to drain out of hose and into a drain pan.
-
Raise front of vehicle to ensure complete drainage of coolant.
-
After all coolant has drained, lower front of vehicle, connect radiator hoses (C) and coolant hose (E).

MXAL43218-UN-19MAR13 -
Remove overflow hose (G) from recovery tank.
-
Remove the screw (H) and lift recovery tank out of machine.
-
Remove cap (I) and empty recovery tank into drain pan.
-
Check condition of all hoses. Replace as needed. Check all hose clamps and tighten as needed.
-
Install recovery tank in machine and secure with screw (H).
IMPORTANT: Avoid damage! Install overflow hose properly to ensure proper function of the cooling system. Position hose slightly above bottom of reservoir. Do not allow hose to contact bottom of reservoir or bend upwards out of the coolant.
-
Install overflow hose (G) and cap (I).
-
Fill and bleed cooling system.
Filling and Bleeding Cooling System
IMPORTANT: Avoid damage! Using incorrect coolant mixture can damage the radiator:
• Do not operate engine without coolant or with plain water.
• Use antifreeze approved for use in aluminum engines.
• Do not exceed a 50% antifreeze mixture for the coolant.
• Do not pour coolant or water into radiator when engine is hot.
• Do not add Stop Leak or other additives.
NOTE: John Deere COOL-GARD™ coolant is recommended when adding coolant to the cooling system. Follow the directions on the container for correct mixture ratio.
IMPORTANT: Avoid damage! Bleed screw uses a special aluminum seal washer. Do not lose or substitute with any other type of washer.
NOTE: Engine block bleed screw may be black in color.
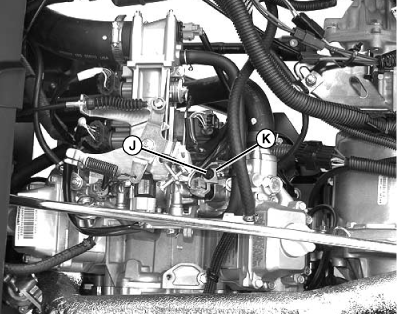
MXAL43219-UN-19MAR13
-
Remove bleed screw (J) and seal washer located on intake manifold (K).
-
Remove radiator cap and add recommended coolant mixture to radiator until coolant runs out of bleed port.
-
Install and tighten bleed screw with seal washer.
-
Add additional coolant mixture to radiator until coolant run out of overflow port and into the recovery tank.
-
Install radiator cap.
IMPORTANT: Avoid damage! Position hose slightly above bottom of recovery tank. Do not allow hose to contact bottom of recovery tank or bend upwards out of the coolant.
-
Remove recovery tank cap and add coolant mixture to recovery tank until it is approximately half full.
-
Install recovery tank cap.
IMPORTANT: Avoid damage! If coolant temperature indicator comes on while engine is running, stop engine and add more coolant mixture to radiator.
-
Start and run engine at medium speed until upper and lower radiator hoses have become warm (10 - 15 minutes), indicating thermostat has opened and coolant is circulating.
-
Allow engine to cool.
-
Loosen bleed screw and allow air to bubble out until air bubbles are no longer visible at bleed port. Tighten bleed screw completely.
-
Remove radiator cap and add recommended coolant mixture to radiator until coolant runs out of overflow port and into the recovery tank.
-
Install radiator cap.
-
Run engine until cooling fan starts, indicating the engine and coolant has reached operating temperature.
-
Stop engine and remove key.
-
Allow engine to cool and suction back any needed coolant from overflow recovery tank. Fill recovery tank as needed to lower line.
Flushing Cooling System
-
Drain cooling system.
-
Prepare a cooling system flushing solution using clean water and John Deere Cooling System Cleaner, John Deere Cooling System Quick Flush, or an equivalent.
-
Fill radiator completely with flushing solution. Install and tighten radiator cap.
-
Start and run engine until it reaches operating temperature.
-
Stop engine.
CAUTION: Avoid injury! The radiator will be hot and can burn
skin. Built-up pressure may cause explosive release of coolant when
the radiator cap is removed:• Shut off the engine and allow to cool.
• Do not remove the cap unless the radiator and the engine are cool enough to touch with bare hands.
• Slowly loosen the cap to the first stop to release all pressure. Then remove the cap.
-
Turn radiator cap slowly to the stop to release system pressure. Remove radiator cap.
-
Drain cooling system immediately into a container before rust and dirt settle:
- Disconnect radiator hoses from engine.
- Loosen engine block drain screws.
-
After all solution has drained, connect radiator hoses and tighten engine block drain screws.
-
Remove and clean recovery tank.
-
Install the recovery tank.
-
Fill cooling system with recommended coolant mixture.
|
COOL-GARD is a trademark of Deere & Company |
OUMX068,00009B3-19-20140909 |