Assemble Snowblower
Assembly Preparation
Time Needed and Skills Required
- Assembly for this attachment should take the average homeowner with minimal technical skills an average of two operating hours.
Tools Required
- Metric socket wrench set and open-end wrench
- Adjustable wrench
Assemble Frame to Housing
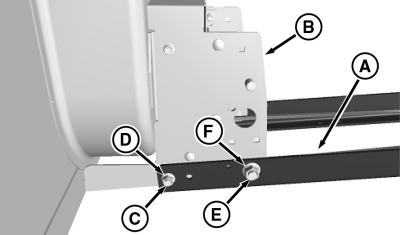
MXT006719-UN-15MAY13
A - Frame
B - Housing
C - Carriage Bolt, M12x25
D - Nut, Flange, M12
E - Bolt, M16x30
F - Nut, Flange, M16
-
Slide the frame (A) up to the back of housing (B). Align two mounting holes of the frame with two holes at the bottom of housing.
-
Install two carriage bolts (C) through front mounting holes from the inside. Install two flange nuts (D) on carriage bolts, but do not tighten.
-
Install two bolts (E) through the rear mounting holes in the housing from the inside. Place two flange nuts (F) on bolts.
-
Tighten all hardware.
Assemble Chute to Housing
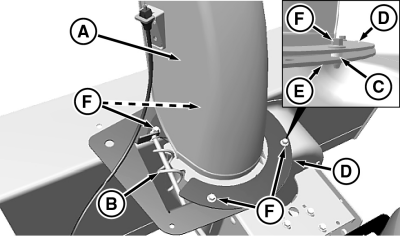
MXT006720-UN-15MAY13
A - Chute Assembly
B - Spiral Rod
C - Bushing
D - Retaining Bracket
E - Chute Base
F - Screw, Self-Tapping, M8x20
-
Install chute assembly (A) on chute base, with teeth on chute aligned with spiral rod (B).
-
Install four bushings (C) and retaining bracket (D) on chute base (E) and secure with four self-tapping screws (F).
-
Tighten all hardware.
-
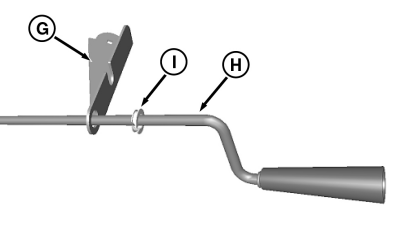
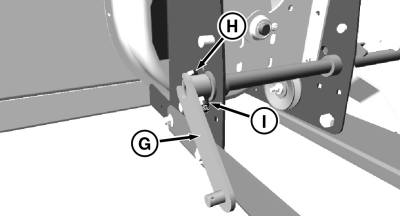
MXT007202-UN-15MAY13Machines up to S.N. -099999 shown. Chute control bracket for S.N. 100001- is similar.
G - Chute Control Bracket
H - Multi-Function Lever
I - Split Bearing
From the parts in kit listing, determine which chute control bracket (G) to install. Slide chute control bracket onto chute multi-function lever (H), with slotted flange facing the handle end. -
Install split bearing (I) onto handle side with smaller flange of bearing toward bracket. To secure, push bearing into bracket by working counterclockwise from the split.
-
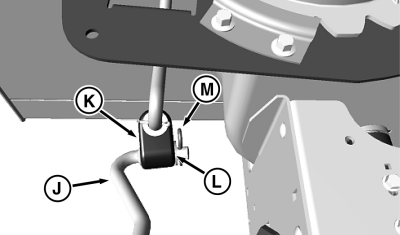
MXT007203-UN-15MAY13J - Chute Control Handle
K - U-Joint
L - Washer, M10.5
M - Spring Locking Pin
Insert end of chute multi-function lever (J) into U-joint (K) at end of spiral rod, and secure with washer (L) and spring locking pin (M). -
NOTE: Handle must be in vertical position when tightening to allow proper operation.
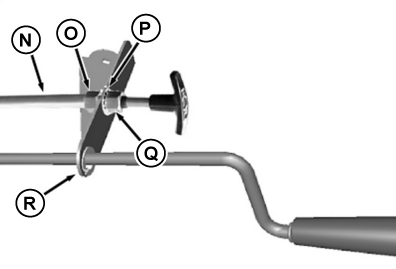
MXT014390-UN-14JUL15Machines up to S.N. -099999 shown.
N - Chute Control Bracket
O - Nut, Top
P - Discharge Spout Cable
Q - Lockwasher
R - Nut, Bottom
Thread top nut (O) on discharge spout cable (P) as far as possible. -
Put handle end of cable into slot in chute control bracket (N). Secure with lock washer (Q) against top nut (O) and bottom nut (R) against bottom side of bracket. To secure, tighten nuts.
-
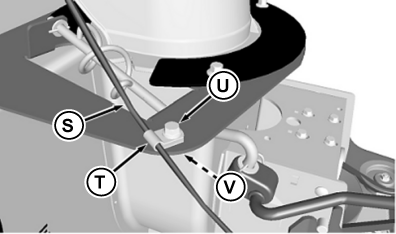
MXT014391-UN-14JUL15S - Spout Cable
T - Clamp
U - Bolt, Flange, M6x16
V - Nut, M6
Rotate chute to right until it stops. Secure discharge spout cable (S) to the left rear mounting hole in the chute base, using clamp (T), flange bolt (U), and nut (V).
Install Lift Lever
MXT007206-UN-15MAY13
A - Bearing
B - Lift Lever Assembly
C - Mounting Hole, Left
D - Mounting Hole, Right
-
Assemble bearing (A) onto lift lever assembly (B) with flange toward the outside.
-
NOTE: Make sure bearing seats in hole (C) and bearing flange is tight against housing.
Slide lift lever into large hole (C) in right side of housing and out through large hole (D) in left side of housing.
-
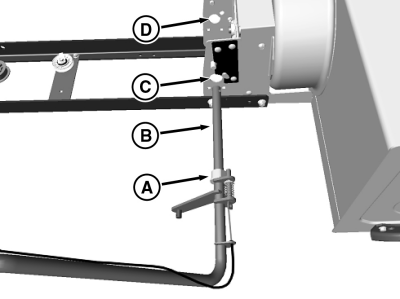
MXT007207-UN-17MAY13E - Bearing
F - Lift Lever
Install the remaining bearing (E) on the left end of the lift lever (F) and slide into hole in housing until flange is against housing. -
MXT007433-UN-26JUN13G - Lift Arm
H - Bolt, M10x55
I - Locknut, M10
Install lift arm (G) on the left end of the lift lever. Align the cross hole in the lift arm with the cross hole in the lift lever. Secure with bolt (H) and locknut (I).
Install Secondary Belt
MXT014386-UN-14JUL15
MXT014387-UN-03AUG15
A - Nut
B - Belt Guard
C - Sheave Idler
D - Idler
E - Sheave, Drive
F - Slot
G - Slotted Bracket
-
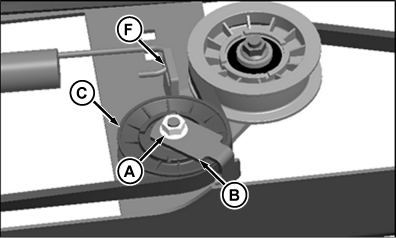
NOTE: The secondary belt is supplied already installed on the sheave at the housing. It has to be routed to the sheaves at the rear of the frame.
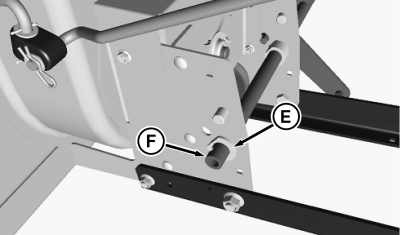
Remove and retain nut (A) and belt guard (B) at idler sheave (C).
-
Route secondary drive belt from housing around outside of idler sheave (C), outside of idler (D), and around secondary (lower) drive sheave (E).
-
Check secondary drive belt to ensure that the belt is not twisting between any of the sheaves- (C, D, and E).
-
Locate secondary belt tensioning spring, hook either end of the spring through slot in bracket (F).
NOTE: Check that twist in belt is correct between front right idler sheave and secondary (lower) drive sheave.
NOTE: Check that twist in belt is correct between front left idler sheave and idler sheave.
-
Install other end of spring into slot in slotted bracket (G).
-
Install and tighten belt guard (B) and retaining nut (A) removed earlier.
-
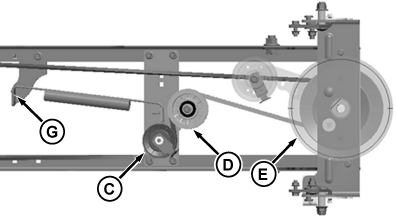
MXT014388-UN-23SEP15G - Bolt, M6x45
H - Nut, M6
Install belt guard bolts (G) and nuts (H) at the rear of the frame.
Install Primary Belt Tensioning Spring (Electric Mower PTO Only)
MXT015273-UN-27AUG15
Parts Removed For Clarity Of Viewing
A - Spring, Primary Tensioning, Electric Mower
B - Slot, Spring, (Electric PTO)
C - Hole In Frame (Rear Most Hole)
-
IMPORTANT: Electric and manual mower PTO machines require different primary belt tensioning springs.
Locate primary belt tensioning spring for electric mower PTO machines.
-
Install one end of spring (A) into rear most anchor hole at left side of frame (C). Install other end of spring in slotted connection (B) in the primary belt tensioning arm.
Install Primary Belt Clutching Spring (Manual Mower PTO Only)
-
MXT015274-UN-26AUG15Parts Removed For Clarity Of Viewing
A - Spring, Primary Clutching (Manual Mower)
B - Tensioning Arm
C - Hole In Frame
Locate primary belt clutching spring (A) (Manual Mower PTO Only). -
Install primary clutching spring in hole in belt tensioning arm (B).
-
Install other side of spring into frame (C).
|
OUO2004,0000C85-19-20150826 |