Install Snowblower
-
Slide frame under machine with rear hanger brackets on frame positioned under the rear mounting plates on the machine
-
With frame on the ground, connect mower PTO cable (A).
NOTE: Certain vehicles have C-shaped springs and others have Z-shaped springs. Depending on the spring type, the installation points for the spring differ.
For Manual PTO Models Only
-
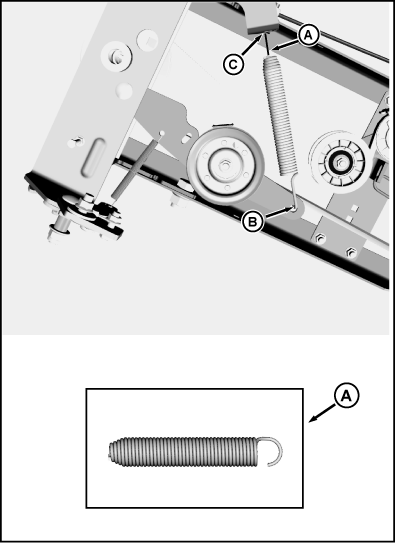
MXT015560-UN-27AUG15Newer Models (With C-Shaped End Of Spring)
A - Mower PTO Cable
B - Tensioning Arm Hole
C - Hole, Cable Bracket
With frame on the ground, connect mower PTO cable (A) from tensioning arm hole (B) to cable bracket hole (C). -
Secure cable in bracket with spring locking pin.
-
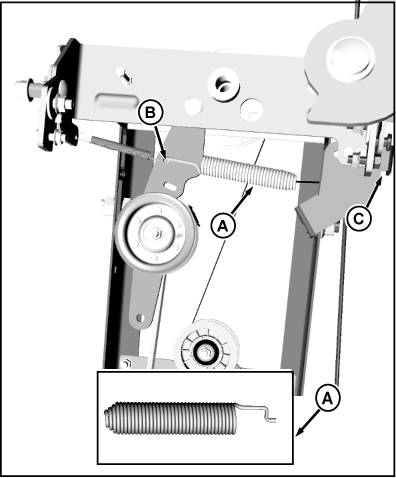
MXT015558-UN-26AUG15Older Models (With Z-Shaped End Of Spring)
A - Mower PTO Spring
B - Tensioning Arm Hole
C - Hole, Cable Bracket
With frame on the ground, connect mower PTO spring (A) from tensioning arm hole (B) to cable bracket hole (C). -
Secure cable in bracket with spring locking pin.
-
-
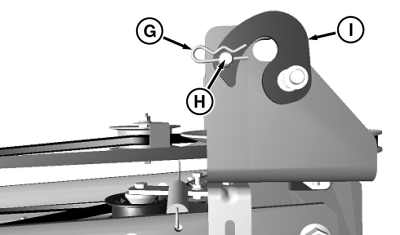
MXT007220-UN-15MAY13G - Spring Locking Pin
H - Drilled Pin
I - Latch
Remove spring locking pin (G) and drilled pin (H) that secures the latch (I) to the hanger bracket at both sides of the machine. Rotate the latch backwards to expose the slot in the hanger bracket. -
MXT007221-UN-15MAY13J - Hanger Bracket Slot
K - Bushing
Lift the back of frame. Align the slot (J) of the hanger bracket with the long bushing (K) at the rear mounting plate at each side of the machine. -

MXT007222-UN-17MAY13L - Latch
M - Drive Belt, Primary
N - Sheave, Drive
Slide the frame backwards to engage the hanger brackets. Rotate the latch (L) to closed position on each side and secure with drilled pins and spring locking pins, removed earlier. -
Install primary drive belt (M) on machine drive sheave (N).
-
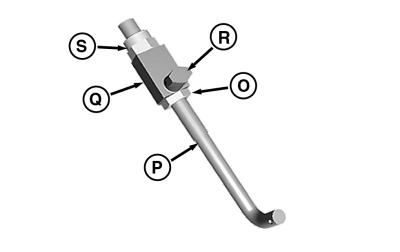
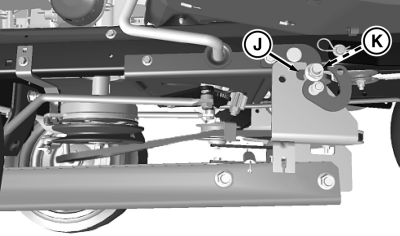
MXT007223-UN-17MAY13O - Nut, M10
P - Lift Rod
Q - Lift Link
R - Lift Rod Mounting Leg
S - Locknut, M10
Assemble adjustable lift link to adjustable lift rod (one assembly per side):-
Thread nut (O) onto adjustable lift rod (P).
-
Slide adjustable lift link (Q) onto lift rod with mounting leg (R) toward the bottom (15 in front tires) or the top (16 in front tires). Secure with a locknut (S).
-
-
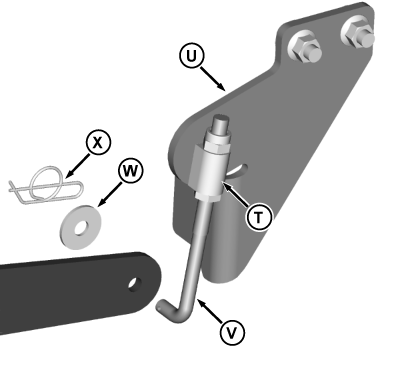
MXT014394-UN-15JUL15T - Lift Link
U - Mounting Plate, Front
V - Lift Rod
W - Washer, M10x30 OD
X - Locking Cotter Pin
Install mounting leg of each adjustable lift link (T) into front mounting plate (U), and pivot it downward. -
Install lower end of each lift rod (V) into mounting hole in lift arm and secure with washer (W) and locking cotter pin (X).
-
Tilt hood forward.
-

MXT007225-UN-17MAY13Spout control cable not shown. Machines up to S.N. -099999 shown. Chute control bracket for S.N. 100001- is similar.
Y - Chute Control Bracket
Z - Carriage Bolt, M6x45
Position chute control bracket (Y) on console and install carriage bolt (Z). Install M6 serrated lockwasher, M6.4 washer, and M6 wingnut on carriage bolt from underneath hood. Tighten securely. -
Lower hood.
-
Adjust lift height. See “Adjusting Lift Height” in Operating section.
-
 CAUTION: Avoid Injury! Snowblower rotating parts may continue
to rotate if primary drive belt tension is improperly adjusted.
CAUTION: Avoid Injury! Snowblower rotating parts may continue
to rotate if primary drive belt tension is improperly adjusted. Inspect snowblower rotating parts and adjust primary drive belt tension if necessary.
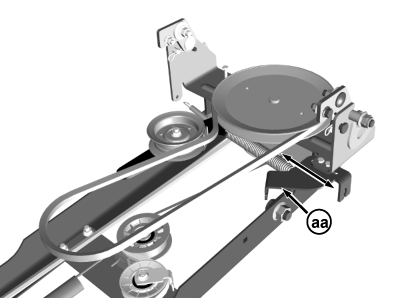
MXT015961-UN-29OCT15aa - Bracket, PTO Cable
The PTO cable bracket (aa) on manual PTO models may require adjustment to achieve proper belt tension. After snowblower installation is complete check to make sure that the snowblower stops rotating when the PTO lever is moved to the disengaged position. Check to make sure that snowblower starts rotating when the PTO lever is moved to the engaged position. To decrease belt tension, move the bracket inward, toward the frame. To increase belt tension, move the bracket outward, away from the frame.
|
OUO2004,0000D2F-19-20151030 |